 Did we miss anything in this section? Is there something we didn't discover?
Let us know!
Background
Did we miss anything in this section? Is there something we didn't discover?
Let us know!
Background
You'll receive this quest from Mayor Lazlo Buckman in West Harbor (#3).
Walkthrough
Buckman will tell you that two black dragons are trying to take over the town, and, worse, that they've probably captured Tarmas, the town's wizard, who recently left to scout the dragon's cave, and who hasn't been seen since. To entice your assistance in the matter, Buckman will offer you a supply of Harbor Mead, a rare resource.
When you reach the Dragon Caves (located to the south of West Harbor), you'll be greeted by Ginni and Pitney Lannon -- and Tarmas -- who they just rescued. The trio will report that they didn't find any dragons in the caves, but that they did find "traps and nasties." They'll then wish you good luck before departing for West Harbor.
If you explore the cave further, then you'll discover the real Tarmas in a jail cell in the back (#16), and you'll realize that one of the dragons polymorphed itself to look like Tarmas, and allowed itself to be "rescued," so it could gain access to West Harbor.
When you then return to West Harbor, you'll first run into Mayor Buckman, plus Ginni and Pitney Lannon (and perhaps the real Tarmas), and you'll learn that Buckman made a deal with the black dragons. They were supposed to eliminate the undead in the swamp in return for gold and later Harbor Mead -- only they grew insatiable for the mead, and that's why they're holding the town hostage now.
Next up, you'll meet Voarag, one of the black dragons. He'll try to sway you to his side, which will trigger the quest "A Deal with Dragons," and you'll have to choose between the dragons and the humans:
- If you side with the dragons, then you'll have to kill Buckman and the two Lannons (and perhaps Tarmas). This battle shouldn't be especially tough, and you'll find a
Heavy Shield +2 and
Padded Armor +3 on the remains.
Afterwards, Voarag will reward you with 1200 xp (and perhaps 5000 gp), and he'll promise you Dragon Mead, which you'll be able to purchase when you click on West Harbor on the overland map. But Voarag won't allow you to re-enter the town, which will cost you some quests and a companion. To get back inside, you'll have to talk to Voarag and challenge him to a fight. This will essentially revert you to siding with the humans, with the same results (just minus the people you killed).
- If you side with the humans, then you'll have to fight Voarag (with a pair of lizardfolk elites) and Waervaer in separate battles. Buckman and the Lannons (and perhaps Tarmas) will help you out, and so the battles shouldn't be too tough. Just whack the dragons with spells while your fighters distract them. Killing the dragons will earn you the Dragon Slayer feat (+2 damage and attack versus dragons), and you'll also find
Black Dragon Scales and a
Greatsword +2 on the remains.
Afterwards, Buckman will reward you with 1200 xp, and he'll make Harvest Mead available "at the best price we can give you." To purchase the mead, just return to the overland map and then click on West Harbor. You'll receive an option to trade with town, and you'll find Harvest Mead listed under rare resources. You'll also be able to return to the Dragon Caves and loot the dragon hoard there (#17), where you'll find two
Holdfast amulets, the short sword
Littlefang, a
Katana +2,
Chainmail +2, and more.
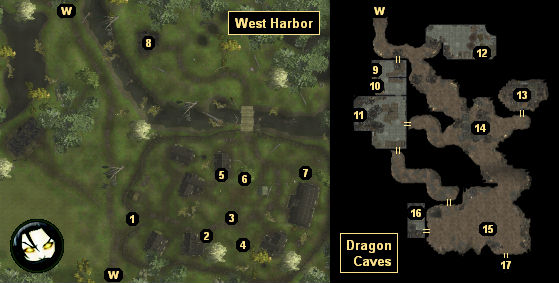
1 - Front Gate
When you first arrive at West Harbor, you'll meet Caryl Nemorem at the front gate, and she'll ask to you speak with Mayor Buckman (#3).
2 - Sheydann Zinn
Zinn will sell you a basic selection of items, including alchemical silver and cold iron weapons. If Mayor Buckman (#3) dies, then he'll add rogue items to his stock. Eventually, Zinn will leave the town (see #6).
3 - Mayor Buckman
4 - Quarrel
When you first meet Quarrel, you'll find him talking to himself, and he won't have much to say to you other than "Go away." Later, after receiving the quest
Path of the Master from Goodwife Aruna (#6), Quarrel will talk to you, and you'll eventually be able to recruit him to your party.
5 - Tarmas' House
This house will start out locked. If you side with the humans against the dragons, then the house will turn into a trading center for you (complete with crafting workbenches), and Tarmas will stand out front and sell you some magical items, including mithral armor and recipes.
6 - Goodwife Aruna
Aruna will give you the quest
The Goodwife's Shawl when you talk to her. She'll also heal you and sell you some items. Later, if you side with the humans over the dragons, then Aruna will trigger the quest
Path of the Master. Finally, at some point near the end of the act, Aruna will inform you that Sheydann Zinn (#2) has recruited Jan Buckman (#7) into a cult, and she'll ask you to rescue him. This is covered in the quest entry for
Whispers in the Marsh.
7 - Jan Buckman
When you first meet Jan, he'll let slip that his father the mayor (#3) "makes deals" to protect West Harbor. Later, he'll disappear from the town, and you'll need to rescue him (see #6).
8 - House
This was your house in the OC, but you won't find anything there now.
9 - Lizardfolk Secret Chest
You'll find an
Amulet of Natural Armor +1 and a
Dagger +1 inside the chest.
10 - Suspicious Barrel
With a high enough appraise skill, you'll recognize that the barrel contains Harvest Mead, and you'll realize that somebody in West Harbor is dealing with the dragons.
11 - Sacred Chest
You'll have to defeat a few lizardfolk guarding the chest, but inside you'll find
The Goodwife's Shawl (needed for the quest
The Goodwife's Shawl) and a
Relic of Semuanya.
12 - Containers
In this spot you'll discover a weapon rack and a gear chest. Inside you'll find a
Fen-Tamer and some potions.
13 - Workshop
Inside the workshop you'll have to battle an umber hulk thrall, but then you'll find an arcane chest (containing a
Potion of Lore and a
Wand of Magic Missile) and a locked magic jar (containing six mephits who will attack you, plus
Mephit Guano).
14 - Statue of Tyr
You'll sense goodness emanating from the statue. If you try to break it anyway, then Tyr will rebuke you with fire and divine damage. If you seek a blessing, then you'll get attacked by mephits. Nothing different will happen if one of your party-members is a follower of Tyr.
15 - Lizardfolk Chieftain
You'll have to battle the lizardfolk chieftain, plus some warriors, casters, and a water elemental, here. When the chieftain dies, he'll drop a
Battleaxe +2, the
Chieftain's Key, and some gold. You'll need the key to open the jail cell (#16).
16 - Jail Cell
This is where you'll meet the real Tarmas.
17 - Dragon Hoard
You won't be able to access the hoard while the dragons live. But if you kill the dragons then inside the hoard you'll find two
Holdfast amulets, the short sword
Littlefang, a
Katana +2,
Chainmail +2, and more.
Exits:
- World exit.


