 Did we miss anything on this map? Is there something we didn't discover? Let us know!
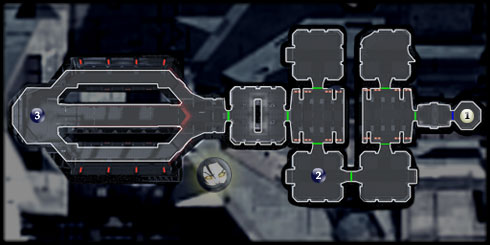
Your destiny is set: Darth Nihilus awaits at #3 after you make your way through the snake-like pattern of eerily large rooms and massive walkway. The main resistance will be at #2 where you'll face a couple of Dark Jedi and several Sith, but I would recommend searching every room on your way there.
1 - Exit
Did we miss anything on this map? Is there something we didn't discover? Let us know!
Your destiny is set: Darth Nihilus awaits at #3 after you make your way through the snake-like pattern of eerily large rooms and massive walkway. The main resistance will be at #2 where you'll face a couple of Dark Jedi and several Sith, but I would recommend searching every room on your way there.
1 - Exit
Exit to
Ravager Command Deck (#10).
2 - Dark Jedi & Sith Resistance
Consider this large battle the pre-game warmup. Before you reach the door leading to #3, Visas (if in your party) will tell you to make sure you're prepared.
3 - Darth Nihilus
As you approach him, you'll enter into conversation. You can use your Wisdom or Intelligence to tell him that Kreia has lied to him, and weaken him before battle.
Prepare for him like any other tough opponent but at least you will have the additional support of your other party members this time. Stimulants, buffs (including speed) and shields to begin are always helpful, and for Light Siders, use Force Enlightenment.
When Nihilus reaches roughly 50% of his vitality, Visas will interrupt. To further stun Nihilus, tell Visas that she is the link and ask her if she can break it somehow.
After his defeat, Visas will attempt to remove his mask and you're able to ask for it. If you do, it cannot be equipped but you will receive additional force points. It's now time to head back to the command deck and exit the Ravager at
Ravager Command Deck (#11).
After your escape from the Ravager's destruction, you'll end up on Telos facing a familiar face from the first game. He'll tell you about Malachor V, and it's there, its
Surface (#1) where you will land the Ebon Hawk, alone, a step closer to your final confrontation.


