|
|
 Did we miss anything on this map? Is there something we didn't discover? Let us know!
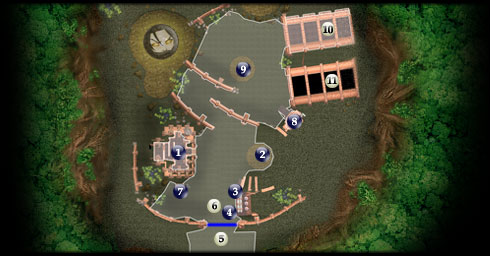
When first taken here, ask Mandalore if there's anything else you can do, for an additional quest; gaining honor with him is your only way off Dxun. You can find several quests here that can help you gain honor. Talk to the Mandalorians at #2, 3, 4 and 9 for further honor quests, including the fun Battle Circle. Kex at #7 can sell you items and supplies. After you've gained enough respect from Mandalore, he'll take you to Onderon in his shuttle at #10.
1 - Mandalore & Lab Station
Did we miss anything on this map? Is there something we didn't discover? Let us know!
When first taken here, ask Mandalore if there's anything else you can do, for an additional quest; gaining honor with him is your only way off Dxun. You can find several quests here that can help you gain honor. Talk to the Mandalorians at #2, 3, 4 and 9 for further honor quests, including the fun Battle Circle. Kex at #7 can sell you items and supplies. After you've gained enough respect from Mandalore, he'll take you to Onderon in his shuttle at #10.
1 - Mandalore & Lab Station
Mandalore will agree to help your party if you first gain his trust and respect. Ask him if there's anything else you can do to receive the Mandalorian Cache quest, the last thing you'll do back in the Jungle if you follow the walkthrough. Every quest you complete will gain you further honor with Mandalore and eventually, he'll take you to Onderon. You do not have to complete every quest, but it's recommended if you want the most experience.
On the eastern portion of this area, you'll find a ramp leading up to a door. Every time you try and ascend it, Mandalore will stop you. To get to the top, equip one of your characters with a stealth generator, put them in Solo mode, sneak up to the door, and use security on it to gain entrance. Bao-Dur usually works well for this. Inside the room are several containers with very high-quality random items for your level.
You will also find a Lab Station here.
a) After gaining enough honor to please Mandalore:
Return to Mandalore and he'll tell you that you've earned yourself a ride to Onderon. Unfortunately, the Sith have caught up to you at this point. All throughout the ruins you'll find groups of Sith Assassins fighting Mandalorians. It's to your benefit to help the Mandalorians here, since though you can simply watch from afar, the battle takes much less time with your help. Eventually, after several Assassins are slain, Mandalore will figure it is best to get you out of here, and lead you to #10, where you'll make your escape to Onderon. See Iziz Spaceport (#1).
2 - Xarga
Speak with him to learn of a missing Mandalorian by the name of Kumas. To complete his quest, find Kumas' body in the Jungle and bring word back to Xarga to receive honor with Mandalore. You can find Kumas at Jungle (#7).
3 - Zuka, Technician
Zuka, as a Mandalorian, is not surprisingly having problems with the maintenance around the ruins. He has three things you can do. One is to repair the broken wires a short distance to his left. Use a person with some degree of repair to best accomplish this. Another is to fix the telemetry computer at #8. To do this you'll need programming spikes and use computer skill. Bao-Dur or T3-M4 work perfectly. Finally, you're to find the scattered pieces of the phase pulse converter in the Jungle, likely in the stomachs of the insatiable cannoks. You can find these three pieces at Jungle (#5, #8 and #15). When you have all three, bring them back to Zuka and you will receive a super-sized helping of honor with Mandalore.
4 - Mandalorian Guard Captain
Ask him all about the Jungle and you'll find out about the Zakkeg, a ferocious beast that is a match even for Mandalorians. If you defeat it, you can gain honor with Mandalore. You'll find the Zakkeg at Jungle (#9). Return to the Captain with its ear to complete the quest.
5 - Exit
Exit to Jungle (#4).
6 - Exit via Mandalorian Guide
Talk to the guide here and he will take you directly to your ship at Jungle Landing (#1), at any time. You can also use him in reverse, to come back here at any time.
7 - Kex, Reluctant Quartermaster
Kex is a merchant that can sell you items, and will also be your second adversary in the Battle Circle.
8 - Workbench & Telemetry Computer
If you have Zuka's quest from #3, you can fix the telemetry computer with programming spikes to solve one of his three tasks. Then report your success to Zuka. Alternately, use the workbench to upgrade, breakdown or create items. Fortunately you can freely switch in and out party members here at the Ruins.
9 - Mandalorian Battle Circle
Here is a chance both to gain honor and to have a little fun. If you're a consular-type character, these battles will be a little more difficult for you, but are still doable. As a guardian-type, they should prove to be a piece of cake, with the right gear.
First talk with the Mandalorian Sergeant and tell him you want to fight in the Battle Circle. There are a total of five matches, the first three against lesser opponents, and the last two only possible after you have met with Kelborn in the Jungle. The best tip I have is to equip the right gear for the job. If you are fighting fist and feet only, you will still be allowed to wear all your armor pieces.
Equip any damage resistance gear you have for these if possible (such as the immunity belt), as they can help more than anything else. Additionally, equip the best armor, even if you are a consular. Since you are not allowed to use your force powers in three of the matches, it's to your best advantage to have a high defense. Finally, the best tactic if you're losing some of the difficult melee battles (though I consider it a bug of the combat system) is to hit and run, but remain careful of staying in the circle. For some reason, if you run away, quickly turn around and hit your opponent, then run again, they cannot get an attack in.
a) Battle Circle, 1st Fight, Davrel:
This is a straight fist and feet fight with no powers, weapons or items. The higher defense and better melee feats you have, the better you will do. Return to the Sergeant after the fight to begin your second battle. Your vitality is completely replenished at the beginning of each fight.
b) Battle Circle, 2nd Fight, Kex:
Time to fight Kex, but the rules are yours to choose. If you're a guardian-type and manhandled the first opponent, you may as well continue to do fist and feet with Kex. However, a consular-type will probably want to choose having no restrictions. Return to the Sergeant after the fight to begin your third battle.
c) Battle Circle, 3rd Fight, Tagren:
Again, you must fight fist and feet only, no force powers, weapons or items, but you may use feats. Use the same tactics as the first, but for a consular-type, this may be the toughest battle of the entire circle.
Return to the Sergeant after the fight and he'll tell you that the remaining two contenders are champions and you must be sponsored by one of them to participate. If you haven't already completed Kelborn's quest in the Jungle (#10), you will need to do so before continuing in the Battle Circle. Once you have, he will be pleased to fight with you for your fourth battle.
d) Battle Circle, 4th Fight, Kelborn:
With Kelborn, you will get a plain longsword and cannot use your force powers or other items. Hence, it should be a little easier than the last fight. Return to the Sergeant after it's finished to battle the final champion, Bralor.
e) Battle Circle, 5th Fight, Bralor:
Bralor is a fair sport and allows you full access to any item or power you want. He's a fairly tough combatant, but without restrictions, this fight is clearly in your favor. When it's over, you've gained much honor and receive both experience and a random weapon (such as a Ryyk Blade or Zhaboka).
10 - Exit
When you've gained enough honor, Mandalore will take you to Onderon and back via this shuttle after the Sith Assassin battle. If you've come here before hand (or later) there are several containers here with items.
11 - Exit
After visiting Dxun's Jungle and Sith Tombs later in the game, under the "Loose Ends" section, you will be flying the ship in this building to Onderon.
|
|
|


