 Did we miss anything in this section? Is there something we didn't discover?
Let us know!
Background
Did we miss anything in this section? Is there something we didn't discover?
Let us know!
Background
You can receive this quest from the steward at
Caed Nua after triggering the quest
Never Far from the Queen.
Walkthrough
The steward will warn you that some powerful force rules the Endless Paths of Od Nua, and that if you want to maintain control over
Caed Nua, you'll have to defeat it. However, as you make your way through the Endless Paths, all you'll be able to do is ask the creatures about the Master, and not really learn anything of use -- until you reach
Level 14.
On
Level 14, you'll discover a large adra formation, and when you click on it, the spirit of Od Nua will appear. From him you'll learn that he isn't the Master Below -- an "old, ancient thing" is -- and that he built the Endless Paths to find a way to reunite with his dead son Maros.
Your conversation with Od Nua will either lead to a battle or not. To avoid the battle, you won't need to pass any attribute checks. You can end matters peacefully by being benevolent and recommending that he "let go" and not lose himself by trying to leave. If you want to fight him -- plus the named cean gwla and the wind blights that he'll summon -- then you can just select any of the attack dialogue options that come up. Either way, you'll find the
Shroud of Mourning, and the barrier blocking the staircase leading down to
Level 15 will disappear.
On
Level 15, you'll finally run into the Master -- an Adra Dragon (#1). She'll speak to you when you approach her, which will give you an option of working with her rather than attacking her. But regardless of your choice, you should play along and at least pretend that you're going to help her. If you attack her right away, then there's a good chance that she'll immediately breathe acid on your party and all but one-shot it.
Lots of things you say to the Adra Dragon will lead to a fight. To get the option to help her escape, you'll need to speak the following lines:
- "I have claimed Caed Nua."
- "You said you are bound here?"
- "What will you do when the adra is gone?"
- "So you are trapped here."
- "There is not much adra left."
- "Is there no way to free you?"
The dragon will then give you
The Dragon's Amulet, and she'll explain how you can use it to help her escape.
Working with the Dragon
If you want to help the Adra Dragon, then you'll need to execute her plan. First you'll need to take
The Dragon's Amulet to the titan's hand on
Level 1. Clicking on the palm of the hand will transfer the dragon's soul into the amulet. Then you'll need to meet with Falanroed at the Shrine of Galawain in the northeastern corner of the
Black Meadow, and convince her to wear the amulet.
There are two ways to do this. You can throw the amulet on Falanroed, or you can lie to her that it's a reward for something she did previously. Either way, when Falanroed feels the power of the amulet, she'll realize what you're up to, and she'll attack you. With six against one, the battle shouldn't be too difficult, and once Falanroed has been defeated, the dragon will take over her body. The dragon will then bequeath to you the contents of her hoard (#4).
Attacking the Dragon
If you want to fight the Adra Dragon, then you'll have a couple of choices:
- You can meet with Falanroed and tell her the dragon's plan. This will cause Falanroed to give you the Scale-Breaker ability, which will allow your main character to reduce a target's defenses for 15 seconds (once per rest). But the dragon will sense your betrayal, and she'll turn hostile to you, which will make it more difficult when you return to attack her.
- You can ignore Falanroed. You'll lose out on the Scale-Breaker ability, but the Adra Dragon will remain neutral. This will allow you to explore freely in the dragon's lair -- minus the path to her hoard (#4); if she sees you head there then she'll attack you -- which means you'll be able to move behind her and attack the adragans there (#2). The Adra Dragon will turn hostile when you do this, so you'll need to kill the adragans quickly and then get ready for the main battle.
Note: You could kill the dragon's xaurip helpers (#3) instead, but they're much less of a threat.
This is the option we'd recommend.
The Adra Dragon is the toughest foe in the game, and she'll have help from adragans (#2) and xaurips (#3) -- or not, depending on how you start the battle. Try to deal with the helpers as quickly as possible, and then spread out your party when attacking the dragon, so her breath attacks only hit one character at a time.
The dragon is immune to fire and shock damage, and she'll resist everything else to a high degree. So try to hit her with raw damage (which can't be resisted), and do your best to weaken her or paralyze her with your casters while your non-casters whale away with their regular attacks. Some spells to try out include Disintegration, Expose Vulnerabilities, Gaze of the Adragan, Hold Beasts, Mental Binding, and Plague of Insects.
Because of the dragon's health and resistances, it'll take a while to wear her down. You should put your strongest melee fighters on one side of her while your weaker DPS characters are on the other side. You probably won't be able to heal your tanks quickly enough using spells, so be sure to load them up with
Potions of Major Endurance. It's also a good idea to have all of your characters eat
Dragon Meat Dishes before the battle, and of course rest at an inn -- and perhaps sleep with a prostitute -- to maximize your bonuses.
Note: In general, we'd recommend buffing your characters to do more damage rather than buffing them to resist damage. The dragon will blow right through most defenses, so extra offense will help you more than extra defense. That is, if you're thinking about potions for your characters, then you're better off with
Flasks of War Paint rather than
Potions of Bulwark Against the Elements.
Another Note: If you get truly desperate, then you can also do things like re-spec your characters so they do extra damage to beasts, and enchant new "exceptional" weapons that include beast-slaying and freezing lash.
All the above being said, no matter how prepared you are for the fight, sometimes the Random Number Gods just won't see things your way. So you'll need to be patient and keep trying. When the dragon eventually dies, you'll find two
Adra Dragon Scales (needed for enchanting armor to "superb") and a few pieces of
Dragon Meat on her corpse.
Reward
Regardless of how you deal with the dragon, for your reward you'll be allowed to loot her treasure hoard (#4). Inside it you'll find
Little Savior, Minoletta's Grimoire (containing all of Minoletta's spells and more),
Puitente med Principi,
Vengiatta Rugia, and
Wendgar.
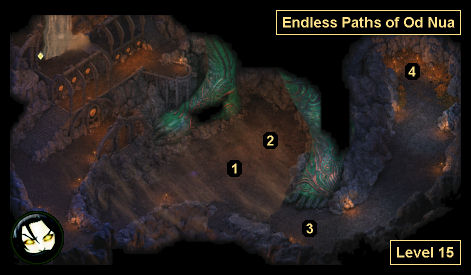
1 - Adra Dragon
2 - Adragans
3 - Xaurips
4 - Treasure Hoard


