|
|
Side Quest: Supply and Demand
 Did we miss anything in this section? Is there something we didn't discover?
Let us know!
Background
Did we miss anything in this section? Is there something we didn't discover?
Let us know!
Background
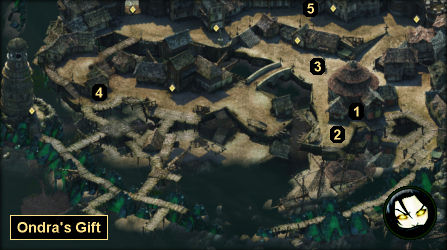
You'll receive this quest from Maea at the Salty Mast in
Ondra's Gift (#1).
Walkthrough
When you ask Maea if she's having any problems, she'll tell you that "local rowdies" are harassing her workers and clients, and she'll ask you to put a stop to it. However, she won't have any idea about where to start your search.
When you exit the Salty Mast, if you head straight south a bit (#2), then you'll witness one of the assaults (it's also possible to see this assault before receiving the quest). However, the thugs will leave, and the victim won't say anything useful, and so you still won't know where to look.
In fact, nobody will tell you where to look. You'll just have to wander around until you spot five harassing thugs standing by a statue (#3). No matter what you say to them, they'll attack you -- and probably die really quickly. When you loot their corpses, you'll find a Rusty Bronze Key.
After wandering around some more, you'll discover that the Rusty Bronze Key unlocks the door to the Ramshackle House on the western side of the district (#4). When you go inside, you'll meet Aefre, one of the Dozens. She'll tell you that Maea at the Salty Mast is "toadying up to the nobles," to the point where the locals can't afford her services, and she'll announce that this isn't fair. You'll have three ways to respond:
- With Intellect 15 or Resolve 16, you can convince Aefre to stop her harassment. Then when you return to the Salty Mast, you'll earn a "minor" reputation bonus with Defiance Bay, 600 cp, and cheaper room and escort prices from Maea.
- You can attack Aefre and the thugs with her. If you have a Dungeon at Caed Nua, then Aefre is one of the characters you can imprison rather than kill. After the battle, when you return to the Salty Mast, you'll earn a "slight" reputation bonus with Defiance Bay, 600 cp, and cheaper room and escort prices from Maea.
- You can agree with Aefre. Then when you return to Maea, you'll need to convince her that Aefre is right, which will require one of four things: Resolve 16, Intellect 17, Intellect 18, or an agreement from the Doemenels for cheaper bitter squash seed prices (bitter squash seeds are used to terminate pregnancies).
To negotiate with the Doemenels, you'll have to go to their house in
Brackenbury. The servant inside will let you in, even if the Doemenels hate you. You'll find Bricanta Doemenel upstairs. She'll agree to lower prices if you have a high enough reputation with the Doemenels, or if you do her a favor -- deal with Kolfecg, who can be found in
Ondra's Gift (#5). This favor is covered in the task entry for
Hard Feelings.
When you complete the quest, you'll get a different reward depending on the method you used: the Resolve 16 option will earn you a "minor" reputation bonus with Defiance Bay, the Intellect 17 option will earn you a "moderate" reputation bonus with Defiance Bay, the Intellect 18 option won't earn you anything, and the Doemenel option will earn you a "major" reputation bonus with Defiance Bay, 600 cp, and cheaper room and escort prices from Maea.
1 - The Salty Mast
2 - Assaulted Noble
3 - Harassing Thugs
4 - Ramshackle House
5 - Kolfecg's House
|
|
|


