 Did we miss anything on this map? Is there something we didn't discover? Let us know!
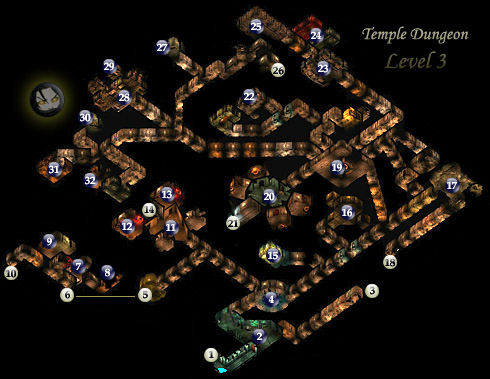
This is the last carefree level of the game. The one below it is more challenging, and the elemental nodes after that (if you choose to go there) are yet more challenging. Dungeon Level 3 is fairly linear, in that there's a sort of detached circle going on if you look at the map. All it takes is for you to venture out onto the branches of the circle, come back to the main path, continue on, branch out, etc., and you'll have the whole dungeon completed.
It's likely that you entered at #1, though you could have entered from #14, 21, 26 or even #10 instead... all stairs from Dungeon Level 2 and the last from the Temple Escape Tunnel. Regardless, notice exits #3 and 18, close to one another. They'll take you to Dungeon Level 4 when you're finished here. Your main goal on this level is to get to #8 and steal Falrinth the Wizard's "Orb of Golden Death," the artifact needed to win the game, unless you decide to be initiated into the Greater Temple and serve evil forever. Alternatively, you may also beat the bosses of each elemental node to open up a passage to the last area, giving you another way to win. With this artifact, a passage in the Temple Interior will immediately open up, near the throne at the back of the Interior, and you'll be able to descend to "The Locked Level," the final area of the game.
However, if you choose to become more powerful yourself before you take the journey to the locked level, consider taking on the four Elemental Nodes for both their few powerful magic items, and the unbelievably powerful elemental power gems that each of the boss creatures hold. You'll find all of this on Dungeon Level 4, from the aforementioned exits at #3 or #18.
Finally, note #32. Inside is an NPC Prince Thrommel, carrying the most powerful weapon in the game, Fragarach. It never misses.... Consider this before moving on.
1) EXIT: to
Dungeon Level 2 (#12)
2) Lamia & Fungi: Your first bout with Fungi in the game. Not only that, there's a fairly powerful and magical centaur-like creature called a "Lamia" that's hunting you in this area as well. When she's dead, you can loot her body for a Longsword +3.
3) EXIT: to
Dungeon Level 4 (#1)
4) Will o' Wisps: Four of them. They're very difficult to hit, unless with magic. Other than that, they're weak.
5) EXIT: Secret passage to #6, and where you'll need to go to recover the Orb of Golden Death, very near now.
6) EXIT: Secret passage to #5. Falrinth is at #7, nearby, and his secret room houses the Orb of Golden Death, the item required to win the game (in most scenarios).
7) Falrinth & The Orb of Golden Death: You'll find Falrinth and his familiar, a Quasit, in the room hanging out. You can either sneak past him and attempt to recover the Orb without a fight, or you can battle. He's a tough wizard if you allow him to cast spells, so be prepared. After it's over, seek out both of his chests, but especially the one in the secret hidden room at #8. Open it to discover the Orb of Golden Death, the very artifact that's required to win the game in most scenarios. You can, however, still reach the last area without it. But it would require you to beat all the elemental nodes and use the transition on Dungeon Level 4. When you lift it out of the chest, you'll be treated to a short FMV of the secret passage in the Temple Interior.
8) The Orb of Golden Death:
By itself, the Orb purportedly only holds power for Iuz, a demigod. With the four elemental power gems that you'll receive on each elemental node (optional) inserted into the notches on the skull's forehead, it becomes something amazing. However... it can be destroyed, which significantly weakens the last boss. What you'll have to do is go to Burne at the Guard Tower in Hommlet, and ask him about the Orb. He'll tell you to come back in awhile after he's had time to ponder its mysteries. End the conversation and begin a new one. Ask him if he's had time (funny, time quests like this). He'll say that it's pure evil, and that you should talk to his assistant Pishella. Talk to Pishella and she'll require four things to make it work. These four things must be in the inventory of the character you decide to use to talk to her when you're ready:
1. Masterwork Maul. Can be found at
Dungeon Level 1 (#4). Another can possibly be found at the Trading Post in Hommlet.
2. Gust of Wind Scroll. Can be found at
Dungeon Level 3 (#22) in the "Banshee's Chest." Or, you can have your wizard scribe this scroll (with the official patch when it comes out or the fanmade Co8 patch that's already available - link in the Walkthrough FAQ) if you've already learned it.
3. Scroll of Fireball. The only way I know is to scribe it yourself, or recruit Burne and have him scribe it.
4. Holy Water. You can buy this from Calmert at the Temple of St. Cuthbert in Hommlet. Or, you can have a cleric cast Bless Water to make some.
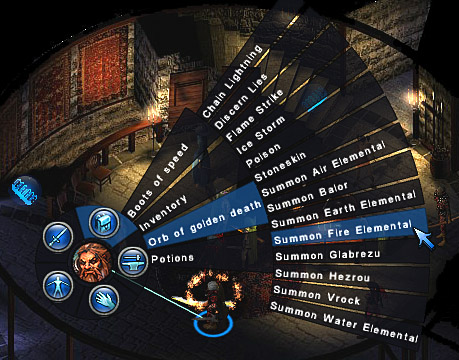
Finally, you'll want to visit each elemental node, defeat its boss, and retreive their special elemental power gem. There are four of them, one for each elemental boss: Earth, Air, Fire and Water. By themselves, the gems have significant power. Socketing them into the skull gives them a few more. When all this is completed, talk to Pishella with the character and she'll go through the ceremony to destroy the orb. You'll now have four days to destroy Zuggtomy, the last boss in the game, in her weakened state. Here, my dwarven fighter reconsiders giving the Orb to Pishella. I call this piece, "Contemplation."
 9) Smigmal, Leader of the Bandits:
 Before you enter this room, save your game. There's a bug pre-patch where if you decide to let her live after your first battle, any subsequent meetings with her she'll be invisible and there will be nothing you can do, including casting any see invisibility spell, etc. One way around this is to kill her when you have the chance. Alternatively, if you can provoke attacks of opportunity while she's invisible, your characters can take her that way. Yet another way is to summon monsters and have them take her out, as they will be able to see her. She'll attack you as soon as she sees you, and when she's almost dead, will beg for her life. If you have the chance in conversation attack her again. On her body will be a key to the chest behind her. Turns out she's the leader of the brigands in the Tower Ruins, via the nearby Temple Escape Tunnel at #10... a very handy exit from the dungeon.
There's at least one workaround for the Smigmal bug if she's turned invisible. Right-click a character's radial menu, select the "single attack" option and then click on Smigmal's portrait in the initiative line-up above. That should target her.
10) EXIT: to
Temple Escape Tunnel (#3). Use this exit to get back to the surface and to the Burnt Farmhouse, where you can use your World Map. It's much faster than going back through Dungeon Level 2, then 1, then the Interior, then out.
11) Dungeon Disturbance: If you've been to Hedrack in Dungeon Level 4, after completing any three initiation quests from the elemental sub-temple of your choice, then this area is related to Hedrack's first and only quest. You're to find out the cause of the disturbance on Dungeon Level 3. He'll have marked this area on your map. Turns out that the main source is Scorpp, the hill giant behind the door in area #12. Deal with him, and report back to Hedrack of your success. In the other doors to the south, there are a couple Greater Temple Bugbears in each. The leaders hit harder than the normal ones... as expected. Finally, there's also an exit at #14 to the north of this room, back up to Dungeon Level 2, and a fairly difficult Ogre Shaman and three Ogres in #13.
12) Scorpp, Hill Giant: This gentle giant will likely engage in conversation with you but attack afterward. Diplomacy will delay this, but he'll attack anyway. Fortunately, he only hits with his crossbow (Wonnilon's Crossbow of Dungeon Level 1), and you shouldn't have very much trouble with him. When he's low on life, he'll surrender and at this point you can ask him about what he knows about the temple, and he's also available for hire! He packs a whollop, and should make your party yet more powerful... but perhaps would make it lopsidedly so (he starts with a 30 strength). However, he's also got Wonnilon's Crossbow and Control Plants spell, from the mini-quest on level 1. The easiest way to get these is to attack and kill the giant. However, you could recruit Scorpp, take him to a merchant where he then sells the items, and then buy them yourself. Your call.
It's worth noting that many of the inhabitants of the towns will not talk to you if you have Scorpp in your party, but there are a few who will. The Temple of St. Cuthbert for instance, and a few more.
13) Ogre Shaman & Ogres: There's a shaman and three ogres here, providing a more challenging encounter.
14) EXIT: to
Dungeon Level 2 (#5). This will take you right up into Air Temple territory (assuming they're not all dead).
15) Jackalweres & Gargoyles: This is a fairly tough encounter, mainly due to the two jackalweres that attack your party. The jackals and gargoyles are insignificant compared with the two 'weres. A wand of magic missiles works wonders against them, as well as any silver weapons (if you have any... silver arrows work here too), or powerful ones. Essentially, attack them with magic for best results.
16) Umber Hulks: Another challenging encounter, three umber hulks... lumbering giant insectesoid-like creatures who like to cast confusion. Each umber hulk is in its own niche on the north, south and east walls.
17) Leucrotta: Two of them. These foes are tough, considering there are only two. They'll have a strong resistance to magic, cast their own debilitating Ray of Enfeeblement, and hit for enough damage to make you notice.
18) EXIT: to
Dungeon Level 4 (#2). This is an alternate stairway into Dungeon Level 4. You'll end up in approximately the same place as the exit at #3.
19) Ettin: One ettin, and these dumb two-headed giants hit for a ton. Try and fight it ranged, or have some healing spells ready.
20) Hub With Trolls: In each adjoining room, you'll fight a troll. Each troll has a key labeled Northwest, Northeast, Southwest and Southeast, corresponding to the parts of this dungeon level that are roughly in the same direction. The Northwest Troll key, for example, opens a chest somewhere on the northwest part of this level. You'll also notice another exit here, back up to Dungeon Level 2, at #21.
21) EXIT: to
Dungeon Level 2 (#8)
22) Groaning Spirit & Gust of Wind Scroll: One of the keys to destroying the "Orb of Golden Death" artifact you got at #8, after you defeat the groaning spirit, you'll have access to its chest, containing a Gust of Wind scroll and a lot of other useful magic items. It's well worth your effort.
23) Ogres: Four of them. No shaman, sorry.
24) Shadows: In each of these two adjoining side rooms, you'll fight six shadows and then ten shadows, in the south and north rooms respectively. They're not too challenging.
25) Trolls: Two of them.
26) EXIT: to
Dungeon Level 2 (#24). Yet another exit back up to level 2.
27) Black Pudding: The kind of creature that makes one laugh... until one of their kind multiplies when hit. Fortunately, this one doesn't.
28) Goblins Attack: Where there's goblins, there's usually...
29) Hill Giants: Two of them. They hit for as much damage as any creature in the game... though their number of attacks are limited. Make sure you either fight them ranged (with entanglement-type spells) or have healing spells and potions ready. One of them made a 52 point critical hit to my fighter, right after a 28 point hit, killing him and his already waining hit point total.
30) Carrion Crawler: Your typical centipede-like creature, but much bigger. They aren't extremely dangerous to a party that can get this far.
31) Ogre Shaman & Ogres: There's a trend in this game, of pairing a shaman with three ogres. Use caution.
32) Prince Thrommel, Hero of Emridy Meadows: Through a secret door in the wall, you'll find the prince, a level 10 fighter. He'll gladly join your party, but on one condition: if you leave the temple, he leaves your party. As it happens, he has in his possession the most powerful weapon in the game, other than his alternate sword he gives you for a reward sometime later. It's a magic sword called Fragarach. Your alignment matters with the sword, if you should manage to acquire it somehow. In the original module it is a Chaotic Good sword, and will be most useful to those of that alignment. Here is its description in the official ToEE module of old:
This hefty steel broadsword bears a mighty
enchantment. It was originally fashioned
for a demigod of elsewhen, and eventually
passed into the WORLD OF
GREYHAWK� Setting. It served well for a
short time, all too soon falling into the
hands of the minions of Chaotic Evil. It has
been in their grasp for a decade or more,
resting in hiding in the Temple of Elemental
Evil, guarded by the worst of elemental
grues. Fragarach means "The Answerer."
The sword is of Chaotic Good alignment.
Any Lawful creature trying to grasp it takes
1-6 points of damage and falls senseless for
1-10 rounds. A Neutral creature holding it
takes only 1-3 points and swoons for 1-4
rounds. In evil hands, Fragarach has no "to
hit" bonus whatsoever; in Chaotic Neutral
hands, it will strike but one opponent per
round. The sword functions perfectly only
for a Chaotic Good user. In such hands, its
+ 4 bonus always operates, and it will strike
as many opponents unerringly as have
struck at its possessor. Fragarach always
hits all such targets, the + 4 pertaining to
additional damage only. Note, however,
that The Answerer always strikes last in a
melee round. Against evil opponents, the
bonus doubles (to + 8) whenever a natural
20 is rolled for "to hit" determination.
The sword has a hilt of silver and gold
wire, most cunningly wrought. Its guard
and pommel are set with perfect emeralds
(corundum)�7 gems, total value 65,000 gp.
Its scabbard is likewise trimmed with precious
metal and decorated with many gems
of green and golden hue, worth another
35,000 gp.
Whether Troika integrated merely some or all of that into ToEE I do not know. I can tell you, however, that the sword always hits (which is alone amazing), and, with my Chaotic Good party, hits for a lot of damage, usually in the 20's (non-critical).
If you decide to take Thrommel out of the Temple, he'll leave the party, but not after first offering a reward. If you accept the reward, then around 20 or so days later, maybe more, during a random encounter, you'll be approached by his courier. He'll give you 2000gp, several rings of protection, and the greatsword Scather. Scather is another sword that always hits (which is amazing), but its special abilities can only be used by Chaotic Good, apparently. So there is some incentive to rescue Thrommel as well. You'll also get a better ending postscript.
Here is the text from the original ToEE module for "Scather" and other swords like it. It is merely a well-made magical replica of Fragarach:
When Fragarach first came to this world, it
received immediate attention and quick
renown; so much so, in fact, that six other
swords like it were forged and enchanted.
These are lesser weapons, of course, and
their alignments vary. Each has a + 2 bonus
(and cannot hit opponents struck only by
+ 3 or better weapons). On a natural "to
hit" roll of 1, no bonus applies; on a natural
20, like their predecessor, the bonus is doubled
(to + 4). These lesser swords are identified
by the differing gems set in guard and
pommel. They are reported to be amethyst,
aquamarine, garnet, peridot, topaz, and
tourmaline stones, with combined value of
about 24,000 gp per weapon, 16,000 gp per
scabbard. These weapons are named Rebutter,
Scather, Replier, Retorter, Squelcher,
and Back-Talker, in honor of Fragarach.


