 Did we miss anything on this map? Is there something we didn't discover? Let us know!
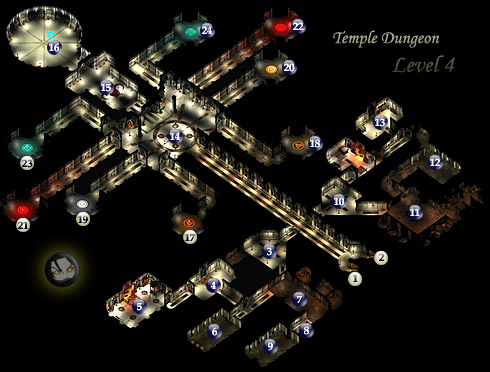
Metaphorically, this dungeon is an art piece, a stick being held up by a perpendicular base on the ground. At the top of the stick is a spoked hub. In the middle of the hub is Hedrack, and each of the spokes takes you to each of the four elemental nodes. The spokes on the left are the gates to the elemental nodes, while the spokes on the right are the returning points from the nodes. The base of the stick is made up of random and very challenging monster encounters.
Your goal in the dungeon is to either join with Hedrack at #14 after you've completed any of the sub-temple's three quests above in Dungeon Level's 1 or 2, or to defeat him, rejecting the evil of the Temple (or hording it to yourself), in which case you'll have an immense battle on your hands and need the Orb of Golden Death, described at
Dungeon Level 3 (#8) to win the game. I'd suggest only going to Hedrack when you're clear of your choice. If your plan is to join Hedrack, it's simple. You'll first have to have completed all three initiation quests from either Romag of Dungeon Level 1, or Kelno, Belsornig or Alrrem's three quests from Dungeon Level 2. You'll then either be brought directly to Hedrack, or must travel there yourself (as with Belsornig of the Water Temple). Hedrack will ask you to perform one simple quest: to find out the matter of the disturbance on Dungeon Level 3, which he'll mark on your map. If you've already cleared Dungeon Level 3 and have killed Scorpp the hill giant at #12, you'll get the option to tell Hedrack that he was the source. If you haven't yet, travel to #12 and deal with Scorpp, then return to Hedrack.
If you're here to defeat Hedrack, I'd strongly suggest not walking up to him first and talking with him, but instead sneaking your party up to area #14, positioning your characters with your wizard in front, and letting loose a couple to a few cone of cold spells or your most devestating spells, before anyone takes notice. I'll go into a few more details at #14's description.
Finally, there are some non-required but challenging and lucrative encounters at the base of the level. The most challenging encounter other than the elemental nodes and Hedrack's, is at #11, where you'll have to deal with swarms of bugbears, ogres, and an ogre shaman all at once. It will probably tax your resources, even at level 10.
Another large and surprisingly difficult encounter (if unprepared) is the one at #15, right above Hedrack, with multiplying oozes, molds, fungi and jellies. There are others, explained below.
1) EXIT: to
Dungeon Level 3 (#3)
2) EXIT: to
Dungeon Level 3 (#18)
3) Trolls: Two of them.
4) Trolls: Three of them.
5) Paida & the Concubines: Two of them, and they're harmless. You can talk to them (and flirt with them), gleaning enough to know that Hedrack is dangerous. One of them is Paida, the Wheel & Wainright's wife in Hommlet, a level 1 fighter. You may have been asked by him to rescue her. In the room is a dispel magic scroll. You can use this spell on Paida to free her, recruit her, then take her back to Hommlet to be with her husband, for a shaving of xp.
6) Ettins: Three of the hard-hitting hulks. Proceed with care. Behind them, the third chest from the bottom has the loot.
7) Ettin & Troll: One of each.
8) Talking Hill Giant, Kella: This hill giant is really a druid named Kella in disguise, and she will join your party, but only if you are of True Neutral alignment or you have a druid in your party speak with her first. Regardless of whether you were able to talk her into joining or not, if you attack her and take her down to low life, she'll change and stop the combat. After this point, she wouldn't join my Chotic Good party.
On Kella's body is the Ring of Change, allowing her or a druid to change into a Hill Giant.
9) Hill Giants: Three of them. Use extreme caution.
10) Trolls: Up to four of 'em, random.
11) Ogres, Bugbears & Shaman: A literal horde of all three types (save for the one shaman) await you here. You may not face the shaman, as the number and type of creatures appear somewhat random or based on night & day. Be on your best, for this is one fun fight.
12) Ogre Chieftain & Ogre Leaders: One Greater Temple Ogre Chieftain, and two G.T. Oger Leaders. Again, the number could be random, but you'll face ogre leaders regardless. They're all powerful, so be careful.
13) Senshock the Wizard: This is yet another big fight, and you might also find Barkinar the "Commander of the Temple Troops" here as well - otherwise he'll be walking in the hallway just before #14. You'll have to face a myriad of creatures. One powerful wizard named Senshock (if he's in at the moment... otherwise he'll fight with Hedrack at #14), many summoned elementals of every type and greater temple bugbears. Be sure to check Senshock's chest after the battle.
14) Hedrack, High Priest of the Greater Temple: Just before #14, you might find Barkinar, the "Commander of the Temple Troops" roaming the hallway. You could have also found him at #13. He'll initiate conversation when he spots you and likely attack. If you're near enough to everyone else just behind him, they will too. On his body are the very valuable Boots of Speed.
Hedrack himself is the current high priest of the Temple of Elemental Evil. After you've completed three quests from one of the sub-temple's high priests - Romag, Kelno, Alrrem or Belsornig - you'll be taken or sent here to visit with Hedrack. He'll send you on one quest to find the source of a disturbance at
Dungeon Level 3 (#11) (marked on your map by Hedrack), and following that you'll be given a chance to join. Simply defeat Scorpp the hill giant at
Dungeon Level 3 (#12) and report back to Hedrack. One of the game endings is here. If you choose to accept his subsequent invitation into the Greater Temple, the game will end and you'll see the mini-epilogues roll.
If you choose instead to attack, you'll face Hedrack, a very powerful evil cleric, two wizards, Senshock from area #13 if he wasn't in his home area, two ettins, a hill giant, many gargoyles and many bugbears. It's quite the fiesta. If you allow Hedrack the time, he'll likely summon Iuz to fight, and subsequently St. Cuthbert as well. Then they'll both have a chance of leaving. Iuz can resurrect Hedrack before he leaves, and summon a large number of ghouls. When it's over, be sure to loot Hedrack himself for valuable magic items and prizes, and then the others.
Your next step will be to rest up and pay a visit to each of the elemental nodes, branching away to your left. These elemental nodes are not required, but they're dangerous and you should be level 10 to attempt them. The prizes are worth it though. One elemental power gem from each node with insanely powerful summoning spells, and other magical effects. They can be very useful against the final boss, now that you're required to win the game by facing it. There will be another option, though, instead of battle, but I'll detail that on The Locked Level page.
15) Fungi, Molds, Puddings & Jellies: A cornucopia of colors and odors await you here. Before you begin the fight, be sure to stock up on magic spells, especially fireball if possible. Any damaging spells will do. Slashing some of the enemies here only muliplies them, and it can soon get out of hand for your party. Magic is your best solution for these creatures. Behind them you'll find chests full of goods and, more cloaks.
16) Teleport to Locked Level, Ooze & Ascomids: If you manage to beat all the elemental nodes, a magical doorway can teleport you from this location to The Locked Level, and vice versa. Aside from the door, you'll fight three bouncing ball creatures called ascomids and a grey ooze. You'd think something else would be here, due to its position on the map, but apparently not.
17) EXIT: to
Earth Elemental Node (#1). This portal gives you a one-way ticket into the Earth Elemental Node. The only way back is through the gate at the end, after defeating its boss.
18) Return: from the Earth Elemental Node's final gate.
19) EXIT: to
Air Elemental Node (#1). This portal gives you a one-way ticket into the Air Elemental Node. The only way back is through the gate at the end, after defeating its boss.
20) Return: from the Air Elemental Node's final gate.
21) EXIT: to
Fire Elemental Node (#1). This portal gives you a one-way ticket into the Fire Elemental Node. The only way back is through the gate at the end, after defeating its boss.
22) Return: from the Fire Elemental Node's final gate.
23) EXIT: to
Water Elemental Node (#1). This portal gives you a one-way ticket into the Water Elemental Node. The only way back is through the gate at the end, after defeating its boss.
24) Return: from the Water Elemental Node's final gate.


