 Did we miss anything on this map? Is there something we didn't discover? Let us know!
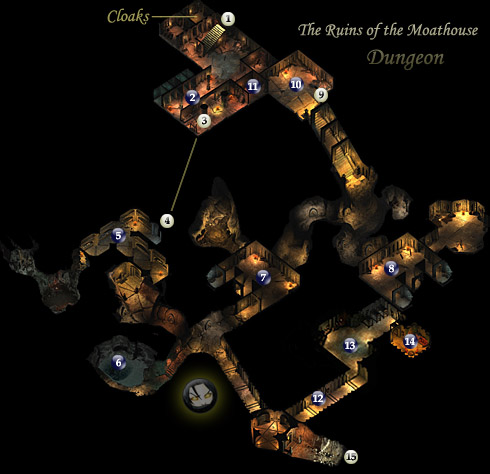
Whether you entered at #1 or at #9, your eventual goal is the same, and the paths meet up. It's to get to #14, Lareth. The big fights in the dungeon are at #2, 7, 8 and 13. The other fights you'll notice are smaller and easier to handle. Your first objective, should you want to be diplomatic with some of the encounters, is to pick up the Eye of Flame cloaks in the northern room above the staircase at #1.
1) EXIT: to
Moathouse Interior (#5). Immediately on descent you can check the two small rooms to the north. The one on the right side is important in that it houses a chest full of Eye of Flame cloaks. If you outfit your entire party with these (something you'll probably do again before the game is through), you can get past some of the potentially difficult encounters through diplomacy and dialogue. The ogre at area #10 will talk to you. The Gnolls at area #7 will talk to you whether you have them on or not.
2) Zombies & Slimes: When you walk around the corner to face the zombies, you'll see them munching on a dead adventurer. As soon as they see you, the fight will commence (regardless of the cloaks). If you're level 1 or 2, this fight could be challenging without a character that has the Turn Undead ability, and up until now, possibly the most challenging of the game. Watch your rear during the fight, because there's a chance two green slimes will drop down from the ceiling behind you, essentially surrounding your party with enemies. They didn't fall on me one of my times so I'm assuming it's a random chance. The zombies will be the toughest, however. Don't be afraid to use all you have against them, and rest afterward. When it's over, you might consider heading into the door to area #10 when you're healed and ready, or quickly dispatching the couple of undead in the next room south, near the exit. They should be a pushover compared to this.
3) EXIT: to #4 and a couple of undead waiting nearby.
4) EXIT: to #3
5) Ghouls: You'll fight a couple ghouls in this area, and also find a chest that they seem to be guarding.
6) Giant Crayfish: When you walk down the plank into this room and get near the water, you'll be ambushed by a giant crayfish. It's got enough hit points and power to give challenge to a low level party, but since it's only melee damage, shouldn't prove too tough. This is also a good place to rest after battles, as long as you don't mind the random chance of battle. Remember, the spider tower outside is a free place to rest in pure safety.
7) Gnolls: Before you attack, the Gnolls will talk to you whether you don the Eye of Flame cloaks or not. They'll vacate the dungeon for a fee of 100gp (50gp with Diplomacy), and also mark Lareth's location on your map... your ultimate goal. Finally, if you use a character with Intimidate, you can get them to leave for free.
Fighting these Gnolls will prove a bit tougher, but you'll be getting much more xp for the job. Try and use area spells and take them out one by one if possible. Sleep is a good spell to use here.
8) Bugbears: There are a lot of bugbears in these two rooms. If you decide to do battle with them, prepare for a lengthy fight at low level. Sleep is good, as well as any other area effect spells. Luring them out to you in the cave is also feasible. Keep in mind the others in the back room as well, who like to fire ranged weapons.
9) EXIT: to
Moathouse Interior (#8). If you've entered the dungeon the first time through this way, it's recommended that you deal with the Ogre at #10, free the prisoners, and then head to #2, rather than descending the stairs. You'll have a lot of tough battles ahead of you if you do that, and no chance at resolutions other than fighting (if you don't have the Cloaks mentioned above).
10) Lubash the Ogre: Unless your party is wearing Eye of Flame cloaks (mentioned above), he'll attack. If he's willing to talk, choose a character with Bluff or Diplomacy to get by him peacefully. If you attack, be prepared to dish out considerable damage at this level, and also to absorb it... he hits for quite a lot when he connects. After it's over, open up the door to #11 (fairly easy to miss), and rescue the prisoners.
11) Nybble & Prisoners: Inside this cell you'll talk to a gnome named Nybble, and before the conversation is over, he'll offer you a ring that makes you a friend of the gnomes (which you may be able to use later in the Temple of Elemental Evil).
12) Lareth's Guards: There are three sentries lining this hallway into the big room with quite a few guards. The front guard will halt you when you get close, and if you're wearing the Eye of Flame cloaks, you can attempt to bluff your way into see Lareth, otherwise you can possibly intimidate him. Either way, only the character that did the talking will be taken into the room at the end, #13, where your bluff will be called, and you'll end up doing battle with them all. If you decide on this path, take that lone character and have him run out of the room every move, past the hall guards, to meet your other party members. You don't want him or her doing battle by themselves.
It's likely that if you angered the whole crew and tried to escape, none or few of the guards in the big room are following, and you'll have an easier time with just the hallway guards.
If you're not in the talking mood, and simply attack the hallways guards first, lure a couple of them out at a time until you can reach the back room without combat.
13) Lots of Lareth's Guards: If possible, after you defeat the hallway guards at #12, sneak up to the corner and prepare for the big battle inside. Throw a spell in the room to start with your spellcaster. Use any tactics you think are appropriate. There are a lot of ranged attackers in the room, so you might want to keep most of your party members behind the corner, and lure them at you instead of going into the room right away. The swell thing about ToEE is that the combat system is incredibly adaptive to most any strategy.
When the entire room is clear, open the door to #13 and confront Lareth the Beautiful himself.
14) Lareth the Beautiful When you first enter the room, he'll attack, so be ready. When you whittle him down until he's almost dead, he'll surrender and begin conversation. He'll ask to join your party and offer to show you the Temple of Elemental Evil... which is a fast way to get there. Your options are to take him up on the offer, or kill him there and take his valuable magic belongings. When it's over, check his dresser for his diary, which will mark the Nulb location on your World Map. Beware, though, that if you accept his offer to join the party, he will betray you once you reach the Temple, and attack.
Congratulations. You've just cleared the first dungeon of the game, and a fairly challenging one at that (for low level). Head back to Hommlet now to finish up any quests you've missed, sell you're loot, and/or to rest and prepare for your journey to Nulb.
15) EXIT: to Hidden Cave Exit. This will take you to a small area outside the Moathouse Ruins, from where you can access your
World Map. There is no danger in the area except for possibly sleeping.


