 Did we miss anything on this map? Is there something we didn't discover? Let us know!
There are three general ways into this dungeon from above. One is if you told the Tower Guard at the
Tower Ruins Entrance (#2) that Wat sent you. In that case, you'll be brought to Alrrem, High Priest of the Fire Temple at #19. And, if you're not yet wearing your Fire Temple robes from the Temple Interior, you'll be attacked when you step out of the room. See #19 for further details.
The other, not-recommended way, is to come from the spiral staircase at the
Temple Interior (#4). You'll be dropped off in the middle of the Air Temple facing off with several air elementals at #7 if you're not wearing your Air robes.
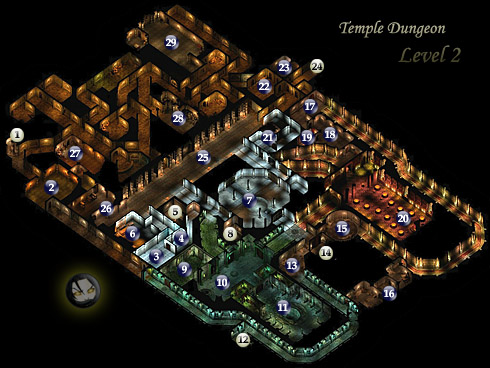
Finally, the most common approach is from the stairs at #1 here. For starters, if you haven't yet read the temple overview, this dungeon level is covered by three main elemental sub-temples: Air, Fire and Water, each with its own High Priest. The high priests are the ones who will initiate you into their temple by providing you with three quests apiece... that is, unless you attack them. After the completion of any of those quests, you'll become a member for that temple, and will not be required to wear their robes to pass safely through its denizens. You can try and take as many quests as you want, just for fun or for experience, until one of them asks you to kill another member of an opposing temple, where you'll need to make a choice. What's the ultimate goal of all this? To be initiated into the Greater Temple... serving evil. If that's your ultimate goal, then you'll be brought down to Dungeon Level 4 to speak with Hedrack after any three High Priest's quests are completed, and once you complete Hedracks, be initiated into the Greater Temple to end the game on that storyline.
What if you don't want to do any temple quests? It's easy. Simply go from room to room, killing off the creatures, making your way to Dungeon Level 3, finding the artifact required to win the game, and then entering the "Locked Level" and doing what you need to do in order to win. That's what most people who do not succumb to evil will do.
1) EXIT: to
Dungeon Level 1 (#18)
2) Minotaur Statue: It comes to life as you get close, and will attack. It's not too challenging for a mid-level party. There's a chest in the room as well.
3) Air Temple Bugbears: They will attack if you're not yet a member (having completed one quest) or wearing the Air Temple robes.
4) Kelno, High Priest of the Air Temple: This is the man you'll want to speak to if you want to perform any Air Temple quests. As soon as you do one, you'll no longer be required to wear the Air Temple robes to pass safely by its creatures (not that there are many).
Kelno's first initiation quest will implore you to convert the water temple bugbears in the room south of this one at #9 to the air temple. Go to #9, talk to the Bugbear Chieftain, offer 500 gold and they'll convert to the Air Temple. Be sure to wear your Water Temple robes the first time you enter the room. Report back to Kelno for your membership card (not literally). Alternatively, you may still complete the quest by killing the Bugbears. I guess if the Air Temple can't have them, no one can.
The second Air Temple quest asks you to defile the Earth Temple altar with the vial of holy water that Kelno gives you. The alter is at
Dungeon Level 1 (#19). Walk up to the Altar, click on it and insert the holy water, and you'll have finished the mission. The priests will not even attack if you're already a member of the Earth Temple or wearing their robes. Tell Kelno of your success for your third and final mission.
Kelno's third task is a little more sinister. You're to kill any of the opposing temples' high priests. Belsornig at #10 should prove the most difficult with his guards and a summoned creature there. Alrrem at #19 is probably the easiest. When it's done, report back to Kelno, and he'll escort you to the Greater Temple to see Hedrack when you're ready. Before doing this quest, it might be a good idea to finish the quests of the high priest you've decided to kill.
When you're ready to see Hedrack in Dungeon Level 4, see
Dungeon Level 4 (#14) for details.
5) EXIT: to
Dungeon Level 3 (#14)
6) Air Temple Goblins, Bugbears & Gnolls: A mishmash of creatures here, all in this kitchen-type area.
7) Air Elementals: This is where you're dropped off if you've taken the spiral staircase from the
Temple Interior (#4). It also houses four elementals, mostly minor to come and bother you, if you're not yet a member or not wearing Air robes.
8) EXIT: to
Dungeon Level 3 (#21)
9) Water Temple Bugbears: These are the bugbears that can be recruited for the Air Temple's first quest, given by Kelno at #4.
10) Belsornig, High Priest of the Water Temple: Another high priest, Belsornig is perhaps the toughest to fight if you're looking for combat. Like the other high priests, he'll give you three quests for your initiation into the Water Temple.
His first quest is exactly the same as the Fire Temple's first quest, to recruit the Troll Chief Oohlgrist into the temple. He's at #16. With a little diplomacy on your part, Oohlgrist will join the Water Temple for free. Report back to Belsornig for the second quest when this task is completed.
Belsornig's second task is to kill Alrrem, High Priest of the Fire Temple at #19. He'll give you a vial of poison (purportedly from Kelno) to pour over the body. Simply stick it in his inventory to complete the quest, and return to Belsnornig.
The Water Temple's third quest takes you over to area #22 where you'll have to kill the bugbear and ogre guarding the greater temple jail, and plant evidence against the Earth temple (Romag) on their bodies. For this, he provides you with a set of Earth Temple brown robes. In the cells there at #23 you'll find a few familiar names if you've been playing Chaotic Good, Princess Tilahi and Sir Juffer. Here's your chance to finally end that quest... though you wouldn't have needed this one to do it.
When you've completed all three quests, instead of taking you to Hedrack himself, Belsornig just marks the location on your map. His directions are to take the stairway at #12, then take the other stairway at
Dungeon Level 3 (#3) down to Dungeon Level 4. Once on that level, you can find Hedrack at
Dungeon Level 4 (#14). See the link for details.
The lavish room to the south holds Belsornig's chest. All of the High Priests have chests near them, which are usually worth looting.
11) Giant Snakes: Here are four huge snakes for you to fight, should you choose to. They won't prove too difficult.
12) EXIT: to
Dungeon Level 3 (#1). This is the recommended way into Dungeon Level 3.
13) Troll & Owlbear: You'll find a troll attempting to tame an Owlbear.
14) EXIT: to
Dungeon Level 1 (#2). This is another of those pesky "magically held" doors. You won't be able to unlock it with your thief, or a knock spell.
15) Troll & Hydra: Here's a troll taming a Hydra. The Hydra has five melee attacks, as expected.
16) Oohlgrist, Chief of Trolls: Aside from being an NPC hireling (with a good Intimidate score), both Alrrem of the Fire Temple and Belsornig of the Water Temple will ask that your recruit him. If you're coming for the Fire Temple, Oohlgrist will ask for 1000gp just to talk to him. You can intimidate him out of the demand, but he'll ask for 10,000gp to join the Fire Temple. A bit steep, so consider it well.
For Belsornig of the Water Temple, Oohlgrist will join for free if you have a good number of ranks in Diplomacy. He'll also join your party if you Intimidate him afterward.
17) Fire Temple Bugbears: These bugbears will attack unless you're already a member of the Fire Temple or are wearing the Fire robes.
18) Underpriests of the Fire Temple, Antonio & Tubal: Tubal has a quest of his own. He wants you to get his mace back from Antonio. Mention the game of three-eyed snake to Antonio (the priest in the south of the room) and you'll be able to play for the mace. Use a character with Intimidate or you're doomed to failure. When you win, you can intimidate Antonio into giving you the mace.
Both Antonio and Tubal are also the underpriests that Romag of the Earth Temple has you assassinate for his 2nd quest (if you weren't able to do his first bidding). Unfortunately, this too does not result in the option to tell Romag of your completion. Pre-patch, killing these two priests will not gain you the third and final quest of Romag. If it should be fixed in a subsequent patch, at least you'll know the procedure.
19) Alrrem, High Priest of the Fire Temple: If you came by way of telling the Tower Guard at
Tower Ruins Entrance (#2) that Wat sent you, then you'll end up in this room with Alrrem. Hopefully you've got your Fire Robes with you from the Temple Interior, or you'll have to do battle with the Fire Temple minions outside the room.
Alrrem, like the other high priests, will ask you to perform three tasks for him, in order to be initiated into the Fire Temple Order. After the tasks are complete, he'll take you to see Hedrack for initiation into the Greater Temple on Dungeon Level 4. Alrrem's first quest is to recruit Oohlgrist the Troll Chief at #16. If you've already done this for the Water Temple, or if he's dead, you're out of luck with this particular assignment. However, you can still report back to Alrrem with news of Oohlgrist's "death" and receive the next task, the Ogre Cave.
Here's how to recruit him. When you talk to Oohlgrist, he'll ask for 1000gp just to speak with him, but you can Intimidate him to escape the fee. After that, however, he'll require that you pay him 10,000gp to buy his services for the Fire Temple. Pretty steep. Report back to Alrrem when it's done, or if you've failed. Even if you managed to flub this quest up, returning with your head in shame at your refusal to pay 10,000gp, you're still able to continue with the Fire Temple, though Alrrem will be displeased.
The second quest gives you a new location on your
World Map, the Ogre Cave. Your to recruit the ogres into the Fire Temple, and this shouldn't prove too difficult. The Ogre Chief simply requires that you talk to him for them to join. Once that happens, return to Alrrem for the next and final quest.
If you recruited Oohlgrist for the Fire Temple, Alrrem's third task is for you to clear up the mace matter between Tubal and Antonio. If you already have, report that to Alrrem and the quest will be completed. If you haven't yet, see #18.
If you "botched" the Oohlgrist quest for Alrrem, your third assignment is the most difficult. It's to steal the Orb of Death from Falrinth at
Dungeon Level 3 (#8). He'll mark the location on your map. To do that, you'll have to either sneak past him into his secret room at #8 on that map, or defeat him. It's worth it to defeat him for his magic items, though he can be tough if you allow him to cast spells.
One word about the Orb of Death. This item is one of the ways to reach the end area to win the game if you don't accept initiation into the Greater Temple by Hedrack later. The other way is to beat all four elemental nodes, where a teleport will then open to the last area. You can still give the Orb to Alrrem, but is an item of power like that really deserving of him? Think about it.
When you're finished with the three quests, speak with Alrrem about the initiation into the Greater Temple. You'll then meet Hedrack at
Dungeon Level 4 (#14). See the link for further details.
20) Bassanio of the Fire Temple: Here's a lone wizard with a nice item guarding a chest with a nice item. Any attempt to get said item from chest results in a large battle. It's better to simply attack with initiative at the beginning. You'll be fighting what becomes the most challenging battle of this level: two fireball chucking salamanders behind Bassanio to the left and right of him, and many minor salamanders on each side of the long corridor. All of them are resistant to fire. It's best if you approach this battle at no less than level 8, though it's possible to win with levels below that. Equip all of your minor fire resistance rings to your characters (you should have a few by now if you've been thorough), and have at it. Cold spells obviously work wonders such as cone of cold or ice storm.
When peace and quiet has returned, loot the chest to find the Frostband greatsword, and Bassanio to find the Flaming Longsword +1.
21) Mysterious Voice: As soon as you enter the room, you'll get a short dialogue with a mysterious voice claiming that if you lay all of your magic weapons and armor on the ground in the room and step out, they'll be blessed. Don't listen to it. In the next small hallway there's a secret door to a small room with two very powerful werewolves. You won't be able to hit them well without very good weapons or silver weapons, with their damage resistance. It's best to come back here after you're very powerful. In the chest that they're guarding is an Otiluke's Resilient Sphere scroll.
22) Bugbear & Ogre Prison Guards: If you've been sent by Belsornig of the Water Temple to kill and plant evidence on the guards, these are the guards you're looking for. Kill both the bugbear and ogre, place the robes Belsornig gave you on the bugbear's corpse (in his inventory), and report back to Belsornig. If you're here because you're simply exploring, you might consider killing them anyway. In the jail cells on the east side of the room are Princess Tilahi and Sir Juffer if you're playing the Chaotic Good alignment.
23) Princess Tillahi & Sir Juffer: These two are the mission from your Chaotic Good alignment vignette quest. Skip this if you're not playing as Chaotic Good. When you rescue them, your opening vignette will finally be completed.
24) EXIT: to
Dungeon Level 3 (#26). You'll end up on the east side of Dungeon Level 3.
25) Ogre Shaman & Ogres: You'll face one very resilient ogre shaman and three ogres here. It can be a challenging battle for mid-level characters.
26) Brigand Runner & Brigands: In the hallway preceding the room, from the main hallway that #25 rests in, you'll find a lone Brigand. When he sees you, he'll begin running into the room above the hallway alcove, and a battle will ensue: your party vs. lots of brigands. It's one of the bigger battles of this level.
27) Greater Temple Guards: These guards will likely leave you alone unless you attack them.
28) The Littlest Troll: There might have been a quest assigned to this at one point, but for now, it doesn't seem to do anything but attack. Kill him (if you wish) in the same manner as the rest of his trollish brethren... with a "coup de grace" finish when they're unconscious.
29) Great Bugbear Battle: Here we have a very large number of Greater Temple Bugbears, your first taste of some of the more difficult battles to come. Lots of bugbears rushing at you, with some of the harder hitting variety intermixed. Fortunately, some area effect spells like web, fireball, cone of cold, etc. will do wonders.


