 Encounter any problems with this walkthrough? Have comments? Let us know!
1 - Cave
Encounter any problems with this walkthrough? Have comments? Let us know!
1 - Cave
Inside the cave you'll find several barrels of poison, plus an orc named Tipsix. The cave is part of a quest for Hugh in the farm area. When you kill Tipsix, be sure to pick up the
golden key he drops.
2 - Bandit Camp
The thing to watch out for here is the thug leader, who is level 27 and who has an armor rating of 168. But he's susceptible to "freeze," so kill the thugs and orcs around him and then keep him frozen while you whack away at him. He'll drop a
key when he dies, and the
key unlocks the chest in the camp. Inside you'll find about 2000 gold and some potions.
3 - Blue Boar Inn
As you approach the front door of the inn, a man named Logan will stumble up to you and pickpocket you for up to 5000 gold. You won't notice the theft, but if you walk east along the road you'll meet Logan's wife Jolie who will tell you that Logan is a thief. Then you'll notice the money is missing, and if you talk to Logan again (he'll be at the eastern side of the inn now) you can either demand your money back (and get it) or kill him (and not get it). Since Logan is worth around 5000 experience, the most efficient course of action is to drop all of your money except for ten coins (the minimum that Logan will steal), and then meet up with and eventually kill Logan. That way you'll get the experience but lose almost no money. If you use this plan, don't forget to pick up your money again.
Note: To drop some of your money, drag it from your inventory to the ground, but press the control key when you release the mouse button. Then a dialogue will pop up and let you specify the amount to drop.
On the main floor of the inn are two people of note:
At the bar is El'Gammon. If you spend 2500 gold to buy his fake magical items, he'll teach you a point of "trader's tongue." (Each time you buy an item, just click on it in your inventory to move the process along.)
In one of the rooms on the right is Harriet. She'll ask you to deliver a letter to her uncle Afrasam in Verdistis. When you do you'll receive 15,000 experience and 100 gold. Nothing will happen if you return to Harriet to report your success.
In the basement of the inn you'll find a locked door. If you killed Tipsix the orc in the nearby cave (#1), then you should have found the
golden key that unlocks the door. Beyond it you'll discover more of the poison that you found in the cave. When you ask Splinter the bartender about the room with the poison, you'll earn 15,000 experience, and he'll let you know that Dr. Elrath was the one renting it.
Later, after you've completed the quest to send an escort to Aleroth, the Aleroth healers (Joram, Lanilor, Otho, and Goemoe) will show up at the inn. At that point you should be able to ask Goemoe for the lizard activation scroll.
4 - Poor Quarter
See the Poor Quarter section for more information.
5 - Rude Knight
The knight will try to pick a fight with you. If you oblige -- which you should, since the knight is only level 11 -- you'll get some chain armor and a good quality (two-handed)
bastard sword when he dies.
6 - Cart Crash
Every time you walk by you'll get to hear the two drivers involved in the crash insult each other. Eventually they'll wander off in search of beer.
7 - Malachias
If you give him a gold piece, Malachias will tell you about a mysterious disappearing gem. Apparently the gem disappears when you approach it and then re-appears some distance away. He'll go on to say that you can find the gem "near the entrance to the graveyard" but really it appears not too far to the west, and only at night.
If you follow the gem (an emerald) you'll end up being ambushed by four thugs led by a wizard named Boratus. Of note, Boratus will mention Dr. Elrath before he attacks. If you haven't heard the name yet, Dr. Elrath will pop up in a few places in the northern and southern parts of the dukedom. Boratus will teleport away shortly after the battle starts, and there isn't any way to attack him. But you'll see him again (in the Dark Forest).
8 - Pauper's Graveyard
When you enter the graveyard, you'll see a woman named Elora get kidnapped by none other than Zombie Jake. You just can't keep a good zombie down. To rescue Elora, you'll have to go down into the catacombs beneath the graveyard. You can enter them via any of the four pits near the center of the graveyard.
The catacombs are roughly circular in shape, and if you consider them to be a clock, then you'll start at 6:00, and you can find Jake and Elora at 2:00. Mostly you'll only have to fight corpses in the catacombs. When you find a zombie or a dark corpse, you'll know you're close to Jake.
Jake is level 21, but he's the same Jake you might have fought in Aleroth, and so he should be pretty easy to kill by now. Once you've killed Jake, the other undead in the catacombs will disappear, and you won't get any experience for them. So if you're having trouble in the final battle, target Jake immediately. Otherwise, attack Jake last so you get as much experience as possible.
It doesn't appear to matter what you say to Elora after the battle. You'll always receive 17,500 experience and 1 reputation point.
9 - Troll King
Somewhere in this area you should find a patrolling troll king. It'll drop something good when it dies.
10 - Spider Cave
Inside you'll find a whole mess of spiders, including a level 27 mutated spider. Once you've killed the spiders, be sure to take the
treasure map on the altar in the back of the cave. If you haven't received it already, picking up the map will trigger the "treasure maps" quest. See the Treasure Maps entry in the Other Quests section for more information.
11 - Archer's Guild
Inside you'll meet the elven lord Eredor, who will give you the elven activation scroll.
12 - Robbery House
When you get close to the house, a little boy named Timmy will run up to you and tell you that robbers have invaded his house and are holding his parents captive. See the Robbery House section for more information.
13 - Teleporter
It requires the elven activation scroll.
14 - Antoinette and Victor
They're grave robbers who are working for Thelyron. If you tell them that Thelyron is dead, you'll receive 15,000 experience and the two robbers will leave. "He promised us on his mother's grave that he has nothing evil in mind."
15 - Overturned Cart
The cart belongs to Kistandalius, the owner of the Ars Magicana in Rivertown. The note on the ground next to the cart warns of a "horrible curse" should you loot any of the nearby barrels, but there isn't a curse. The barrels are simply trapped, and you can avoid the traps by attacking the barrels rather than opening them.
16 - Headquarters of the Town Watch
Commander Ralph will give you three quests (or not; you might have discovered some of them or all of them already):
1. Look into the duke's death.
2. Cure the plague in the poor quarter.
3. Help stop the orc invasion.
You'll need to complete at least one of these quests to receive an invitation into Stormfist Castle.
17 - Barracks
See the Barracks section for more information.
18 - Teleporter
It requires the human activation scroll.
19 - Egon
Around this area you'll meet up with a man named Egon. If you give him some gold, he'll tell you how the orcs have ravaged the village to the southeast, and how there's a secret tunnel leading from his (former) house to one of the orc encampments.
20 - Stone
The stone commemorates the ancient battlefield surrounding it. If you click on it, then a bunch of fallen skeletons will appear. If you decide to fight the skeletons, then your best bet is to immediately run to the edge of the plateau. If you don't, then you'll get swarmed and probably killed by the skeletons. But starting at the edge you can fight the skeletons a few at a time and defeat them easily. There aren't any repercussions to touching the stone and fighting the skeletons.
21 - Military Camp
When you walk far enough into the camp, three evil wizards named Cornelius, Josephina and Antx will take over the minds of the soldiers and turn them against you. There isn't any way to cure the soldiers, so go ahead and kill them all unless it makes you feel too guilty. You'll meet the three evil wizards again.
22 - Ravaged Village
See the Ravaged Village section for more information.
23 - Teleporter
It requires the human activation scroll.
24 - Orc Supply Train
This fenced-in area will come up in a quest for Captain Mitox at the Ravaged Village.
25 - Orc Spy
Around this area you'll meet an orc who will claim that he's a spy working for Captain Mitox. Nothing will happen if you let him continue on with his mission, so feel free to not believe him and kill him for the experience.
In the same area you can find a note hidden under a boulder. It's from Grisnak, an orc from the
Lord of the Rings.
26 - Secret Orc Camp
See the Secret Orc Camp section for more information.
27 - Main Orc Camp
See the Main Orc Camp section for more information.
28 - Locked Chests
The keys are nearby (press the alt key to see them). You should fine some mediocre equipment plus 1750 gold inside.
29 - Broken-Down Cart
At the cart you'll meet some "fruiterers." If you've already spoken to Marcus in Rivertown, then talking to the fruit merchants will net you 15,000 experience. Regardless, the merchants will ask you to go to Marcus and get a new cart wheel from him. The rest of this quest is covered in the "Moll and Marcus" entry in Rivertown.
30 - Drizzt's Corpse
This is an Easter Egg, obviously. "C.B." is Catti-brie, one of Drizzt Do'Urden's friends. The amulet isn't used for anything in the game.
31 - Teleporter
It requires the dwarven activation scroll.
32 - Wishing Well
The wishing well -- or the "miraculous-water-dispenser" as it prefers to be called -- will grant you one wish depending on the amount of money you throw into it. If you toss in 2 gold or 10 gold, the well will become offended, and you won't get anything. Otherwise, these are the rewards you can receive:
Completely healed: a potion of super healing (100 gold)
An ally: a level 29 spider (100 gold), a level 33 skeletal warrior (1000 gold), or a level 37 scorpion (10,000 gold) will follow you around and help you out.
An enchanted sword: the well will give a clue for the Holy Weapons quest, but it's not information you couldn't find on your own.
Attributes: if you ask for strength, agility or intelligence you'll receive +5 (1000 gold) or +10 (10,000 gold).
Greater experience: you'll gain enough experience to earn a new level (1000 and 10,000 gold).
A million gold pieces: nothing.
Two more wishes: nothing.
The best prize is probably to wait until you've gained, oh, level 40 and then to use the well to immediately gain level 41. If you don't want to wait that long, then you should take a +10 attribute bonus.
33 - Bodies
Once you've received the quest from #29, you'll find a pair of dead bodies here.
34 - Cave
This cave is a part of the quest started with the cart at #29.
35 - House with No Doors
If there aren't any doors, how do you get in? The answer is to click on the hollow tree not far to the east. Inside the house you'll find a bunch of gems and gold, but anything you pick up will turn to stone in your inventory. The note on the counter explains why: "If you only look for treasure in this world, the only thing you will find is treasure." Click on the hatch on the floor to re-appear next to the hollow tree.
36 - Chest
The chest contains a spellbook for "poison cloud" and a
regular staff.
37 - Teleporter
It requires the dwarven activation scroll.
38 - Dwarven Bread Inn
In the main room you'll meet Sylvana and learn that she's worried about her boyfriend Christopher.
On the western side you'll meet a man named Wouton. He'll tell you that he's a Marked One as well, and that Zandalor asked him to wait in the inn while he searches for the third Marked One in Stormfist Castle. Talking to Wouton will give you the "Find Zandalor" quest.
In the room north of Wouton you might find a dwarf named Krasnegar. If you tell him you've been having a "hard time" lately, he'll offer you a gem. If you accept this generosity, you'll receive a random gem. If you decline, you'll receive 3 reputation points. If you rob Krasnegar, you'll receive half a dozen gems but you'll lose 3 reputation points. For the latter two choices, Krasnegar will then leave the room, allowing you to take the dwarven activation scroll on the table. For all of the choices, you'll also receive 6000 experience.
Eventually, however, Krasnegar will leave his room, and you'll find a dog named Lar there instead. So if you don't get to Krasnegar before he leaves, you'll have to pick up the dwarven activation scroll from the mayor's house in the dwarven village (or eventually get it from the dwarven king). When Krasnegar leaves the inn, he'll leave behind a magical
crossbow.
On the eastern side of the inn, down the stairs, you'll find the area where they hold boxing matches (aka bar fights). As soon as you enter the room, you'll see Christopher get pummeled by Burleigh, the reigning champion. If you then walk over and talk to Christopher (and Sylvana again), it should be easy enough to convince him that he doesn't need to participate in fights to impress Sylvana. Then when you go back upstairs to check on the happy couple, Sylvana will give you three
minor healing potions. If you decide to be evil and tell Christopher that Sylvana thinks he's a "loser" if he can't beat Burleigh, then the couple will get mad at you, but nothing else will happen.
If you want to fight Burleigh, you'll have to talk to Sean (standing beside the ring) and pay him 500 gold. Then when you enter the ring you'll be stripped of all of your equipment and potions for the fight. If you're level a 25+ warrior then you can probably take Burleigh. Otherwise you might need to cheat a little, because spells aren't allowed inside the ring. If you place an object (like, oh, your weapon) in the ring before you enter it, you can pick it up and use it during the fight, and Burleigh will probably go down easily. Once you've defeated Burleigh you'll receive 25,000 experience and 2 reputation points, and Sean will give you 2000 gold.
Also in the basement, on the southern side, you'll find a locked room. If you can pick the lock you'll find a manuscript inside. The manuscript details how Buad's Tea can be used to kill talking trees.
39 - Locked House
When you approach the house, three soldiers will come up to you and pretty much accuse you of being a thief. If you're polite to them anyway, you'll receive 38,000 experience. If you decide to fight them, you'll probably receive about 2000 experience, plus whatever loot they drop.
If you can pick open the front door, then inside the house you'll find a ghost and not much more.
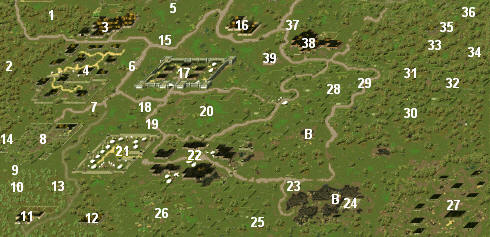
Exits:
A. Road to the Dark Forest.
B. Entrance to a mine shaft. (Another entrance can be found inside Egon's house in the Ravaged Village.)


