 Encounter any problems with this walkthrough? Have comments? Let us know!
Area Note
Encounter any problems with this walkthrough? Have comments? Let us know!
Area Note
If you have problems early in the game (or if you just want to squeeze out as much experience as possible), you can kill the rabbits wandering around Aleroth. At level 1, each rabbit is worth 50 experience, and you should be able to find over a dozen of them in the town. Plus, the meat from the rabbits restores vitality.
1 - Joram's House
This is where you'll start out in the game. Most characters will become upset if you steal things from their houses, but Joram won't care, so go ahead and loot everything not tied down. You won't find anything too useful, but it's better than nothing.
Note: You can sleep on either of Joram's beds when you're hurt. Just click on a bed to use it.
Finally, talk to Joram. He'll tell you how a white cat led him to your unconscious body (it's the same cat from the opening cinematic sequence), and that various bad things have been happening of late, the most notable of which is that Mardaneus, the leader of the town, has gone "crazy as a loon." Or maybe he's been possessed by a demon. Go ahead and agree to look into the matter.
As soon as you leave Joram's house, you'll witness a cut scene demonstrating Mardaneus' ravings. "He will come! The end is upon us!"
2 - Lanilor's House
At the beginning of the game, Lanilor will be stuck in front of Mardaneus' house (#3), and so you can take the opportunity to steal everything in sight.
3 - Mardaneus' House
When you first move close to the entrance of the house, you'll see Mardaneus mistake his assistant Lanilor for Thelyron Hashnitor (the lord of decay) and turn him into a popsicle. However, Lanilor isn't completely frozen. If you talk to him, he'll ask you to help him, and he'll suggest you sneak into Mardaneus' house and convince the wizard to free him.
The door to Mardaneus' house is locked, but if you try it and then talk to Lanilor again, he'll tell you that there's a way into Mardaneus' house through the nearby well (#4). Once you go through the well and enter Mardaneus' house, you'll automatically talk some sense into the wizard, and he'll go outside and thaw out Lanilor. You'll also receive 1500 experience.
With Lanilor himself again, he'll ask you to help Mardaneus, and he'll suggest that the catacombs under the town might be the key. However, he won't know how to get into the catacombs; he'll just give you a clue about "facing the dragons to the north." The dragons are at #5.
After you've explored the catacombs and healed Mardaneus, you'll be able to use him as a shopkeeper. Mardaneus will also heal you for free.
4 - Well
The well leads down into the cellar of Mardaneus' house (#3).
5 - Dragon Statues
When you turn all the dragon statues so they're facing north (just click on them until you can't anymore), the statue in the center will fly up into the air revealing a staircase down, and you'll earn 1000 experience. Then when you approach the stairs, Lanilor (assuming you've freed him) will run up to you and give you a
teleporter pyramid.
The pyramids will be your good friends during the remainder of the game, but if you "drop and use" the pyramid you have now, you'll end up in a room surrounded by a half dozen skeletons. If you're quick, you can immediately grab the pyramid on the floor and then "use" it to teleport back. You can also just click on the pyramid while it's on the ground, and then it will teleport you back to the first pyramid. That will allow you to use hit-and-run tactics on the skeletons. But if the skeletons give you too many problems, don't despair. You'll eventually stumble across the second pyramid while you're exploring the catacombs underneath the town. When you pick up the second pyramid, you'll earn 1500 experience.
There is also a cat that hangs out next to the statues. If you click on it, then it will start following you around. This is sort of funny, but it's also bad if you're trying to kill the rabbits.
6 - George's House / Store
At the start of the game...
The first time you approach George's house, you'll witness a dispute between George and a man wearing a Wicked Witch of the West hat. George will demand herbs from the man even though he can't pay for them, and he'll threaten to expose the man's secret if he doesn't comply. The man will simply leave. It doesn't matter what you say to him as he passes by.
Once you go inside George's house, he'll ask you to retrieve an herb called
Drudanae from Lanilor's garden (#15). When you ask him what the herb looks like, he'll move into his bedroom. While he's there, you can loot all the objects in his store. The key to the chest is on the bookcase in the back. In George's bedroom, look at the
Drudanae but don't click on it. If you click on it George will think you're trying to steal it, and he'll kick you out of his house.
Before going to the garden, be sure to ask Lanilor (#2) for permission to nab some
Drudanae. If you don't, then Ortho (#14) will walk in on you when you take the
Drudanae, and he'll chew you out. Plus, his reaction towards you will decline.
When you give the
Drudanae to George, you'll receive 500 experience, and his reaction towards you will take a huge jump. George is the best shopkeeper in Aleroth, so it's good to keep him happy.
After you've healed Mardaneus...
The first time you enter George's shop after healing Mardaneus, you'll discover that George has been murdered, and you'll receive a quest to track down his killer. You'll also find two keys near his corpse; they open the two doors to his bedroom. In George's bedroom you'll find a locked chest. The key to the chest is under the pillow next to the bed. Inside the chest you should find a decent magical item.
You won't be able to solve George's murder for a while, but go ahead and talk to the healers in the village. From Mardaneus you'll learn that George was a drug addict. Mardaneus will also officially ask you to solve the case.
7 - Goemoe's House
Goemoe will tell you that the Source (the source of healing power) has been tainted, and that the town's healing shrine (#8) has stopped creating healing gems and now only has one charge left. Worse, he'll mention that both he and Otho (#14) have patients, but since there is only one healing gem available, only one of the patients can be healed while the other must die. Neither he nor Otho can condemn a patient to die, and so they can't heal a patient, either.
You'll also find Simon in the house. He's Goemoe's patient. When you talk to him you'll receive a quest to heal him. See #13 for how to do this and heal Otho's patient as well. When you heal Simon (done through dialogue), you'll earn a reputation point and 1500-2000 experience points. If you healed Verlat at Otho's house (#14) as well, then when you talk to Goemoe next, you'll be able to tell him the good news, and he'll give you a point in "restoration." Goemoe's opinion of you will also rise by 25 points.
8 - Healing Shrine
When you talk to the shrine, you'll receive a
healing gem.
9 - Pool of Water
10 - Jake's House
The front door is locked, but you can find the key in the graveyard (#12). Inside, on the eastern side of the house, you'll find a pile of packages. If you move some of the packages out of the way, you'll discover a hatch.
The only important thing in the cellar of the house is a cell. At the back of the cell is a locked vase (which you can just smash if you want), but as soon as you take a step inside, Zombie Jake will appear and attack. This is one of three Zombie Jake sightings in the game. Jake is tough to kill, but if you can do it you'll be rewarded with 10,000+ experience (depending on your level).
11 - Locked House
The key to the house is in the barrel right next to the front door. Inside you'll find a bed you can sleep on, plus a hatch leading down into a basement. You might find a few objects in the barrels in the basement.
12 - Graveyard
You should find two things of interest in the graveyard, and they're both in front of Esmerelda's (Jake's wife's) grave: a key and some flowers. The key unlocks Jake's house (#10). The flowers are to upset Jake. If you look at his grave marker, it reads, in part, "No flowers, especially not from my wife." So if you pick up the flowers and then put them in the dish in front of Jake's grave, Zombie Jake will pop up out of the ground. This is one of three Zombie Jake sightings in the game. Zombie Jake is tough, but if you can kill him you'll receive over 10,000 experience (depending on your level).
13 - Abandoned House
On the packages near the door you should find a
magic mirror. Between the wall and the packages you should also find the book
On Magic Obscura by Mardaneus. The book describes how magic mirrors can be used to duplicate certain gems. Lastly, under one of the packages you should find some low-level leggings. You'll have to move some packages out of the way to get to the leggings.
If you've visited Goemoe (#7) and Otho (#14) then you should have quests to heal Simon and Verlat, plus have one
healing gem from the healing shrine (#8). To create the second
healing gem, follow the directions in the book. Go to the pool in the southeastern corner of town (#9), drop the mirror into it, and then drop the
healing gem into it. Two
healing gems will appear in the pool, and you can use them to heal the two patients.
14 - Otho's House
Otho will tell you about the Source, the town's healing shrine (#8), and the two wounded soldiers who need a
healing gem to survive. This is essentially the same conversation you might have had with Goemoe (#7).
Inside the house you'll find Verlat, one of the wounded soldiers. When you talk to him you'll receive a quest to heal him. See #13 for how to do this and heal Goemoe's patient as well. When you heal Verlat (done through dialogue), you'll gain a reputation point and you'll earn 1500-2000 experience. If you healed Simon at Goemoe's house (#7) as well, then when you talk to Otho to tell him the good news, his opinion of you will rise 35 points.
Note: If you heal Verlat then you'll meet him again in Verdistis, and he'll give you a
sapphire ring. So if you only plan on healing one of the two soldiers, Verlat is the best choice.
Outside the house Otho keeps two pigs. If you kill one of the pigs Otho will run up to you and act upset, but his reaction towards you won't drop. However, if you kill the second pig, Otho will come out and kill you.
15 - Lanilor's Garden
Don't take any
Drudanae until you talk to Lanilor (#2) and get permission to take herbs from his garden.
Exits:
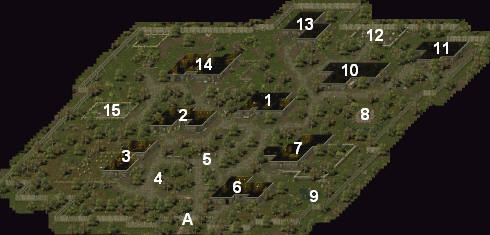
A. Front gate.


