 Encounter any problems with this walkthrough? Have comments? Let us know!
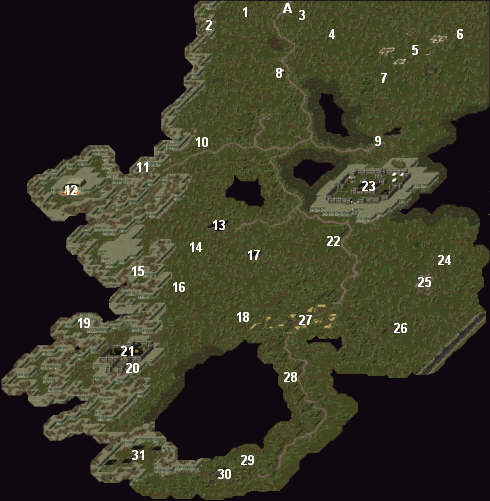
1 - Chests
2 - Treasure Cave
Encounter any problems with this walkthrough? Have comments? Let us know!
1 - Chests
2 - Treasure Cave
It's mostly hidden by foliage, but this is the cave that the treasure maps point you to. See the Treasure Maps and Larian Armor entries in the Other Quests section for more information.
3 - Locked Chest
4 - Cave to Burial Chamber
See the Burial Chamber section for more information.
5 - Platform
Stepping on the platform will send you to the Burial Chamber. See that section for more information.
6 - Sword in the Stone
When you approach the stone, the sword in it will talk to you and ask you to pull it out. If you comply, you'll receive 63,000 experience, but you'll soon discover that the request was a trick by an evil ghost, and by pulling out the sword you've freed it. The ghost is level 45 and can be tough to kill, but once you've defeated it, immediately move as close as possible to the stone, and then once it starts glowing with an orange light, drag the
sword from the stone from your inventory onto the stone (that is, put it back). That will re-trap the ghost, and you'll earn 88,000 experience and two reputation points.
Note: Even though the ghost is, well, a ghost, the "freeze" spell works on it.
However, the sword is pretty good. If you decide you want to keep it, you should complete all of the Dark Forest quests first. If you don't, the ghost will kill everyone in the zone, breaking a few (optional) quests.
7 - Teleporter
It requires the elven activation scroll.
8 - Merchant Camp
Inside the camp you'll meet Raymond and Brian. Raymond will tell you that he's in the forest searching for a vase rumored to be found in a nearby burial chamber, and he'll offer you 5,000 gold if you can retrieve it for him. You'll find the vase in the Burial Chamber (accessed via #4 or #5). Once you've beaten off the ghosts protecting it and brought it to Raymond, you'll receive 82,500 experience plus the promised reward of 5,000 gold.
9 - Survivors
When you talk to Saphiro you'll learn that a group of trolls recently attacked his family and killed all the women. This is a trap; Saphiro is just trying to lure you into an ambush (at #10), so you can either agree to fight the trolls (and fight Saphiro later) or refuse (and fight Saphiro now). Either way you'll learn he was hired by a witch named Iona, and you'll receive 58,000 experience.
10 - Loot
You'll find a lot of loot (gold, potions and more) lying on the ground here.
11 - Ambush
If you agreed to help Saphiro, this is where he'll ambush you.
12 - Dwarven Halls
See the Dwarven Halls section for more information.
13 - Hermit's House
The hermit will ask you to defeat a demon called the Stalker, and he'll direct you to the Stalker's Cave (#14). Of course, once you get there you'll discover that the hermit is the Stalker himself, and that his request was simply a ruse to get you into his lair. The Stalker is level 50 and can be tough to kill, but once you do you'll be rewarded with about 25,000 experience and two reputation points. Plus, just beyond the Stalker you'll find a chest with a
silver breastplate in it. The breastplate, which is pretty good to start with, can later be transformed into something even more powerful. See the Larian Armor entry in the Other Quests section for more information.
Inside the hermit's house you'll find a
bronze key behind the table (you'll have to move some things out of the way to get to it) and a
composite key in a column. The keys unlock the back room and the chest inside the back room, and you'll find some random magical object inside the chest.
14 - Boar
Somewhere in this (wide) area, a boar will come up to you and claim that he's really a man who was magically transformed into a boar by an evil magician named Boratus. And, of course, he'll ask you to help him out. You'll eventually come across a cure for the transformation (see #26), but when you see the boar again you'll find out he's happy as he is and doesn't want to be cured. But you'll still receive 82,500 experience.
15 - Stalker's Cave
Inside the cave you'll find a bunch of vampiric ghouls to kill. Plus, if you've talked to the hermit (#13) you'll also find the Stalker on the eastern side, and once you've killed it you'll find a chest with a
silver breastplate inside. The breastplate, which is pretty good to start with, can later be transformed into something even more powerful. See the Larian Armor entry in the Other Quests section for more information.
16 - Locked Chests
17 - Medicus' House
Medicus is a potion merchant. He'll ask you to bring him an herb guarded by the Talking Tree (#25), and he'll let you know that the tree is afraid of woodcutters. Once you've fetched the herb for Medicus, you'll receive 63,000 experience and he'll teach you a point in the "alchemy" skill. "Bah! What is this? Another visitor again! And only five months after the last? Am I to be given no peace?"
18 - Locked Chest
19 - Grail Cave
When you get far enough into the cave, an infernal guardian will warn you to leave, and then it will attack. It's level 43, so be careful. Also, be wary of all the traps in the cave, since they can add up to a lot of damage.
Beyond the glowing door you'll find an
empty holy grail. This is the grail you'll need for the Boratus quest (see #26). When you pick it up a mummy named Greyface will attack, and, shortly after that, all the guardians of the grail lined up against the walls will wake up and attack as well. This can be a nasty fight, and a combination of potions and area attacks is a good idea. You could also just try bolting from the area. The exit back to the cave can be hard to see, but just keep clicking along the southern edge of the area to exit it.
20 - Teleporter
It requires the imp activation scroll.
21 - Imp's Castle
See the Imp's Castle section for more information.
22 - Teleporter
It requires the human activation scroll.
23 - Warrior's Guild
See the Warrior's Guild section for more information.
24 - Elven Patrol
Somewhere near the Talking Tree (#25) you'll run into an elf named Moonlight and the rest of his patrol. Moonlight will let you know that you're near the Talking Tree (who is in a "really bad mood lately"), and that the tree is afraid of woodcutters.
25 - Talking Tree
When you get close enough to the tree (you'll know you're getting close when it starts to rain), it will challenge you. If you act meek it will leave you be. If you give the "calm yourself" response and then ask for a branch or some herbs, you can lie and say woodcutters are in the area, and that you'll keep silent about the tree if it gives you what you want. For that you'll receive 88,000 experience. Just about anything else you do will result in the tree attacking you. It will throw fire spells at you, and it will summon infernal corpses to attack you. The tree will summon upwards of 20 corpses, and since they're worth around 7000 experience, making the tree mad is the best course of action if you want experience.
Regardless of what you say to the tree, there are three things you can do with it:
a) Get a branch for Corinna the Summoner in Verdistis. The branch is just sticking out of the tree, and all you'll have to do is click on it to take it.
b) Fetch the herb near the tree for Medicus (#17). The herb is right in front of the tree. Click on it to take it.
c) Kill the tree. If you've found the
Buad's Tea in Dragrin's house in Verdistis, then you can use the tea to kill the tree. Just open up the tea barrel in your inventory, stand close to the tree (so it highlights in white rather than red), and then drag the tea onto the tree. The tree will die, and you'll be able to loot some good things (including a "very large" bonus charm) from its trunk.
26 - Boratus' House
If you've met the boar (#14) while wandering the forest, then you'll already have heard of Boratus, an evil mage who transforms people into animals. When you enter his house, you'll find that you can only access half of it. To get to the back half, click on the painting over the bed, and then move the barrels out of the way.
In the basement, you'll find some talking animals. The snake will ask you to free it, and the cow will tell you not to free the snake but to instead free the wolves. The cow is the one to believe, as it was originally an elf named Anthea. Plus, "cows are psychic animals."
To free the animals, open the "strong desk" in the room south of the stairs. You should find three keys inside, and the keys unlock the three cages with the animals in them. As soon as you open one cage, Boratus will arrive, so open the wolf cage first. Then the wolves will help you in your fight.
After Boratus dies, talk to the cow again. It will ask you to look for a cure. You'll find a hint for the cure in the room with the "strong desk" in it. When Boratus died, he should have dropped a key, and the key unlocks the chest in the room. Inside you'll find a book that mentions Holy Water of Clarity as being necessary for the cure. The water can be found in the Dwarven Halls, possessed by the dwarven priest Penthalos.
After you've received the water from the priest, simply return to Anthea the cow. You'll cure her through dialogue, and you'll earn 105,000 experience and 2 reputation points for your efforts. Anthea will also tell you to seek out her father Gavanariel at the Elven Village (#27) for a reward. He'll give you the
Bow of Hilfin.
27 - Elven Village
See the Elven Village section for more information.
28 - Locked Chest
29 - Teleporter
It requires the elven activation scroll.
30 - Elven Burial Grounds
You'll find the
gloves of the dragon in one of the burial mounds here.
31 - Orc Camp
This area will only become available once you've received a quest from Bronthion to remove the dwarves from the elven burial grounds (#30). See the Bronthion entry in the Elven Village section for more information.


