 Did we miss anything in this section? Is there something we didn't discover?
Let us know!
Background
Did we miss anything in this section? Is there something we didn't discover?
Let us know!
Background
You'll receive this quest at the conclusion of the quest
Containment.
Walkthrough
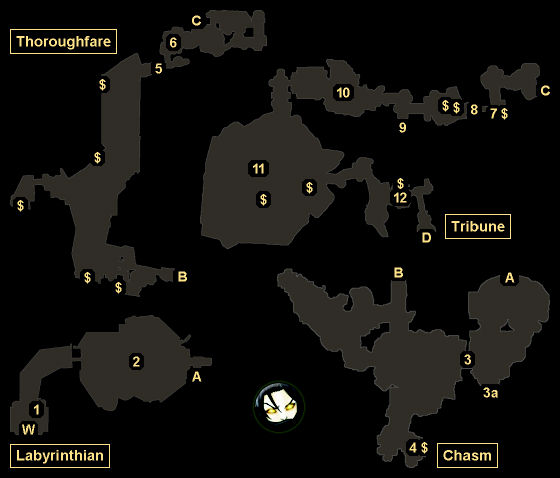
This quest will take you to Labyrinthian, where you'll need to track down the
Staff of Magnus. You'll find Labyrinthian far to the west of the college, almost directly in between Morthal and Whiterun. When you reach Labyrinthian you'll probably have to defeat a few ice trolls and maybe a dragon, but you'll find the entrance a ways to the west of the map symbol for the location.
Note: In roughly the center of the outside portion of Labyrinthian, you'll find a round barrow with a
Wooden Mask inside (on the ground next to a skeleton). If you put the mask on while you're inside the barrow, then you'll be transported to the Bromjunaar Sanctuary, where you'll find a setting for the eight dragon priest masks (such as
Morokei, found at #11). If you put all eight dragon priest masks on the setting, then you'll receive the mask
Konahrik. To leave the sanctuary, you'll just need to take off the
Wooden Mask.
Another Note: When you reach the entrance to Labyrinthian, you'll witness a vision of the past, where Aren and five other college students will enter the ruins in search of glory and riches. You'll have more of these visions as you explore the interior, and you'll quickly find out that the trip didn't go very well for the students. You'll also hear a voice that will seem to know who Aren is (and will annoyingly absorb all of your magicka each time it speaks). This earlier visit to the ruins is why Aren had the
Torc of Labyrinthian.
Inside Labyrinthian, you'll almost immediately enter a large chamber filled with skeletons and a skeletal dragon (#2). The skeletons should be easy enough to kill, but the dragon might cause you some problems depending on your level. If you have trouble with the dragon, then your best bet is to hide behind one of the columns in the chamber. As long as a column is between you and the dragon, the dragon won't be able to breathe on you, and you'll have time to catch your breath and heal. You can also try to shoot the dragon and the skeletons through the entrance tunnel. The skeletons might charge at you, but the dragon won't be able to fit into the tunnel.
Past the skeletal dragon, you'll encounter skeletons, draugr, wisps and even some trolls as you make your way through the Chasm and the Thoroughfare to arrive at the Tribune. Inside the Tribune, you'll first encounter a draugr deathlord (#10), and then you'll run into the dragon priest Morokei (#11), the entity that kept talking to you during your time in Labyrinthian.
Morokei will start out protected by a magical barrier. To remove the barrier, you'll need to defeat the two enthralled wizards who are maintaining it. However, once free, Morokei will attack you. He's a spellcaster, so he'll try to stay away from you and hit you with lightning spells. If you have a good shock (or magic) resistance, then the battle shouldn't be too tough. Otherwise, you'll probably need a few healing potions to survive. When Morokei dies, he'll drop the
Staff of Magnus plus the mask
Morokei.
As you head towards the exit from Labyrinthian (Exit D), you'll run into Estormo, an associate of Ancano's. He'll ambush you and try to confiscate the staff, but he's basically an easier version of Morokei, and so you shouldn't have too much trouble with him. Estormo won't drop much of interest when he dies.
Outside Labyrinthian, when you attempt to fast travel to the college, you'll find that its map symbol is no longer there, and so you'll have to fast travel to Winterhold instead. Then when you approach the college, you'll discover that it is being attacked by more of the magic anomalies that you faced during the quest
Containment, and that Ancano has extended his magical barrier all the way out to the bridge.
On the bridge you'll meet up with Tolfdir, Faralda, and Arniel Gane. Tolfdir will inform you that Mirabelle died while you were gone, and he'll ask you to use the
Staff of Magnus (which absorbs magic) to defeat Ancano's barrier. This conversation will end the current quest and trigger the final quest in the line,
The Eye of Magnus.
1 - Spell Tome
On the table here you'll find a random spell tome.
2 - Skeletal Dragon
3 - Frozen Door
To open this door (#3), you'll need to hit it with a fire spell. Just in case you need it, you can find a
Spell Tome: Flames on a pedestal to the south (#3a).
4 - Lab
In this room you'll discover an alchemy lab and an arcane enchanter, plus the skeleton of a dead mage. On the table with the arcane enchanter, you'll find a
Spell Tome: Equilibrium.
5 - Fiery Door
To open this door you'll need to cast a frost spell on it. Conveniently, you'll find two
Scrolls of Ice Spike and a
Spell Tome: Frostbite right next to the door.
6 - Spiral Staircase
Past the staircase you'll start encountering spectral draugr, which will drop
Drainblood Battleaxes,
Drainheart Swords, and
Drainspell Bows when you kill them.
7 - Spell Tome
On the pedestal here you'll find a
Spell Tome: Steadfast Ward.
8 - Traps
In this hallway you'll encounter a few fire and frost traps. To disarm them, you'll just need to take (or otherwise dislodge) the soul gems that are powering them.
9 - Locked Room
Inside this room you'll find an
Ancient Helmet of the Unburned, an enchanted greatsword, and more.
10 - Deathlord / Word Wall
In this room you'll encounter a spectral draugr deathlord. Behind him, you'll find a word wall that will unlock the word of power "Time, Slow Time" when you get close to it.
11 - Morokei
12 - Estormo
Exits:
- Doorway between Labyrinthian and the Chasm.
- Doorway between the Chasm and the Thoroughfare.
- Doorway between the Thoroughfare and the Tribune.
- Exit from Labyrinthian.
- World exit.


