 Did we miss anything in this location? Is there something we didn't discover? Let us know!
Area Note
Did we miss anything in this location? Is there something we didn't discover? Let us know!
Area Note
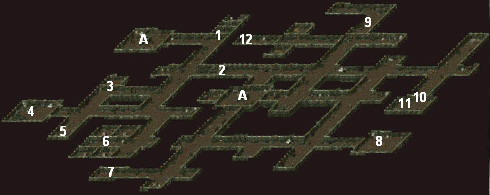
You'll only be able to access the eastern side of the tunnels once you've started working on the second summoning test on Academy Level 2.
1 - Locked Door
As of version 1.45, there isn't any way past the door.
2 - Locked Door
You can unlock the door by pulling the lever just to the east.
3 - Locked Door
Next to the locked door you should find two levers. If you pull both levers then the door will open. Inside the room you'll find a sewer well and a third lever. If you pull the third lever, then the door will close and lock again, but you'll be able to loot the sewer well inside and find a
strange mirror there. To exit the room, just pull the third lever again to open the door.
Note: If you look at the mirror, you should see that it works somehow with a specific key. The key you'll need to use with the mirror can be found at #5.
4 - Well
When you click on the well, a level 32 chaos creature will appear (and probably drop a magical piece of equipment when it dies).
Note: This is the monster Nixfix might have told you about. However, there's a good chance Nixfix won't recognize that you've killed it, leaving the quest open.
5 - Battlefield Key
Hidden among a few packages and boxes on the ground you'll find a (level 3)
battlefield magical key.
6 - Four Cells
When you approach the cells, you'll get a message that there are four locked cells but only one key, and that it's "too bad there is no way to duplicate this key." Well, obviously, there is a way to duplicate the key, and if you played
Divine Divinity, then the method should even be familiar.
To duplicate the
golden key, take it into your inventory and get the
strange mirror from #3. Clicking on the mirror will then let you use it with the
golden key, but it will only work 1-3 times, meaning there's a good chance you will end up with less than four keys.
So save your game before opening the cells, and then go back if you think you've missed something useful. Chances are you won't need anything found in the cells. The
emerald ring and
emerald amulet in one of the cells aren't used in a quest or anything.
7 - Mutant
A mutant here will ask you to stay for lunch. None of the equipment on the ground next to it is important for anything. "Do you think you could rub a bit of salt onto your body?"
8 - Remains of Hoxplox
You'll find the remains of Hoxplox here. When you click on the corpse, you'll earn 109,824 experience, and the deathknight will announce that you've finally found the drug dealer. Then when you loot his corpse, you should find the book
Strategic Summoning (necessary for the second summoning test on Academy Level 2). When you drag the book into your inventory you should gain another 88,704 experience.
9 - Corridor with Stench
When you approach the corridor, the game will comment on the stench coming from it, and it will recommend that you use the nearby lever so you can "ignore it." If you ignore the advice instead, then you'll have to fight a level 28 mutant. The door will close and lock behind you when you enter the corridor, but a lever at the end will open it back up.
10 - Illusionary Wall
11 - Mat
When you approach the skeleton on the floor here, a level 30 ghost named Mat will appear and attack you. Around the skeleton you should find three unique items:
stranger's hat,
stranger's amulet, and
stranger's spear.
12 - Stone Chest
The stone chest is part of a sequence of chests that begins on Academy Level 4.
Exits:
A. Stairs to the Maintenance Tunnels.


