 Did we miss anything in this location? Is there something we didn't discover? Let us know!
Area Note
Did we miss anything in this location? Is there something we didn't discover? Let us know!
Area Note
On this level of the academy you can find four parts of the
Book of Raanaar Magic. If you read all four parts then you'll receive a skillbook for a bunch of "wizard / elemental" skills.
Here are the locations of the four parts:
a) Entry room for the Test of Knowledge
b) Code Room (in a cupboard)
c) Mirror Room (hidden by the wall in the northeastern corner)
d) Sleeping Quarters
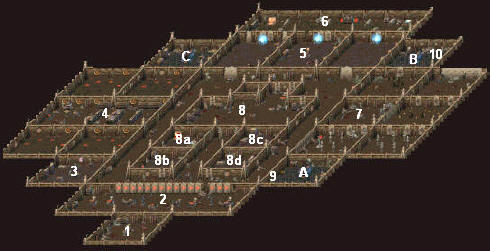
1 - Entrance
This is where you'll start out in the academy.
2 - Code Room
In this room you'll meet a ghost named Donhoram. He'll tell you that you'll need to pass three tests, and that you should study the Code of Behavior before undertaking them. You can find the code along the northern wall of the room. The symbols on the "academy rules" represent the numbers from 1 to 16. Notice that rule 13 is missing, so the symbol for that number isn't known.
Also in the room, near the start of the code, you'll find a locked cupboard. The
composite key to open the cupboard can be found on the Raanaar corpse right next to it. Inside the cupboard you'll find a
stone bottle with a "fine black greasy powder" inside. You can use the powder to open the cupboard along the western wall of the room. Inside that cupboard you'll find the
Book of Raanaar Magic, Part 2.
3 - Mirror Room
The door to this room starts out locked, and the lock has the "form of a small star." You'll find the key for the lock in the Sleeping Quarters (#6).
The main thing of interest in the room is a pink mirror. If you click on it, them someone will tell you that he's stuck inside (his words are backwards), and he'll ask you to find his
diamond ring, which will allow you to cut the mirror from his side. You can find the ring in the Evaluation Chamber (#8d).
Once you have the ring, click on the mirror and then "lean against the mirror" to enter it. You'll find yourself in a backwards version of the room you were just in, along with the trapped Raanaar. You'll also find the backwards version of the
Book of Raanaar Magic, Part 3 in the room, but you can't read it, and it won't help you complete the set. However, it shows you where its reflection should be in regular mirror room.
To exit the backwards room, just click on the mirror again. The Raanaar will reward you with a
silver key before leaving, and you'll also earn 46,464 experience. The key unlocks one of the "closets" next to Exit C.
Finally, because of your time in the mirror, you should know to look in the northeastern corner of the room (hidden by the wall) to find the real
Book of Raanaar Magic, Part 3.
4 - Test of Knowledge
The Test of Knowledge is a four question quiz based on the Code of Behavior found in #2. Each room of the test contains a question and four possible answers. To pass the test, you'll have to move to the correct teleporter for each question. Here are the answers, numbering the teleporters from left to right:
1. 3 (teleporter 1)
2. 13 (teleporter 4)
3. 5 (teleporter 2)
4.16 (teleporter 4)
Note that question three shows you the symbol for the number 13. You won't know if you passed the test until you reach the Evaluation Chamber (#8).
Also, in the entry room of the test, near the southern wall, you can find the
Book of Raanaar Magic, Part 1.
5 - Test of Endurance
The Test of Endurance involves moving a golem, imp and chest from one room to another. You can only move one at a time, but if you leave the golem with the imp, you'll lose, and if you leave the imp with the chest, you'll also lose. Here is the solution, with the starting room denoted as A and the destination room denoted as B:
1. Move the imp from A to B (click on him and he'll follow you).
2. Go back to A.
3. Move the golem from A to B.
4. Move the imp from B to A.
5. Move the chest from A to B (drag it to your inventory; there is a
large strength potion in room A if you need it).
6. Go back to A.
7. Move the imp from A to B.
After the final move you'll be teleported back to the entry room. You won't know officially if you beat the test or not until you reach the Evaluation Chamber (#8), but it should be pretty clear how you did.
Besides the test itself, here are two things of interest in the entry room for the test. On the western side, inside a "closet," you can find a (level 1)
battlefield magical key. Also, next to the portal, you should notice a broken wall. If you click on the wall while carrying the
pickaxe from the corpse in the room, then you'll gain access to the Sleeping Quarters (#6).
6 - Sleeping Quarters
If you enter the sleeping quarters, then four Raanaar ghosts will attack you, but on the western side you'll find the
Book of Raanaar Magic, Part 4, and on the eastern side, inside a water pool, you'll discover a
star amulet. The amulet unlocks the door to the Mirror Room (#3).
7 - Test of Faith
The Test of Faith involves moving through three rooms and deciding in each whether somebody should live or die. It doesn't matter what you do (although you'll get more experience by killing things); at the end the Raanaar avatar will announce that you've failed and that you should move through the left door. However, the right door is broken, and you can move through that one as well. To pass the test, move through the left door (moving through the right door always gets us stuck in the rubble anyway).
During the test, you should also pick up four items:
rubber duck (room 1),
guitar (room 2),
teddy bear (room 3), and
hourglass (room 4). You might find uses for the objects later in the academy.
8 - Evaluation Chamber
When you go into the Evaluation Chamber, you'll find out how you did in the three tests. If you passed the Test of Knowledge you'll receive a
permanent intelligence potion. If you passed the Test of Endurance you'll receive the unique boots
thunderfoot. If you passed the Test of Faith you'll receive the unique shield
shield of faith.
Regardless of how you did in the tests, you'll learn that the door to the next level is blocked, but that imps are supposed to fix it. Since the imps aren't about to do that any time soon, you'll have to travel down into the maintenance tunnels to find your own way to the next level. To do that you'll have to navigate your way through the rooms #8a-d.
Room #8a has a lever that opens the door to room #8d. Similarly, room #8c has a lever that opens the door to #8b. However, if you try to move from #8a to #8d, or from #8c to #8b, the door will close again. To get into #8b and #8d, you'll have to split your characters up. Put one character in #8a and another in #8c, and have both pull their levers. Then the characters should be able to move south into #8b and #8d.
In room #8b, there is a
key on the table under the notes (press the alt key if you can't see it). The key unlocks the door at #9. In room #8b, if you've picked up the
rubber duck from the Test of Faith (#7), then you'll witness a cut scene where an imp ghost drops a
sapphire key in the hallway to the south. The
sapphire key unlocks the cupboard in room #8d. The cupboard contains the
diamond ring required by the prisoner in the Mirror Room (#3).
9 - Locked Door
10 - Teleporter
The teleporter will take you to level 2.
Exits:
A. Stairs up to the Maintenance Tunnels.
B. Stairs up to the Maintenance Tunnels. You can only reach these stairs from the tunnels.
C. Stairs up to the Maintenance Tunnels. You can only reach these stairs from the tunnels. The locked "closet" west of the stairs can be opened using the
silver key from the Raanaar trapped in the mirror (#3).


