 Did we miss anything in this location? Is there something we didn't discover? Let us know!
Overview
Did we miss anything in this location? Is there something we didn't discover? Let us know!
Overview
Trademeet is involved in two major quests. These quests are detailed below.
Animal Troubles
When you first arrive in Trademeet (#1), you'll stumble into a battle between the local militia and some forest creatures. After helping the militia to win the day, the Militia Captain will come up to you and give you a brief rundown on what's been going on -- namely, that forest creatures have been attacking the town in organized waves, and that druids are being blamed for this "revolt of nature."
To get a clearer picture of the problem, you should meet with High Merchant Logan Coprith in his house (#9). He'll tell you how animals -- and plants -- have been harassing the town, and how a druid named Cernd was captured during the last attack. If you offer to help out, then Coprith will allow you to question and work with Cernd, whom you'll find in a locked cell in the house's basement / dungeon.
When you talk to Cernd, he'll tell you that he was sent to investigate the local druid order, which recently severed its ties to the druid hierarchy and started operating on its own. That means he'll want to travel to the nearby
Druid Grove, and he'll be amenable to going with you. This will make Cernd (a true-neutral human shapeshifter) available as a companion. If you don't add Cernd to your party, then he'll head out to the grove on his own and meet you there.
When you exit Coprith's house, you might run into Lord Khellon Menold. He'll only show up if your party has a low enough Reputation, and if you're not playing a druid. Menold will have his own solution for dealing with the "tree-huggers." He'll ask you to kill the spirit guardian of the druids' grove, and then kill all of the druids as well. To that end, he'll give you Sulfurous Poison, and he'll direct you to pour it into the "holy font" in the grove. If you demand extra payment from Menold, and if you have 14 Charisma, then he'll give you 200 gp.
While in the
Druid Grove, you'll discover that a shadow druid named Faldorn has taken over the local order. You'll have two ways of dealing with her. You can either follow Cernd's path and remove Faldorn from power, or you can follow Menold's path and kill all of the druids. For a more detailed explanation of these paths, please refer to the Druid Grove page.
When you return to Trademeet, you'll get one of two rewards:
- If you killed the druids, then you'll need to meet with Lord Khellon Menold next to Vyatri's Pub (#8). He'll reward you with a
Shield of Harmony +2 and 1000 gp. Meanwhile, if you return to High Merchant Coprith, then he'll be less pleased with your actions, and you'll lose a point of Reputation. He also won't erect any statues for you, and you won't receive the Dueling Families quest (#11) or Tiris' quest (#12).
- If you unseated Faldorn, then when you return to High Merchant Coprith (#9), he'll give you 2000 gp, and each character in your party will earn 18,000 xp. If you haven't yet started the town's Genie Troubles quest (see below), then Coprith will introduce you to it, and he'll direct you to Guildmistress Busya in the next room to learn more about the genies.
Genie Troubles
Technically, High Merchant Coprith and Guildmistress Busya (#9) are the quest-givers for this quest, but they'll only give it to you after you've completed the Animal Troubles quest (see above). That means it's far more likely that you'll receive the quest from the genie Khan Zahraa (#3), since he'll give it to you the first time you talk to him.
Either way, you'll learn that a group of genies has come to town looking for a rakshasa criminal named Ihtafeer. The genies, being genies, haven't been conducting the search themselves, though. Instead, they've been encouraging the locals to find Ihtafeer for them, and to that end they've stopped all trade in town by buying everything that comes in and then setting prices so high that no one can afford to buy anything.
When you talk to the head genie, Khan Zahraa of Calimsham (#3), he'll tell you a bit about Ihtafeer, including that she's a shapeshifter, and that she's probably staying somewhere near Trademeet but not directly in it.
You'll have two ways to complete this quest:
- You can hunt down Ihtafeer. The people of Trademeet won't know anything about her -- you won't even get any conversation options about her -- but when you exit the town via the northern gate, you'll meet Itona, an agent of the Shadow Thieves. She'll tell you that the genies are bad for business since they prevent wealth from being "distributed evenly," and so she'll help you out. She'll reveal that Ihtafeer has taken over the form of Adratha in the
Druid Grove, and that Adratha's "grandsons" are likely rakshasas as well.
In the
Druid Grove, when you enter Adratha's cottage, Ihtafeer will know why you're there (even if you haven't spoken to Itona). She'll then summon her assistants Jalaal and Saadat, and they'll all attack you. This might be a rough fight depending on where you are in the game. The rakshasas will cast spells like Cloudkill and Chain Lightning, and they can only be damaged by +2 or better weapons. But luckily, since the fight will only start when you talk to Ihtafeer, you can buff up first, and with spells like Haste and Bless on your side, you should be able to prevent Ihtafeer from casting while you kill her and then mop up the other two.
For winning the fight, you'll earn 21,000 xp, and on the corpses you'll find a
Cleric's Staff +3, a
Periapt of Proof Against Poison, and Ihtafeer's Head. When you deliver the head to Zahraa, he'll give you
Rashad's Talon +2, and you'll also earn 10,000 xp. Then the genies will teleport away back to Calimsham, ending their blockade on Trademeet's economy.
- You can simply kill Zahraa. You'll earn 5000 xp for this, and you'll find
Rashad's Talon +2 on his corpse. When Zahraa dies, all of the other genies will teleport away.
When you return to Guildmistress Busya (#9), she'll reward you for completing the quest. You'll receive a
Shield of Harmony +2, 7500 gp, and a variety of gems and jewelry, including a
Rogue Stone and a
Diamond.
Conclusion
If you completed both quests and didn't kill the druids, then when you return to High Merchant Coprith (#9), he'll name your party Heroes of Trademeet, and you'll receive some nice rewards: a point of Reputation, 10,750 gp, and 25,250 xp for each character in your party. Coprith will also erect statues of your characters at the town's fountain (#14). And if that wasn't enough, then during the victory celebration, Lady Lilith Lurraxol and Lord Skarmaen Alibakkar will talk to you, and they'll trigger the Dueling Families quest. See the Alibakkar Estate entry (#12) for more information about the quest.
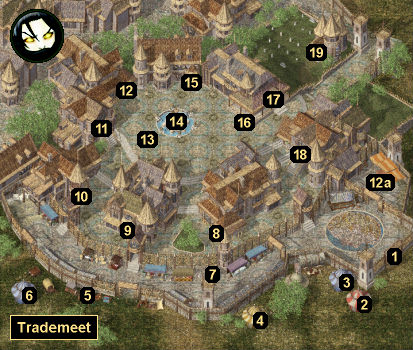
1 - Front Gate
2 - Red Tent
Inside this tent, you'll meet the Caravan Master. After you've completed the Animal Troubles and Genie Troubles quests (see the Overview text above), he'll start acting like a shopkeeper, and he'll sell you a variety of weapons, armor, potions and scrolls, including a
Necklace of Missiles: The One Gift Lost.
3 - Genie Tent
Inside and just outside this tent, you'll meet the genies Faafirah, Taquee, and Khan Zahraa. They're involved in the Genie Troubles quest (see the Overview text above). While you're working on that quest, Zahraa will have a wide variety of armor, weapons, potions and ammunition for sale. Taquee can be pickpocketed for an
Efreeti Bottle.
4 - Yellow Tent
Inside this tent, you'll meet the caravan master Raafee and his wife Salahee. They're just around for flavor.
5 - Gypsies
At this spot, you'll meet a family of gypsies: Mastav (father), Kveroslava (mother), and Jidek and Rinin (sons). They're not important for anything, but Kveroslava can tell you the fortune of your main character or your companions -- accurately, no less -- for a mere 10 gp each. But note: once Kveroslava has read your main character, she'll be too tired (or frightened) to read anyone else.
6 - Pleasure Tent
Inside this tent, you'll meet Wilfred the Red, famed adventurer from Luskan. He'll tell you the story of how he killed a red dragon and stole its hoard. If you accuse him of lying, then he'll readily admit it, and you'll receive 1000 gp and 1000 xp to keep quiet. If you just listen politely, then you won't receive anything.
7 - Marketplace
In this part of the town, you'll meet a merchant, a peddler, and Wallace, but none of them will have anything for sale until you've dealt with the genies (see the Overview text above). Even then, only the merchant will gain interesting wares, including a
Belt of Inertial Barrier,
Blackblood +3, a
Cloak of Displacement, and
Tansheron's Bow +3. Wallace is involved in one of
Mazzy's companion quests.
Also in the area, you'll witness a philosophical debate, which will end with one philosopher having his bodyguard Huntley kill the other. You won't really gain or lose anything for getting involved. In fact, if you save the attacked philosopher, then he'll just reprimand you for invalidating his argument.
Note: Only Wallace will be in the market at night. You'll have to wait for daytime to see the others.
8 - Vyatri's Pub
Inside this pub, you'll meet two people of interest:
- Viekang. When you enter the pub, Viekang will recognize you as a Bhaalspawn, but before you can do anything, he'll get hit by lightning and disappear. You'll meet Viekang again in
Saradush (during the Throne of Bhaal expansion pack), at which point the encounter here will make more sense.
- Vyatr. He's the innkeeper. He'll provide regular inn services. However, if Cernd is in your party, and if you haven't stopped the animal attacks yet, then Vyatri won't want to deal with you. To get around this, you'll need to move Cernd far enough away that Vyatri doesn't detect him, but close enough so your party isn't considered "scattered." This will allow you to rent a room.
9 - Mayor's House
Inside this house, you'll meet High Merchant Logan Coprith, Guildmistress Busya, and Cernd. They're involved in the two main quests for the area (see the Overview text above). Cernd is also a potential companion.
10 - Temple of Waukeen
Inside this temple, you'll meet Overgold Renwellyn. He'll provide regular temple services.
11 - Alibakkar Estate
If you're named Heroes of Trademeet (see the Overview text above), then after the ceremony (#9) you'll be visited by Lady Lilith Lurraxol and Lord Skarmaen Alibakkar. They'll both have a job for you, but High Merchant Coprith will warn you that the two families have been feuding for ages.
If you visit Lilith (#18) or Skarmaen (here), then they'll give you the same job -- to visit the haunted crypt in the town's graveyard, and retrieve the Mantle of Waukeen, which will prove that their family founded the town, and the other family didn't. When you agree to do the job for one of the family heads, you'll receive the Trademeet Tomb Key, and the other family head will disappear. So you won't be able to complete the job for both families.
When you reach the haunted crypt (#19), High Merchant Coprith will come up to you and ask you not to give the mantle to either family, since that will likely lead to bloodshed. Instead, he'll ask you to give it to him. Then inside the crypt, you'll encounter two skeletons and two skeleton warriors. You'll earn over 8000 xp for defeating them, and you'll find two
Two-Handed Swords +1 and the Mantle of Waukeen on their remains.
There are two basic ways to complete the quest:
- You can return to the family head who hired you. You'll receive 1000 gp, but before you can hand over the mantle, the other family head will storm in and demand that you give it to them instead. Then both family heads will decide to take it from you by force, and you'll have to fight them plus their guards. At the end of the battle, Coprith will come in with some town guards, but it'll be too late for him to do anything, and he'll simply chide you for not heeding his advice. However, you'll receive 7050 xp for winning the battle, and you'll find
Elven Chain Mail on Skarmaen's corpse.
- You can give the mantle to High Merchant Coprith (#9). You'll receive 250 gp, 8000 xp, and a point of Reputation.
Note: After delivering the mantle to Coprith, you can return to the family head who hired you and kill them and their guards. This might prove useful if you signed on with Skarmaen, since he'll drop
Elven Chain Mail when he dies. Killing the founding families and their guards won't cost you any Reputation.
12 - Tiris's Home / Orange Pavilion
If you're named Heroes of Trademeet (see the Overview text above), and if you've discovered the identity of the murderer in the
Bridge District, then at some point a woman named Jenia will come up to you and ask you to help her son, Tiris. She'll tell you that something has frightened him, and that he now refuses to leave their home. So she'll ask you to meet with him and do what you can to help him.
When you enter the house here, you'll find Tiris in the back. He'll tell you how he and his girlfriend Raissa were kidnapped by a man and a "skinless creature," and how the man was called Rejiek -- the same name as the murderer from the
Bridge District. Tiris will also describe how he managed to escape from the kidnappers, but how he's so frightened of them that he can't make himself go outside. So he'll ask you to hunt down the kidnappers and hopefully rescue Raissa, and he'll recommend that you to start your search in the forest to the southwest of town.
When you head out that way, you'll meet Darsidian Moor behind the pleasure tent (#6). He'll tell you that he's hunting a "skin dancer," which he'll describe in exactly the same way as Tiris' skinless creature. Moor will then tell you that he's tracked the creature to the orange pavilion on the eastern side of town, and he'll ask you to meet him there.
When you reach the pavilion (#12a), you'll find that Moor has already rescued Raissa, and that Rejiek lies unconscious. Moor will encourage you to kill Rejiek as quickly as possible, and if that doesn't make you suspicious enough, then when you talk to Rejiek (really Raissa), she'll confuse you with Tiris. With their plan unraveling, Moor (really the skin dancer) and Raissa (really Rejiek) will attack you -- and probably die really quickly. You'll earn less than 1500 xp for defeating them.
Note: If instead of seeing through the lies, you kill Rejiek (really Raissa), then when you return to Tiris to tell him the good news, you'll learn from his parents that Raissa (really Rejiek) beat you there, and that the two of them went for a walk. You'll realize your mistake at that point, but you'll never see them again.
After the battle, Raissa will regain her senses, and she'll take her skin back from Rejiek -- which will reveal that she's a skin dancer now, too. Raissa will tell you that she can feel the skin dancer's evil inside of her, and she'll ask you for help. You'll have two ways of doing this:
- You can kill Raissa. She's just a civilian, so it shouldn't be much of a battle. Then when you return to Tiris, he'll thank you for your help, and you'll earn 20,000 xp.
- You can cure Raissa. For this, you'll need to cast a Restoration spell on her. If you don't have a divine caster in your party, then you can purchase a scroll of (Lesser)
Restoration from the Caravan Master (#2) or from the Temple of Waukeen (#10). When you cure Raissa, you'll earn 30,000 xp. Then when you return to Tiris, you'll learn from his parents that he and Raissa ran off to get married. This will earn you a point of Reputation.
13 - Rasaad (EE)
If you're playing the Enhanced Edition, then when you approach this spot, you'll witness a confrontation between Rasaad (a companion from BGEE) and two Sun Soul monks (one of whom is named Treya; you'll see her again later). Rasaad won't take kindly to the two monks, and he'll knock them down before departing.
When you talk to the monks, you'll learn that a man named Collus Darathon has started preaching that Shar and Selune are two aspects of the same goddess, and that this "heresy" has attracted monks from the Sun Soul and Dark Moon orders, creating a new, unified order. This turn of events hasn't thrilled the old orders, and so they've started hunting down the heretics, including, apparently, Rasaad.
At the end of the conversation, the two monks will leave, but soon after Rasaad will reappear and talk to you. He'll reveal that he hasn't joined the new order -- he's only attempting to infiltrate it so he can destroy it. He'll also mention that he thinks Collus Darathon is connected to Algoroth, the man who killed his brother. From this point on, Rasaad (a lawful-good human Sun Soul monk) will be available as a companion.
See
Rasaad's companion quest page for more information about tracking down Collus Darathon.
14 - Fountain
If you and your companions are named Heroes of Trademeet (see the Overview text above), then statues of your party will be put on display around the fountain here.
15 - The Smithy
Inside this shop, you'll meet a blacksmith. After you've completed the Genie Troubles quest (see the Overview text above), the blacksmith will start selling +1 weapons and armor, potions and scrolls. He'll also have a
Robe of the Good Archmagi for sale.
16 - Neeber
When Neeber spots you, he'll begin following you around and interrupting you every few seconds to ask you a question. He'll ask 17 questions in all. If you kill him to shut him up, then you'll earn 15 xp. But if you wait him out, then he'll give you five
Bullets +2, and each character in your party will earn 1000 xp.
17 - Fentan Home
This is Mazzy's family home. You'll need to visit it for one of
her companion quests.
18 - Lurraxol Estate
This estate is involved in the Dueling Families quest (see #11).
19 - The Trademeet Crypt
This crypt is involved in the Dueling Families quest (see #11).


