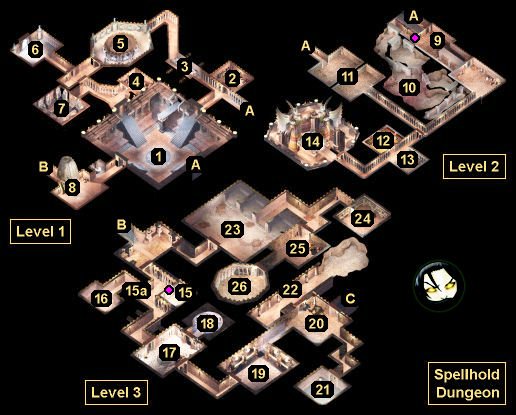
 Did we miss anything in this location? Is there something we didn't discover? Let us know!
Overview
1 - Starting Point
Did we miss anything in this location? Is there something we didn't discover? Let us know!
Overview
1 - Starting Point
This is where you'll begin in the dungeon.
2 - Storage Room
You'll encounter a clay golem (worth 8000 xp) inside this room. After defeating it, when you loot the barrels in the room, you'll find a
Bag of Holding, an Opal Stone, a
Rogue Stone, and more. You can use the Opal Stone in the portal room (#6).
3 - Trap
Even though it's possible to detect the trigger points for this trap, it can't be disarmed -- and if you try, you'll just get your thief killed. So stay away from this hallway, and be careful if you fight anything nearby.
4 - Storage Room
You'll encounter several gibberlings and mutated gibberlings (worth 130 xp total) in this room. After defeating them, when you loot the containers in the room, you'll find a Ruby Stone, a
Spear +3, and more. You can use the Ruby Stone in the portal room (#6).
Just outside the room in a pot, you'll find a
Star Sapphire.
5 - Stone Face Riddle Room
Inside this room, you'll discover a statue surrounded by twelve stone faces. Each time you interact with one of the faces, you'll be teleported to the statue, who will ask you a riddle. If you get the answer wrong, then you'll take some minor piercing damage, and you'll have to try again. When you get the answer right, the statue will teleport you back to the faces. If you answer all twelve riddles correctly, then the statue will give you a
Ring of Regeneration, and each character in your party will earn 5000 xp.
From left to right, the answers for the top (northern) row of faces are: ice, fire, a coffin, a candle, darkness, stars. From left to right, the answers for the bottom (southern) row of faces are: shadows, a sponge, breath, fish, a secret, a hole.
6 - Portal Room
When you enter this room, you'll get attacked by a ruhk (a rakshasa mage) and seven mephits. The easiest way to deal with them is to shoot a fireball into the room before they see you. You'll earn about 10,000 xp for defeating them.
After the battle, you'll discover a portal in the back of the room. If you're holding the Opal Stone (#2), the Ruby Stone (#4), or the Sapphire Stone (#7), then something will happen when you interact with the portal:
- Opal Stone. A greater wolfwere (worth 15,000 xp) will appear.
- Ruby Stone. A pit fiend (worth 9000 xp) will appear.
- Sapphire Stone. A friendly genie will appear and give you
Doomplate +3.
The Opal Stone has the highest priority and the Sapphire Stone has the lowest priority, so if you're holding all three stones, then you'll have to fight both battles before meeting the genie. You'll need +3 weapons to damage the greater wolfwere and pit fiend.
7 - Statue Riddle Room
Inside this room, you'll find eleven statues and a chest. When you examine each statue, you'll see a riddle. To answer the riddle, you'll need to place the appropriate item into the bowl held by the statue. The answer items can be found in the chest. Nothing bad will happen if you get an answer wrong. When you get all of the answers right, a
Dusty Rose Ioun Stone and a Sapphire Stone will appear in the chest, and you'll receive 20,000 xp. You can use the Sapphire Stone in the portal room (#6).
Starting with the statue to the right of the entrance and moving clockwise, the correct answers are: Grinning Skull (death), Hourglass, Mirror, The Gagged Man (silence), Sword Medallion, Sun Medallion, Sundial (time), Jar of Water, Worn-out Boots, Golden Circlet, Star Medallion.
8 - Statue Head
The statue head here will block you from reaching the staircase leading to Level 3 (Exit B). To get the head to open its mouth and allow you to pass, you'll need to talk to it while holding The Hand of Dace (#12) and Kurtulmak's Crystal Shard (#10). Doing this will earn each character in your party 29,500 xp.
9 - Ancient Tome
When you interact with this tome, you'll summon progressively more difficult enemies: a kobold captain (15 xp), a sword spider (2000 xp), an umber hulk (4000 xp), a mind flayer (9000 xp), and then a beholder (14,000 xp). After defeating the beholder, when you interact with the tome again, you'll receive a
Ring of Free Action: Edventar's Gift plus scrolls of
Simulacrum and
Summon Fiend.
10 - Crystal
You'll encounter a large number of kobolds and mephits around the large crystal here. Then after a short amount of time, even more will appear, including a kobold shaman. After defeating all of the guardians, you'll automatically collect Kurtulmak's Crystal Shard, which you'll need with the statue head on Level 1 (#8). You'll also find a
Wooden Stake on the corpse of the shaman, which will allow you to finish off the vampire Dace Sontan (#14).
11 - Umber Hulk Chamber
When you approach the doorway in the center of this chamber, locked gates will spring up, dividing the chamber into two halves, and six umber hulks will appear, three in each half. We'd recommend killing the umber hulks in your half, waiting for any confusion effects to wear off, and then killing the three in the other half. You can pick open the gates if you want, but they'll also open on their own if you wait for long enough. You'll earn 24,000 xp for defeating the umber hulks.
12 - Library
Inside this room, you'll find a trio of high level spell scrolls:
Finger of Death,
Power Word, Stun, and
Ray of Enfeeblement.
13 - Undead Battle
You'll encounter a collection of undead enemies here, possibly including greater mummies and a lich. So be prepared with your best buffs, and try to keep your casters and other ranged attackers as far away from the fighting as possible. After the battle, when you loot the nearby urns, you'll find a
Cleric's Staff +3.
14 - Dace Sontan
Inside this chamber, you'll meet the vampire Dace Sontan. No matter what you say to him, he'll attack you. You'll earn 8500 xp for defeating him, but that will only cause him to turn into a mist and retreat to his coffin. To finish him off, you'll need to interact with his coffin while carrying a
Wooden Stake in your inventory. This will earn you 9000 xp and automatically give you The Hand of Dace, which you'll need with the statue head on Level 1 (#8).
Note: If you don't finish Dace off right away, then you can meet his spirit in the library (#12). He'll explain very carefully where to find a
Wooden Stake -- with the kobolds guarding the crystal (#10) -- and how to escape to Level 3.
15 - Lever / Secret Door
Pulling the lever here (#15) will open a nearby secret door (#15a).
16 - Storage Room
You'll encounter three regular trolls (worth 1400 xp each) and a spirit troll (worth 12,000 xp) in this room. You'll also find two Mithral Tokens inside the room's lone container. Tokens can be used in the contraption room (#26) to make purchases.
17 - Minotaur Room
You'll encounter four minotaurs (worth 3000 xp each) in this room. You'll also find two Mithral Tokens in the room. Tokens can be used in the contraption room (#26) to make purchases.
18 - Display Room
In this room, you'll discover a pool of water and three statues. Inside the pool, you'll find a Mind Flayer Painting, a Minotaur Horn, and two Mithral Tokens. Tokens can be used in the contraption room (#26) to make purchases.
When you examine the statues in the room, you'll see that they offer a painting -- and also a warning. If you take the paintings, then you'll end up with a Djinni Painting, a Troll Painting, and an Umber Hulk Painting, but you'll get hit by a spell (like Cloudkill or Fireball) each time. So it's best to send one character alone to grab the paintings.
19 - Globe Room
Along the walls in this room, you'll find four globes. If you interact with them, then they'll cast spells on you. Starting with the westernmost globe and moving clockwise, the globes will cast slow, heal (on the character in the center of the room), haste, and lightning bolt. You can interact with the globes as many time as you want.
20 - Bodhi / Minotaur Statue
The first time you enter this room, you'll encounter Bodhi plus two vampires. Bodhi will drain five levels each time she hits you, making her pretty nasty. Also, a short ways into the fight, your main character will turn into the Slayer and start attacking anybody nearby, including your other characters. This will alarm Bodhi, and she and her minions will flee.
To make the battle easier, you should cast Negative Plane Protection on your main character and then face Bodhi alone. The transformation will only last for a short time, and afterwards you'll return to normal. Just be aware that the next time you rest, you'll turn into the Slayer again -- and attack your companions again -- so it's a good idea to put a door or a wall between your main character and the rest of your party. After leaving
Spellhold, you'll learn how to control your new ability, and it'll become a useful part of your arsenal.
Also in the room, you'll find a big minotaur statue. When you attach the two Minotaur Horns (from #18 and #21) to it, the door leading to the
Spellhold Tests (Exit C) will open, and each character in your party will earn 29,500 xp.
21 - Minotaur Room
You'll encounter four minotaurs (worth 3000 xp each) in this room. You'll also find a Minotaur Horn and two Mithral Tokens in the room. Tokens can be used in the contraption room (#26) to make purchases.
22 - Pool
Inside the pool here, you'll find four Mithral Tokens. Tokens can be used in the contraption room (#26) to make purchases.
23 - Painting Room
When you enter this room, you'll get attacked by a group of yuan-ti, including a yuan-ti mage. Killing them will net you 14,500 xp. At the far end of the room, you'll discover four large doors, each one with an image painted on it. You can unlock these doors using the paintings found in the display room (#18). From left to right, the doors will lead to:
- Mind Flayer Painting. You'll release an ulitharid worth11,000 xp. You'll find the
Flame of the North +2 on its corpse.
- Troll Painting. You'll release a spirit troll worth 8000 xp. You'll find
Malakar +2 on its corpse.
- Umber Hulk Painting. You'll release an umber hulk worth 10,000 xp, but you'll find a hallway behind it.
- Djinni Painting. You'll release a noble djinni worth 10,000 xp.
24 - Vault
In this vault, you'll discover a locked chest and three neutral clay golems. You'll find the
Gesen Bowstring, four Mithral Tokens, and a
Star Sapphire inside the chest. The
Gesen Bowstring can be used by
Cromwell in the
Docks District to craft the
Shortbow of Gesen. Tokens can be used in the contraption room (#26) to make purchases.
But be careful! When you loot anything from the chest, the vault door will close and lock, and the clay golems will attack you. You'll earn 15,000 xp for defeating the golems, and after the battle the vault door will re-open.
25 - Anteroom
You'll encounter a stone golem (worth 8000 xp) in this room. You'll also find five Mithral Tokens and a spell scroll for Maze. Tokens can be used in the contraption room (#26) to make purchases.
26 - Contraption Room
In the center of this room, you'll find a strange contraption. It'll accept Mithral Tokens (found all over the dungeon) and give you boots or armor in exchange. This is what you can receive:
There are 21 tokens available. You can buy multiple items, but you can't buy one item multiple times.
Exits
- Exits between Levels 1 and 2.
- Exit between Levels 1 and 3.
- Stairs to the
Spellhold Tests. The door leading to this exit will start out locked. To open it, you'll need to place two Minotaur Horns (from #18 and #21) onto the nearby minotaur statue (#20).


