 Did we miss anything in this location? Is there something we didn't discover? Let us know!
Overview
Did we miss anything in this location? Is there something we didn't discover? Let us know!
Overview
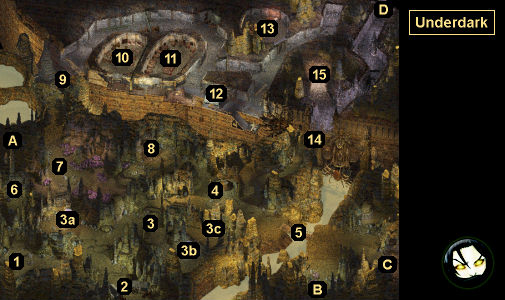
Your goal in the Underdark is to leave the Underdark and return to the surface world. To do this, you'll need to collect a Light Gem from Goldander Blackenrock (#11), which will allow you to meet with Adalon the silver dragon (#15). Adalon will tell you that the drow of
Ust Natha (Exit D) stole her eggs, and she'll ask you to get them back. In return, she'll magically disguise you as drow so you can enter Ust Natha, and she'll promise to show you a way out of the Underdark, should you complete her task.
Inside
Ust Natha, you'll get mixed up in the power schemes of Matron Mother Ardulace and her daughter Phaere, which will eventually grant you access to Adalon's eggs. When you return to Adalon with her eggs, she'll give you
Necaradan's Crossbow +3, and every character in your party will earn 78,500 xp. Then Adalon will take you to the exit from the Underdark -- a gate located in the
Kou-toan Tunnels (Exit A) -- and she'll open it up for you, allowing you to leave.
Of course, you're not required to complete Adalon's task. There are two alternatives to this:
- After Adalon disguises you as drow, you can head over to the exit gate right away and convince the drow there to let you through. This will require you to have 17 Charisma.
- If your party is very powerful, then you can attack Adalon. You'll earn 54,000 xp for defeating her, and you'll find the Blood of a Silver Dragon, a Note, and 3000 gp on her corpse. The blood is a component of
Human Flesh +5, which you can have crafted in
Umar Hills. The Note will give you the runes necessary to open the exit gate yourself.
1 - Starting Point
2 - Duergar Encampment
At this encampment, you'll meet Carlig, Fingerlig, and Uder Mordin. They'll tell you that Bodhi and Irenicus recently passed through the area, and that they were heading for the drow city of
Ust Natha (Exit D). Also, Carlig will sell you some basic equipment and scrolls, including scrolls of
Freedom (which are useful for curing Imprisonment), and Mordin will tell you about a mage he saw get imprisoned in the cavern to the north (#3).
3 - Vithal and the Elemental Portals
The mage Vithal will only appear here (#3) if you cast Freedom somewhere in the Underdark. Mordin at the duergar encampment (#2) will give you the clue for doing this. You can buy a scroll of
Freedom from Carlig at the same camp. Freeing Vithal will earn you 10,000 xp.
When you talk to Vithal, he'll thank you for freeing him, and he'll ask you for help. He'll tell you that this part of the Underdark is "thin," and that he might be able to reach into other dimensions from here to steal some "valuable magic." For your part in his plan, he'll ask you to track down his Book of Rituals, which he'll guess was stolen by the svirfneblin after he got imprisoned.
Note: Before delivering the book, the three nearby elemental portals (#3a, #3b, and #3c) will repeatedly spawn elementals. As soon as you kill one, a new one will appear. If these are easy battles for you, then you can use the portals to grind some xp. Each portal will produce 11 elementals before stopping.
Another Note: At the end of your conversation with Vithal, he'll head over to the earth elemental portal (#3b). You should not follow him there until you have the book, or else he'll probably get himself killed by the spawning earth elementals.
You'll find the Book of Rituals with the innkeeper in the svirfneblin settlement to the north (#10). The innkeeper will want you to pay 300 gp for it. There isn't any way to negotiate this price down, but if you don't want to pay that much, then you can simply pickpocket the book from him.
When you deliver the book to Vithal, he'll begin the ritual. Starting at the earth elemental portal (#3b), he'll summon a greater earth elemental (worth 10,000 xp). When it's been defeated, he'll disappear for a bit, collect some treasure, and return. Then he'll repeat the process at the fire elemental portal (#3c) and the air elemental portal (#3a), summoning a greater fire elemental (worth 10,000 xp) at the former and a greater air elemental (worth 11,000 xp) at the latter. You'll just need to talk to him in front of each portal to get him to continue (which will also give you a chance to save your game).
At the end of the ritual, Vithal will give you your share of the loot, a
Rod of Absorption, and each character in your party will earn 20,000 xp. If you demand more from Vithal, then he'll throw in scrolls of
Simulacrum and
Abi-Dalzim's Horrid Wilting. If you demand more than that, then Vithal will attack you. You'll earn 20,000 xp for defeating him, and you'll find a
Skull of Death plus scrolls of
Incendiary Cloud,
Time Stop, and
Wail of the Banshee on his corpse.
4 - Simyaz
After escaping from the
Mind Flayer Tunnels (Exit C), you'll run into Simyaz and his githyanki companions here. You can ignore them if you want, but if you talk to them, then one of two things will happen:
- If you accepted the
Silver Blade from Saemon Havarian while escaping from
Spellhold, then Simyaz and his fellows will demand it from you (since Saemon stole it from them). You'll either have to give it back to them or kill them for it.
- If you refused Saemon's help while escaping from
Spellhold, then Simyaz and his fellows won't be that interested in you, and you can either let them leave or attack them for abandoning you to the mind flayers.
If you kill Simyaz and his party, then you'll earn 14,000 xp. If you keep the
Silver Blade, then you'll be confronted by another githyanki band when you return to Athkatla.
5 - Kuo-toan Bridge
When you approach this bridge, you'll get attacked by a large group of kuo-toa, including a leader, a priest and two wizards. You'll earn over 16,000 xp for defeating them. They'll drop numerous
Kuo-toan Bolts.
6 - Mind Flayers
At this spot, you'll encounter three mind flayers (worth 27.000 xp total).
7 - Myconid King
At this spot, you'll encounter a myconid king and three spore colonies (worth over 2000 xp total).
8 - Crystal Prison
You'll discover a strange, crystal prison here. If you interact with its facets, then you'll release the "lost souls" stuck inside. There are six facets in total. From left to right, they'll release:
- Madman Aganalo. No matter what you say to him, he'll attack you. You'll earn 6000 xp for defeating him, and you'll find
Jhor the Bleeder +2 on his corpse.
- Raevilin Strathi. He'll be confused, and he'll attack you. If you kill him, then you'll earn 20,000 xp, and you'll find scrolls of
Conjure Earth Elemental and
Summon Efreeti on his corpse. But if you cast Heal on him, then he'll come to his senses, and you'll receive
Albruin +1 and 15,000 xp.
The problem is, Raevilin will cast Fireball and Imprisonment right away when the fight starts, so it's difficult to cast Heal on him without somebody getting imprisoned. But if you attack him, then you'll probably kill him before he can do much of anything. So you might have to decide if you'd rather have
Albruin +1 or an extra scroll of
Freedom around.
- Riti. He'll attack you almost right away. You'll earn 8000 xp for killing him, and you'll find the cursed spear
Backbiter +3 and a scroll of
Improved Haste on his corpse.
- Alchra Diagott. He's a lich, and he'll attack you almost right away. As with all liches, it's a good idea to prepare yourself before fighting him, including casting useful buffs and placing snares where he'll appear next to the prison. You'll earn 22,000 xp for killing Alchra, and you'll find scrolls of
Delayed Blast Fireball,
Spell Turning, and
Summon Nishru on his corpse.
- Bedlen Daglefodd. He'll thank you for releasing him, and he'll promise you a reward when you visit the svirfneblin settlement to the north. You'll get the reward when you talk to Bedlen's father Therndle, who can be found in the inn (#10). Therndle will give you
Bracers of Defense AC 4 for your help. You'll also receive 10,000 xp.
- Gont of Riatavin. You can either let him go (for no reward) or fight him (for 7000 xp).
Right next to the prison, you might encounter a drow war party consisting of priestesses and mages (worth over 30,000 xp total). They'll drop some special drow equipment, including
Drow Elven Chain +3 and
Drow Full Plate +5, but you'll only be able to use it during this chapter.
9 - Svirfneblin Bridge
When you approach this bridge, you'll be stopped by Odendal Breachgnome and two other svirfneblin guards. As long as you don't repeatedly threaten them, they'll allow you to pass. If you kill them, then all of the svirfneblin in the settlement beyond the bridge will turn hostile.
10 - Svirfneblin Inn
Inside this inn, you'll meet two people of interest:
- Innkeeper. He'll allow you to rent a room. He's also involved in Vithal's quest (#3).
- Therndle Daglefodd. He's a shopkeeper, and he'll sell you a variety of +1 gear, plus potions and spell scrolls. He's also involved in Bedlen Daglefodd's quest (#8).
11 - Svirfneblin Dormitory
Inside this dormitory, you'll meet Goldander Blackenrock. He'll tell you that a "monstrosity" is threatening the svirfneblin settlement, and he'll ask you to kill it and collapse its lair. In return, he'll offer you a Light Gem, which you'll need if you want to visit Adalon in the dark cave (#15). If you don't want to complete Goldander's quest, then you can also kill him for the gem or pickpocket it from him. Just be aware that if you kill Goldander, then all of the svirfneblin in the settlement will turn hostile.
If you agree to help Goldander, then he'll give you a Stoneshape Scroll, and he'll tell you that the monster can be found in a chamber to the northeast (#13). To enter the chamber, you'll need to talk to the svirfneblin guarding it. Then inside, you'll find a dark pit. When you click on the ladder leading down into the pit, a balor will appear. The balor is tough, and you'll need +3 weapons to damage it, but by this point in the game it shouldn't be too troublesome, and you'll earn 26,000 xp for defeating it. After killing the balor, you'll need to use the Stoneshape Scroll to seal the pit it came from.
When you return to Goldander, he'll give you
Skullcrusher +3 and the Light Gem, and each character in your party will earn 25,000 xp.
12 - Chest
Inside the (locked) chest here, you'll find the cursed
Ring of Folly: Discipliner.
13 - Dangerous Chamber
The door to this chamber will start out sealed. You'll only be allowed to enter the chamber after accepting Goldander's quest (#11).
14 - Drow Bridge
When you cross this bridge, you'll get ambushed by a group of drow. Some of their party will teleport to the center of the bridge, so to make the battle easier, just send your tank across and keep your squishy DPS characters on the southern side. You'll earn 20,000 xp for defeating the drow.
15 - Dark Cave
This cave is the home of Adalon the silver dragon. You'll need the Light Gem from Goldander Blackenrock (#11) to enter it. Inside, Adalon will give you a quest to rescue her eggs from the drow in
Ust Natha (Exit D). See the Overview text above for more information about Adalon and her quest.
Exits
- Entrance to the
Kuo-toan (Western) Tunnels.
- Entrance to the
Beholder (Southern) Tunnels.
- Entrance to the
Mind Flayer (Eastern) Tunnels.
- Gate to
Ust Natha. You won't be allowed through this gate until you've accepted Adalon's quest (#15). At that point, you'll just need to answer a couple of easy questions -- by identifying yourself as Veldrin from Ched Nasad, and not begging or threatening -- for the drow gate guard to allow you through. If you answer poorly, then the gate guard will attack you, and everyone inside
Ust Natha will turn hostile.


