 Did we miss anything in this location? Is there something we didn't discover? Let us know!
Overview
Did we miss anything in this location? Is there something we didn't discover? Let us know!
Overview
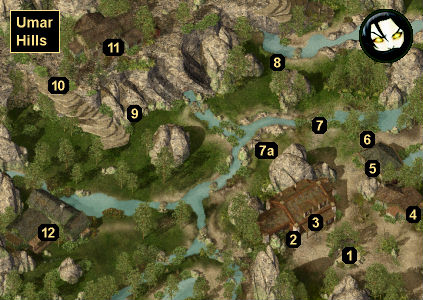
When you arrive at Umar Hills, you'll begin just outside Imnesvale. As you approach the village, you'll witness the villagers and their mayor Minister Lloyd having an animated discussion (#1). You'll learn that several people have been killed -- flayed, no less -- and that their bodies have disappeared. The villagers will be pretty evenly divided between blaming ogres, wolves, and the long-dead witch Umar herself.
When the discussion breaks up, you should head over to Minister Lloyd's house (#4). He'll give you a more complete picture of the crisis, and he'll mention that Merella, the village's ranger-protector, has gone missing as well. He'll also let you know that he's already hired a band of adventurers to look into the matter, but that he hasn't heard anything from them. If you're playing a non-Good, non-Ranger character with at least 8 Charisma, then you can demand money up front from Lloyd, and he'll pay you 300 gp.
If you check out the ogres to the north (#8), then you'll discover that they're not Imnesvale's problem. So you should head over to Merella's cabin (#12). Inside, you'll find Merella's Journal (on the table in the dining room) and A Note from Mazzy Fentan (on the floor in the bedroom). You'll also find evidence that somebody was killed in the cabin and then dragged out by a dog or a wolf.
The two documents from the cabin will indicate that Merella and Mazzy (the leader of the adventurers hired by Lloyd) think that the murders in the region are being caused by wolf-like creatures "with the cunning of men." Picking up the documents will earn you 22,500 xp, and they'll show you the way to the wolf lair, which will unlock the
Temple Ruins on the world map.
When you head over to the
Temple Ruins, you'll learn that the wolves aren't committing the murders, either (or at least most of them). Instead, you'll discover that a Shade Lord has escaped his prison in the temple, and that he's using the murders to build his army of shadows. This is covered in detail on the
Temple Ruins page.
When you return to Minister Lloyd (#4) after defeating the Shade Lord, he'll give you
The Night's Gift +5. If you didn't demand money from Lloyd earlier, then you'll also earn a point of Reputation. If you demanded money before and demand more now, then Lloyd will pay you 267 gp, but you'll lose a point of Reputation. Finally, if you're playing a ranger, then Lloyd will offer you the use of the ranger cabin (#12), which will become your stronghold in the game. See the
Ranger Stronghold page for more information about what you can do there.
1 - Village Meeting / Nelleck
2 - Merchants
You'll meet the merchants Beherant Diir, Elence Fielding, and Min Minling here during the day. They'll retreat into the inn (#3) at night. The trio will have basic weapons, armors and potions for sale. Minling will also sell De'Tranion's Baalor Ale, which you might need for some local kids (#6).
After picking up the Tanner's Letter during the
Bridge District murders quest, you'll also meet Fael here. He's an accomplice of the murderer, which you'll recognize based on the letter. However, to get anywhere with Fael, you'll need to figure out his secret name. You can do this by following the instructions in the letter, which will show you how to manipulate the letters in "Vellin Dahn" (the murderer's immediate master) to form the name. These instructions (written by Fael, not the tanner) are described below:
- The names "are the same in their scale and their cut." That is, Fael's first name has six letters, and his last name has four letters.
- "The last of his begins just as the first of mine." That is, the first letter of Fael's first name is D.
- "The second of my first is the second of his first, though regressed a full four steps." That is, the second letter of Fael's first name is four letters before E, or A.
- "The third of my first is four more than the last of his first." That is, the third letter of Fael's first name is four letters past N, or R.
- "The entire last of my first is the last of his first, except the first one of these is the first of my last." The last three letters of Fael's first name are LIN, except the L is replaced by C (see below) to make it CIN.
- "The first of his last is mine plus one." That is, the first letter of Fael's last name is one letter before D, or C.
- "The next of my last is the last of his first plus one." That is, the second letter of Fael's last name is one letter past N, or O.
- "The last of my last are third and second, coming in first for him." That is, the final two letters of Fael's last name are the third and second letters of "Vellin," which means they're L and E.
That is, Fael's secret name is "Darcin Cole." If you tell Fael this name after buying the book History of the Zhentarim, then he'll ask you how "the armor" is coming along, and he'll offer to upgrade it if you can bring him some Blood of a Silver Dragon. The armor in question is
Human Flesh, which you can find in the Tanner Shop during the
Bridge District murders quest. You'll receive silver dragon blood if you kill Adalon in the
Underdark.
If you bring both items to Fael, then he'll ask you to return in four days. When you do, he'll give you
Human Flesh +5 -- but then he'll reveal that he knows you're an imposter, and three mages will appear and attack you while Fael flees. You'll earn about 20,000 xp for defeating the mages. If instead of working with Fael you try to denounce him, then he'll simply flee. Either way, you'll never see him again.
Note: Nothing interesting will happen if you manage to kill Fael while he's fleeing.
3 - Umar Inn
You'll meet several named NPCs in the inn, but the only one of importance is Vincenzo the Innkeeper, who will perform regular innkeeper duties. He'll also tell you all about Umar the witch, and he'll give you a copy of the Umar Witch Project Journal. If you really like the journal, then you can pick up dozens more copies of it in the back room of the inn.
4 - Minister Lloyd's Home
5 - Jermien's Home
Outside this house, you'll meet Daar. He'll tell you that he loves Jermien's daughter Colette, but that Jermien won't let the two of them get married. Inside the house, you'll meet Jermien and Colette. Jermien will tell you that he's building a stone golem, but that he needs some Mimic's Blood to complete the project.
To help Daar and Jermien, you'll need to head over to Umar's Cave to the west (#9) and defeat the Killer Mimic there. It'll drop the Mimic's Blood when it dies. When you deliver the blood to Jermien, he'll reward you with the short sword
Ilbratha +1, and you'll also earn 19,250 xp. But when Jermien activates his golem, it'll attack him. You'll have two ways to respond:
- If you watch the fight, then the golem will probably kill Jermien and then attack you. Afterwards, Daar will burst into the house, and he and Colette will decide to get married. You'll only earn 500 xp for following this path (plus 8000 xp for finishing off the golem), but you'll find 4000 gp on Jermien's corpse.
- If you kill the golem before it can kill Jermien, then Jermien will realize that he's been a fool, and he'll decide that Daar can marry Colette after all. You'll earn 21,250 xp for following this path.
Regardless of your choice, Jermien, Colette and Daar will disappear from the game, which will allow you to loot Jermien's house in peace.
6 - Dirbert, Neler and Valsben
When you approach this spot, you'll meet three teenage villagers: Dirbert, Neler and Valsben. They'll tell you that they want to be adventurers just like you, and they'll ask you to buy them
Bastard Swords plus De'Tranion's Baalor Ale, which you'll find being sold by the merchants just outside the inn (#2). If you tell the kids that you'll buy them both items, then they'll give you 200 gp to cover the costs. If you tell them that you'll only buy them one of the items, then they'll only give you 100 gp.
You'll have three ways to complete this quest:
- You can refuse to buy the kids anything. They'll stay where they are and remain hopeful, which will give you a chance to change your mind. But if you talk to them again and tell them to get lost, then they'll flee, and you won't see them again.
- You can buy the kids one or both items. This will earn you 1000 xp (for one item) or 2000 xp (for both items). The kids will then run off to make use of their prize(s), and a day later you'll find them in the Umar Cave (#9). They'll be fleeing from a "dragon" (really a diseased gibberling worth 50 xp), and when they exit the cave you won't see them again.
- You can take the kids' money and not give them anything for 24 hours. Then the next time you talk to them, they'll call you a "thief" and a "kobold." If you want, you can give them back their money at this point, or you can keep it to teach them a lesson. Either way, your choice will end the quest.
7 - Jeb, Erlin and Chickens
If you tell Jeb (#7) that you're an adventurer and pay him at least 20 gp, then he'll tell you about seeing Erlin Hendrick stuff something valuable -- a Beljuril -- down the throat of one of his chickens. When you talk to Erlin (#7a) about this, you'll be given two ways to proceed:
- You can threaten Erlin. He'll give you the Beljuril for free.
- You can buy the Beljuril for 10, 50 or 100 gp. Erlin will accept whatever you pay him, but the more you give, the happier he'll be.
Beljurils are worth 600 gp, so you'll make a profit regardless of the option you pick. You'll also need a Beljuril to upgrade the
Bronze Horn of Valhalla into the
Iron Horn of Valhalla. See the
Waukeen's Promenade page for more information about the upgrade.
8 - Madulf
At this spot, you'll meet the ogre Madulf and his band of creatures. They won't attack you. Instead, if you talk to Madulf, then he'll tell you that he and his fellows have suffered the same sort of killings and disappearances as Imnesvale. He'll then ask you to broker a deal with the village so that the two of them can work together and even do some trading. You'll have three ways to respond:
- You can kill Madulf and his band. This will earn you about 4000 xp.
- You can refuse to broker the deal. This won't earn you anything.
- You can broker the deal. Minister Lloyd (#4) will be happy with the idea, and you'll earn 27,500 xp. Lloyd will then leave to negotiate with Madulf, and once they've reached their agreement (which will only take a few hours), you'll need to return to Lloyd and then Madulf. For all of your help, Madulf will reward you with the
Shield of the Lost +2.
9 - Umar Cave
Inside this cave, you'll encounter a Killer Mimic disguised as a treasure chest. When it dies, it'll drop Mimic's Blood, a
Diamond, and more. You'll need the blood for Jermien's quest (#5), and you might need the
Diamond to upgrade the
Silver Horn of Valhalla into the
Bronze Horn of Valhalla. See the
Waukeen's Promenade page for more information about the upgrade. Also in the cave, you'll encounter a pair of Umber Hulks (worth 4000 xp each) guarding some +1 loot.
10 - Derrick
You'll be stopped by a ranger named Derrick when you reach the top of the "steps" here. He'll demand to know if you're searching for Valygar. If you say that you are, but that you're not looking for a fight, then Derrick will leave you in peace. Otherwise, two other rangers will appear next to Derrick, and they'll all attack you. You'll earn 11,400 xp for winning the fight.
11 - Valygar's Cabin
Inside this cabin, you'll meet Valygar (a neutral-good human stalker). He'll tell you about the
Planar Sphere in the
Slums District, and he'll invite you to go there with him. If you accept, then he'll join your party. Valygar is also involved in a bounty quest from Tolgerias the Cowled Wizard in the
Government District. You'll only be able to work with Valygar or Tolgerias, not both.
12 - Ranger Cabin
This cabin is involved in the main quest in the area. If you're playing a ranger, then it will become your
Ranger Stronghold after completing the quest.


