|
|
 Did we miss anything in this location? Is there something we didn't discover? Let us know!
Overview
Did we miss anything in this location? Is there something we didn't discover? Let us know!
Overview
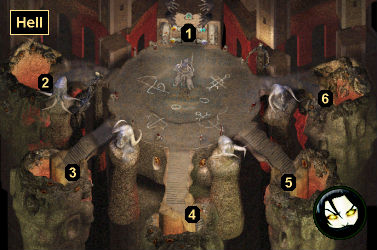
You'll begin your time in Hell next to a door with five open eyes surrounding it (#1). To open the door, you'll need to close the eyes, which means you'll need to collect five Tears of Bhaal. You'll gain these tears by taking tests. Each test will have a "good" solution and an "evil" solution, and the choices you make will reward you in different ways when you take the tears to the door.
Note: Many of the tests require combat, but it's perfectly safe to rest in Hell, so you should always be at full strength for them.
Another Note: The tests can make your main character more evil (but not more good). This is mostly important if you're playing a "good" class like paladin or ranger. Taking the evil path for even one test will cause you to become fallen. There isn't any way to restore a fallen character.
The tests and their rewards are described below:
- Test of Wrath (#2). In this test area, you'll meet Wraith Sarevok. He'll try to goad you into attacking him. Refusing to do so is the good path. This will cause him to attack you, and you'll earn 20,000 xp (when he dies) and +1 Wisdom and +1 Charisma (when you take his tear to the door). Giving in to Sarevok and attacking him is the evil path. This will earn you 20,000 xp (when he dies) and +2 Strength (when you take his tear to the door).
Note: In the original version of the game, the evil path also gave you +1 to your primary attribute, but this bug/feature was removed in the EE.
- Test of Greed (#3). In this test area, you'll meet the demon Greed. He'll tell you that your upcoming opponent is very difficult to defeat, but he'll give you the sword
Blackrazor +3 and describe it as the "right tool" for the job. Past the demon, you'll meet an Enslaved Genie. Giving the genie
Blackrazor +3 is the good path. This will earn you +2 to all of your saving throws (when you take the tear to the door). Killing the genie (with or without
Blackrazor +3) is the evil path. This will earn you 11,000 xp (when the genie dies) and +15 maximum hp (when you take the tear to the door), and you'll also be able to keep
Blackrazor +3.
Note: If you're quick, then you can give the genie the sword and then kill him before he teleports away. This will allow you to keep the sword while staying on the good path.
- Test of Selfishness (#4). Inside this test area, you'll meet the demon Selfishness. He'll tell you that there are two paths to the tear. If you take the western one, then you'll have to make sacrifices. If you take the eastern one, then you'll save yourself. He'll then kidnap one of your companions (or an anonymous peasant if you don't have anyone with you), and he'll move to southern end of the test area.
Taking the western path is the good solution. This will cost you 2 maximum hp, 1 point of Dexterity, and 75,000 xp (when opening the doors along the way) but you'll earn +10% magic resistance (when you take the tear to the door). Taking the eastern path is the evil solution. This will kill the kidnapped companion (or peasant), but you'll earn +2 AC (when you take the tear to the door). You'll also be able to resurrect your companion (but not the peasant), unless the companion is Hexxat (EE). She'll permanently die.
Note: With the EE, there is only one way to stay on the good path without making any sacrifices. To do this, you'll need to cast Maze on your main character and have one of your companions go through the western path. Then when the Maze spell wears off, the demon will give you the tear, and you won't lose anything.
- Test of Fear (#5). Inside this test area, you'll meet the demon Fear. It'll offer you a
Cloak of Bravery, a garment "stitched together from the flayed skins of lovely nymphs." Refusing the cloak is the good path. This will make you immune to +1 and worse weapons (when you take the tear to the door). Accepting the cloak is the evil path. This will earn you +2 Constitution (when you take the tear to the door), and you'll get to keep the cloak.
Of course, you'll also need to complete the test. The test area contains two paths leading to the tear on the eastern side. On the northern path, you'll encounter three elder orbs and two gauths (worth 60,000 xp). On the southern path, you'll find a locked and trapped chest containing a few potions, but you'll also have to pass through an undetectable fear trap. You're not required to do anything other than make your way to the tear, so you can just cast Resist Fear on your party and take the southern path (ignoring the chest or not), and then claim the tear at the end (by interacting with the pink crystal there).
Note: In the original version of the game (but not the EE), you can tell the demon that you're undecided, then pick up the tear, and then return to the demon and ask for the cloak. This will allow you to keep the cloak but stay on the good path.
- Test of Pride (#6). Inside this test area, you'll meet the demon Pride. He'll tell you that there is a "terrible creature" behind him "that deserves death." The creature is actually a friendly dragon. Telling the demon that you won't kill it is the good path. You'll then need to talk to the dragon to get the tear. This will earn you +20% resistance to cold, electricity, and fire damage (when you take the tear to the door). Telling the demon that you'll kill the dragon is the evil path. This will earn you 22,000 xp, a
Ring of Protection +2: The Guard's Ring, a
Robe of the Evil Archmagi, the tear, spell scrolls of
Sphere of Chaos,
Time Stop, and
Wail of the Banshee, and more (from killing the dragon), plus 200,000 xp (when you take the tear to the door).
Note: After telling the demon that you won't kill the dragon, you can go ahead and kill it and stay on the good path. But in the EE, the dragon will only drop the tear and some gold, and none of the other items.
When you bring all five Tears of Bhaal to the eye door (#1), it will open -- and Irenicus will walk through. After a brief conversation, he'll summon some demons to assist him, and then he'll switch to the Slayer form and attack you. The good news is, with Irenicus using the Slayer form, he'll only have contingencies available -- for Fire Shield (Red), Mislead, and a couple of other buffs -- and so you won't have to worry about Time Stops, Spell Triggers, and Power Word, Kills. The bad news is, the Slayer form is tough, and you'll have to deal with strong melee attacks.
So, obviously, you should buff up your party before delivering the final tear to the door (including True Seeing to counteract the Mislead spell), and you might also want to place some traps in front of the doorway to knock down the health of Irenicus and his demons. Then you'll just need to fight. We'd recommend taking down the demons first and then concentrating on Irenicus. Irenicus will teleport around a little, so you'll have to do some chasing (or not; you can also just wait out of sight for his buffs to wear off), but the battle shouldn't be too bad.
When you defeat Irenicus, you and your companions will get jettisoned out of Hell. The elves of
Suldanessellar will throw you a party, and Queen Ellesime will reward you with an
Amulet of Seldarine. This will end the Shadows of Amn portion of the game. If you have Throne of Bhaal (or the EE), then you'll immediately move to the
Forest of Tethir (TOB version), and you'll continue on.
1 - Eye Door
2 - Test of Wrath
3 - Test of Greed
4 - Test of Selfishness
5 - Test of Pride
|
|
|


