 Did we miss anything in this location? Is there something we didn't discover? Let us know!
Overview
Did we miss anything in this location? Is there something we didn't discover? Let us know!
Overview
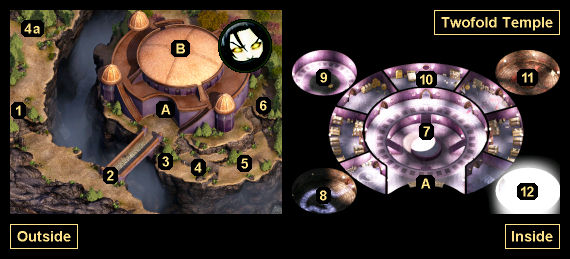
The Twofold Temple is a part of
Rasaad's companion quest. When you go inside, you'll witness a speech from Collus Darathon (#7), the head of the Twofold Trust. You'll have two ways to respond to his words:
- If you denounce Collus, then you'll start up a fight against all of the monks in the temple. However, almost right away the Master of Combat will show up, and he'll ask you to stop fighting. If you ignore his request, then you'll get a chance to kill a few heretic monks, but once you've done enough damage to the Master, the fight will stop whether you want it to or not, and you'll begin a conversation with the Master (see below).
- If you listen to Collus' speech, then at the end, you'll be welcomed into the Trust, and you'll be required to pass four initiation tests, which are located in the temple's four outer rooms. To take the tests, you'll need to talk to the monks standing just outside the test rooms. Only your main character will be allowed inside. The tests are described below:
- Bright Moon (#8). Inside this room, you'll see a path of light on the ground. If you deviate from this path, then you'll get attacked by shadows (worth 420 xp each). The shadows will keep spawning while you're in the shadows, which means you can grind some xp if you want. If too many shadows appear, then you can just retreat to the entrance. If the shadows enter the light, then they'll be destroyed, and you can start over.
When you follow the path (or not) to the center of the room, a disembodied voice called "The Truth" will ask you for a secret. If you comply, then you'll pass the test, and the monk outside the room will give you
Gauntlets of Aln Zekk. You'll also receive 10,000 xp. But if you refuse to tell a secret, then you'll fail the test, and you'll be forced to deal with a few shadows before departing.
- Penance (#9). In this room, you'll need to tell a monk confessor the wrongdoing of somebody. You can reveal an actual transgression or make one up if you want, and the confessor won't notice the difference. If you pass the test, then the monk outside will reward you with a
Cloak of Atonement, and you'll also receive 10,000 xp.
- Room of Pain (#11). Before you enter this room, you'll be forced to drop all of your equipment. Then inside the room, four monks will beat on you while a monk leader tries to get you to renounce the Twofold Goddess. The monks will deal actual damage to you, but it isn't possible for them to kill you, so as long as you don't give up, you'll pass the test. It won't make any difference if you tell the monk leader your name at the end or not. If you pass the test, then the monk outside will reward you with
Eyes of the Beholder, and you'll also receive 10,000 xp.
- Blinding Sun (#12). In this room, you'll get attacked by three invisible stalkers (worth 3000 xp each). To pass the test, you'll just need to kill them. Afterwards, when you return to the monk outside, he'll reward you with a
Gem of Seeing, and you'll also receive 10,000 xp.
Note: While taking the tests, don't threaten or attack any of the monks. The monk leader in the Room of Pain (#11) won't care what you say (as long as you don't capitulate), but others will turn hostile -- which will turn everybody in the temple hostile, which will prevent you from taking any more tests.
After passing all of the tests, you'll need to walk over to the Master of Combat, who will show up where Collus Darathon was before (#7). When you get close enough to him, he'll congratulate you on your successes, and you'll begin a conversation with him (see below). If you failed one or more of the tests, then you'll only be able to progress by attacking the monks in the temple, which will switch you to the violent path for the quest (see above).
That is, regardless of what you do while you're inside the temple, you'll end up talking to the Master of Combat. Depending on what you say to him, he'll either attack you or tell you how he came to join the Twofold Trust. Either way, while you're dealing with the Master, a sentry will rush into the temple and let you know that the Dark Moon order is preparing to launch an attack. The Master and any remaining monks will head outside to face them.
Note: If you kill the Master before the sentry comes in, then you'll break the quest. So don't do that.
When you follow the Master outside, you'll discover that the Dark Order monks are being led by none other than Collus Darathon. If Rasaad is with you, then he'll point out that Collus is really Alorgoth, and Collus will freely admit it. Collus will then reveal that he created the Twofold Trust to weed out those who weren't 100% loyal to Shar.
A fight will then break out, with you and the heretic monks against the Dark Order monks. Collus-Alorgoth will flee, and he'll move so quickly that you won't be able to kill him before he disappears. As a result, the Dark Order monks will only have one priest and one sorcerer on their side, but they'll put up a better fight than you might expect, so be sure to cast some buffs, and target enemies one at a time to kill them more quickly. You'll earn around 25,000 xp for killing the Dark Order monks, and each character in your party will earn 10,000 xp for ending the Dark Order threat.
After the battle, if Rasaad is with you, then you'll get a chance to convince him to take charge of the Twofold Trust, perhaps eliminating the Master of Combat to clear the way. If Rasaad takes this job, then he'll leave your party, and you won't be able to recruit him again until the Throne of Bhaal expansion pack. For this case, all of Rasaad's equipped and held items will transfer to your party, so you won't lose anything. If instead you keep Rasaad with you, then he'll remain in your party as a companion, and nothing will change.
1 - Herath
When you approach this spot, you'll meet Herath, a monk who attempted to join the Twofold Temple, but who was beaten within an inch of her life because she "lacked the resolve necessary to serve as a member." Depending on what you say to Herath, you might learn a bit about the temple, including that there's a Room of Pain (#11), but at the end of your conversation, she'll leave, and you won't see her again. You can also kill Herath for 3000 xp.
2 - Heretic Guard
The guard here will challenge you when you approach. If you joke with him or pretend to be a heretic, then he'll allow you to pass. You can also kill him (for 4000 xp) or use stealth or invisibility to just walk past him. If you retreat from the guard's challenge and then return and threaten him, then he'll flee to the far side of the bridge and call for help, and you'll end up fighting four guards (for 16,000 xp total). Nobody will notice what you do with the guard, so being violent won't lock you into anything.
3 - Blynnyk, Coren, Horvat and Lara
These monks aren't involved in any quests, although listening to them will give you some ammunition for the Penance Test (#9). If you want, you can kill the monks for 8000 xp total, and nobody will notice or care.
4 - Animal Cages
At this spot (#4), you'll meet Jolstead and a caged grizzly bear named Wilson. To gain Wilson as a potential companion, you'll need to talk to him before Jolstead. Then during your "conversation" with Wilson, Jolstead will interrupt you and warn you about the bear. This will give you four ways to acquire him:
- You can purchase Wilson for 1000, 750, 600, 500, or 25 gp (depending on your Charisma).
- You can intimidate Jolstead into giving you Wilson (with enough Strength and Charisma).
- You can kill Jolstead (for 2000 xp), and Wilson will escape during the battle.
- You can pick open Wilson's cage. He'll escape, and Jolstead will attack you.
When you free Wilson, he'll run away to the northwestern part of the map (#4a), where you'll be able to add him to your party -- unless you didn't talk to him first, in which case he'll simply disappear. Besides being a companion, Wilson is also involved in Zaviak's quest from the
Hidden Refuge.
5 - Bound Monks
You'll discover three bound monks here. You can do three things with them: you can leave them be, you can convince them that they're being tortured rather than educated (each character in your party will earn 1000 xp for this), or you can kill them (for 2000 xp each). If a monk departs or dies, then he'll leave behind a Rope, which you can use with the temple skylight (Exit B).
6 - Lemzenn
Lemzenn is spying on the Twofold Temple for the Dark Moon order. No matter what you say to the spy, he'll either attack you or leave, but if you can get him to admit to being a follower of Shar first (by selecting the dialogue options 343211), then each character in your party will earn 1000 xp. Killing Lemzenn is worth 4000 xp.
7 - Collus Darathon
This is where Collus will appear when you first enter the temple.
8 - Bright Moon Test
9 - Penance Test
10 - Collus' Bedroom
You'll have to deal with a pair of traps in this room -- one on the entrance door and one on a chest -- but you'll find a
Star Sapphire and more inside the chest.
11 - Room of Pain Test
12 - Blinding Sun Test
Exits
- Main temple entrance. A guard will be blocking the locked entrance here. To get past him, you can convince him that you belong (easiest if you have Rasaad in your party, since he'll know the right answers), you can kill him and take the Temple Key from his corpse, or you can steal the Temple Key from him. Nobody will notice what you do with the guard, so being violent won't lock you into anything.
- Temple skylight. The skylight will only work as a (one-way) entrance into the temple if you have a Rope (from #5). If you use the skylight before using the main entrance (Exit A), then each character in your party will earn 2000 xp.


