 Did we miss anything in this location? Is there something we didn't discover? Let us know!
Overview
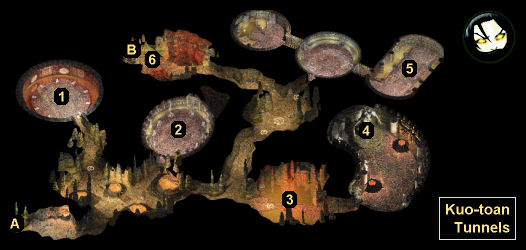
1 - Beholder Room
Inside this room, you'll encounter a beholder and two gauths. You'll earn 32,000 xp for defeating them.
2 - Tadpole Room
When you enter this room, you'll get attacked by a kuo-toan war party, including a kuo-toan lieutenant and a kuo-toan wizard. You'll earn over 6000 xp for defeating them, and you'll find lots of
Kuo-toan Bolts on their corpses.
On the eastern side of the room, you'll find an object that you can interact with. Doing so will net you some Corrupted Tadpoles, which might help you when facing the kuo-toan prince (#5).
3 - Flame Strike Trap
Walking across the "bridge" here will trigger a Flame Strike trap. The trap can't be detected or disarmed, but it will only trigger once. The easiest way to deal with the trap, other than just taking some damage, is to send across a single character with good fire resistance -- or a character wearing the
Cloak of Mirroring.
4 - Demogorgon Statue
When you read the inscription on the demogorgon statue here, it'll mention placing an animal sacrifice at its feet and waking up its children. If that sounds like fun, then you should summon a creature onto the platform in front of the statue. If it's the right sort of creature -- elementals and anything from the Monster Summoning spells seem to work fine -- then it'll automatically get sacrificed, and five demon knights will teleport into the room.
The easiest way to deal with the battle is to buff up your party, including haste, before making the sacrifice, and then running out of the room when the demon knights start teleporting in. You should make it out of the room before they fully arrive, which will allow you to attack them -- or lure them to you -- one or two at a time.
You'll earn 82,000 xp for defeating the demon knights, and when you loot their corpses you'll find
Armor of the Hart +3, a
Girdle of Frost Giant Strength,
Soul Reaver +4, and four
Two-Handed Swords +1.
Note: The
Girdle of Frost Giant Strength is one of the components of
Crom Faeyr +5. See
Cromwell's page for more information.
5 - Prince's Chamber
In the back of this chamber, you'll encounter the kuo-toan prince. He'll be tougher than the other kuo-toan enemies, mostly because he'll regenerate his health very quickly. To stop this from happening, you'll need to place Corrupted Tadpoles (from #2) into the tadpole pool on the western side of the chamber. This will taint the pool and prevent the prince from drawing strength from it.
You'll earn 4000 xp for defeating the prince, and when you loot his corpse you'll find
Bracers of Blinding Strike, Kuo-toa's Blood, a scroll of
Flesh to Stone, lots of gems, and 4540 gp. You might need the prince's blood for Matron Mother Ardulace's noble blood quest in
Ust Natha.
6 - Drow Gate Guards
You'll encounter a group of drow here, including a drow priestess and a drow wizard. If you're disguised as drow (which will happen after you've visited Adalon in the
Underdark), then you might be able to talk the guards into opening the gate behind them. There are two ways to do this. With 17 Charisma or Viconia in your party, you can bribe them 1000 gp. With 17 Charisma and Viconia in your party, you can convince them that an attack is imminent. Otherwise, if you attack the drow, then you'll earn over 40,000 xp for defeating them, and you'll find
Archer's Eyes (if imported from Siege of Dragonspear) on one of their corpses.
Note: If you have trouble defeating the drow, then you can just wait. If you complete Adalon's quest in the
Underdark, then she'll help you out with the battle, making it much easier.
Exits
- Exit back to the
Underdark.
- Locked gate. This gate will allow you to return to Athkatla and the surface world. To open it, you'll have three options: fool the gate guards (#6), complete Adalon's quest in the
Underdark, or kill Adalon and take the gate-unlocking Note from her corpse.