 Did we miss anything in this location? Is there something we didn't discover? Let us know!
Overview
Did we miss anything in this location? Is there something we didn't discover? Let us know!
Overview
If you chose to sail with Saemon Havarian after escaping from
Spellhold, then you'll have a rough voyage. First, you'll get attacked and boarded by a githyanki crew. They'll demand a "relic of holies" from Saemon, and eventually you'll realize that they mean the
Silver Blade that he gave to you earlier. The encounter will lead to a fight, but during the battle you'll also be boarded by a sahuagin war party, which will capsize the ship and send you overboard. Saemon will save himself by teleporting away, but you'll end up in the City-of-Caverns.
Luckily, the sahuagin in the City-of-Caverns won't attack you on sight. Royal High Priestess Senityili will decide that you're the surface-dwellers from a prophecy, and that you were sent to save the city from destruction. But High Priestess Tlyysixxous and Baron Thelokassyil will insist that you're just regular surface-dwellers, and that you should be sacrificed or eaten.
King Ixilthetocal (#3) will enjoy the debate, but he won't be sure about you, so he'll make you prove yourself -- by defeating an ettin (worth 5000 xp) in the arena (#4). This battle should not be difficult. After winning, Tlyysixxous will get sacrificed for being wrong about you, and the king will order you to defeat the rebel Prince Villynaty and bring back his heart as proof of your deed.
However, Senityili will have other plans. When you talk to her at the offering platform (#1), she'll point out how mad the king is, and she'll ask you to negotiate with the rebels instead. To that end, she'll give you a Rebel's Orb, which will prevent the rebels from attacking you inside -- but not outside -- their stronghold (#11), and she'll tell you that Sekolah's Tooth, the key to the stronghold, can be found in the southwestern part of the city (#8).
So you'll have three ways to proceed:
- You can just attack everybody, right from the start. The king will drop a Magical Rope and the Sahuagin Treasury Key when he dies. Inside the treasury, you'll find another Magical Rope and a
Rod of Lordly Might. The prince will drop
Impaler +3 and the
Wave Blade when he dies. Nobody will drop the
Gauntlets of Crushing, and you'll miss out on some quest xp.
- You can kill the prince for the king. For this, you'll just need to enter the prince's stronghold (#11) without the Rebel's Orb, or attack the rebels when you get there. You'll earn over 20,000 xp for defeating the rebels in their stronghold, and when you loot the prince's corpse, you'll find
Impaler +3, a Rebel's Heart, and the
Wave Blade.
When you deliver the heart to the king, he'll be pleased with you, and you'll receive some nice rewards:
Gauntlets of Crushing, a Magical Rope, a
Rod of Lordly Might, and 2000 gp. Each character in your party will also earn 58,000 xp. The king will then escort you to the exit from the city (Exit A), and he'll bid you farewell.
Note: If you steal the Sahuagin Treasury Key from the king before delivering the heart to him, then you can loot a
Rod of Lordly Might from the treasury and also receive one from the king.
- You can work with the prince against the king. For this option, Prince Villynaty and Senior Priestess Sallinithyl (#11) will give you a Fake Rebel's Heart, and they'll ask you to deliver it to the king (#3). When you do, the prince and his rebels will attack the city, but it will take them a while to reach the throne room, which means you'll mostly be on your own against King Ixilthetocal, Baron Thelokassyil, Captain Alyittyl, and a few royal guards. You'll earn about 17,000 xp for defeating them.
After the battle, Prince Villynaty will reward you for your work -- well, sort of. He'll allow you to loot the king's corpse, where you'll find
Impaler +3, a Magical Rope, and the Sahuagin Treasury Key. Inside the treasury, you'll find a
Rod of Lordly Might. Each character in your party will also earn 60,500 xp. You won't receive the
Gauntlets of Crushing. To pick up the
Wave Blade, you'll need to steal it from Prince Villynaty, or kill him for it.
Regardless of your choice, you should end up with a Magical Rope. It will allow you to climb down to the
Underdark (Exit A). This is a one-way exit, and using it will end the current chapter and start Chapter 5. Using the exit will also earn each character in your party 20,000 xp.
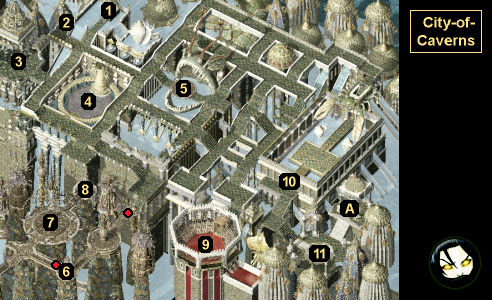
1 - Offering Platform
2 - Priestess of Sekolah
While King Ixilthetocal (#3) is happy with you, the priestess here will provide you with temple services, including selling you a wide variety of potions and spell scrolls.
3 - Royal Throne Room / Treasury
4 - Arena
5 - Rebel Ambush
When you reach this spot, you'll get ambushed by several rebels, including a priestess. You'll earn 18,000 xp for defeating them, and you'll find a
Cloak of Mirroring on the priestess' corpse.
6 - Bone Golem
You'll encounter a bone golem (worth 18,000 xp) here.
7 - Imp Puzzle Platform
When you reach this (heavily trapped) platform, you'll meet two imps. They'll invite you to play a game. If you agree, then five "famous big people" -- Alustriel, Drizzt, Elminster, Khelben, and Piergeiron -- will appear on the platform, each one next to a chest. When you talk to the people, they'll give you an item and a clue about who it goes to, and they'll also give you a clue about what item they want. To solve the puzzle, you'll need to figure out where all five items go, and place them in the correct chest.
The more you know about the "famous big people," the easier the game is. For example, if you played Baldur's Gate and obsessed about how to kill Drizzt for his equipment, then it shouldn't come as any surprise that his item is a Scimitar. But regardless, here are the answers:
- Alustriel - Pendant
- Drizzt - Scimitar
- Elminster - Pipe
- Khelben - Staff
- Piergeiron - Helmet
If you get an item wrong, nothing bad will happen to you. When you get all of the items right, the imps will open the reward chest for you and dispatch its guardian, a specter. Inside the chest, you'll find
Boots of Etherealness and a
Cloak of Protection +2: The Spirit's Shield. For winning the game, each character in your party will also earn 18,500 xp.
Note: If you open the reward chest yourself, then the specter will pop out and kill whichever character you used for the interaction, and then it will disappear. But you'll still get to collect the reward items.
8 - Spectator Beholder
At this spot, you'll discover a spectator beholder guarding a chest. Unlike other beholders, it'll be friendly and talkative, at least if you stay away from the chest. You'll have two ways to deal with it:
- You can force-attack the beholder, or you can open the chest without its permission, which will cause it to attack you. You'll earn 4000 xp for defeating it.
- You can reason with the beholder. If you ask it twice what's in the chest, and if you have 13 Wisdom, or if you have Haer'Dalis or Jan in your party, then you'll work out a loophole in the beholder's orders, and it'll allow you to open the chest. This will earn you 15,000 xp.
Either way, you'll be able to loot the chest, where you'll find Sekolah's Tooth. You'll need the tooth to open the locked door (#10) leading to the rebel compound (#11).
9 - Sea Zombie Lord
In this enclosed area, you'll encounter a zombie war party led by a sea zombie lord. You'll earn about 12,000 xp for defeating them.
10 - Locked Door
To open this door, you'll need Sekolah's Tooth (#8). Past it, you'll be met by a sahuagin chieftain. If you're carrying the Rebel's Orb (from Senityili at #1), then he'll escort you to Prince Villynaty inside the stronghold (#11). Otherwise, he and all of the other rebels inside the stronghold will attack you.
11 - Prince's Stronghold
Exits
- One-way exit to the
Underdark. You'll need a Magical Rope (see the Overview text above) to use this exit.


