 Did we miss anything in this location? Is there something we didn't discover? Let us know!
Overview
Did we miss anything in this location? Is there something we didn't discover? Let us know!
Overview
Note: You'll unlock this area during
Dorn's companion quest.
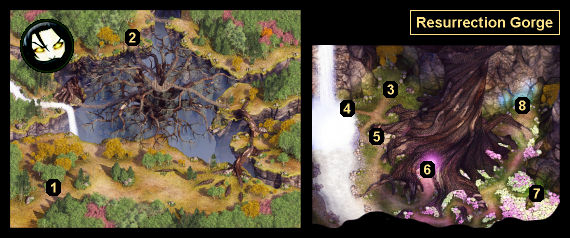
Almost right away in Resurrection Gorge, you'll meet Summerheigh (#1). She'll give you some background information about the area -- most notably, that her son Vernus accidentally summoned the demon Xachrimos into the gorge, and that the dryad Yarrow has been fighting a losing battle to keep Xachrimos from escaping into the rest of the world.
Much later on, you'll encounter Treadsoft (#2). When he spots you, he'll warn you to stay back, but you won't have any choice. The encounter will always lead to a fight. However, once you've done enough damage to Treadsoft, Yarrow will gate in, and she'll order Treadsoft to yield. This will give you two ways to proceed:
- You can keep fighting. The battle shouldn't be difficult at all, and you'll find 100 Acorns of Yarrow on Yarrow's corpse. Each acorn will transport you between the upper and lower parts of the gorge. You'll just need to put them into a Quick Items slot to use them.
- You can talk to the duo. Yarrow will deem you worthy to enter the lower part of the gorge, and she'll teleport you down there.
That is, either way you'll end up in the lower part of the gorge (#3). Once there, you should head to the base of the Great Tree (#6). Inside, you'll find a summoning circle -- and Vernus' corpse -- but you'll discover that you're missing the three summoning stones necessary for Dorn's ritual. Luckily, you'll find them nearby:
- Fil's Summoning Stone. When you talk to the Magnificent Fil (#7), he'll offer you his summoning stone in exchange for a Purple Crystal. You'll have three ways to proceed:
- You can make the trade. You'll find the Purple Crystal to the north (#8) but you'll have to kill six corrupted ankhegs to get to it. When you deliver the crystal to Fil, he'll hand over his summoning stone as promised.
- You can steal the summoning stone from Fil.
- You can simply kill Fil. You'll earn 1450 xp when he dies, and you'll find his summoning stone on his corpse.
- Winterbrook's Summoning Stone. This summoning stone is located in the cave behind Winterbrook (#4). Talking to Winterbrook is optional, but if you're polite to her and humor her, then she'll fetch the stone for you. Otherwise, you'll have to go into the cave yourself and battle a spore colony, five myconoids, and a myconoid king (worth around 3700 xp), and you'll find the summoning stone in the container behind them.
- Xachrimos's Summoning Stone. Xachrimos the demon will be wandering around the lower gorge. He'll be invisible, but he'll keep talking, which means you'll be able to find him by looking for his "speech bubbles." When you get close to Xachrimos, you'll just need to cast a spell like Detect Invisible, Glitterdust, Invisibility Purge, or True Seeing to reveal him. If you don't have any of those spells available, then you can pick up a
Potion of Clairvoyance from Winterbrook (#4) or a
Wand of Glitterdust from the glowing crystals (#8). If you need to rest to memorize one of the spells, then Winterbrook's cave (#4) is the safest place.
When you reveal Xachrimos, he'll attack you, but then once you've done enough damage to him, he'll stop fighting and try to make a deal with you. He'll offer you his summoning stone, the
Abyssal Blade, and perhaps "wealth beyond your wildest imagining" (which will end up being a golden statue of an ogre that you can't pick up). You can accept this deal and let Xachrimos leave, or you can kill him, either before or after accepting the deal. You'll get 8500 xp for killing Xachrimos, and if necessary you'll find the summoning stone and the blade on his corpse.
When you return to the summoning circle (#6) with the three summoning stones, Dorn will casually mention that you'll need to sacrifice somebody during the upcoming ritual. You'll have three options for this -- resurrecting Vernus for the job, summoning a creature using a spell, or using one of your companions -- so if necessary, you should memorize a summoning or resurrection spell before proceeding.
To start the ritual, you'll need to send a creature into the center of the summoning circle. This is the creature that Dorn will sacrifice. You'll then need to pick which demon you want to summon -- Ur-Gothoz or Azothet. Your choice will appear near the center of the circle, and after a brief conversation, a fight will break out. The two demons are tough combatants, but they'll mostly only use melee attacks, so if you buff up first with Bless and Haste and whatever else you have available, then you should be able to defeat them without too many problems.
When the summoned demon dies, Dorn will absorb their power into the
Abyssal Blade, which will gain a bonus against demons or devils, depending on which demon you killed. Then the other demon will show up. You'll have two choices for how to deal with them:
- You can kill the demon. The
Abyssal Blade will gain the bonus it didn't gain before, but Dorn will lose his blackguard powers and become a fallen blackguard (essentially a fighter). This will also prevent Dorn from triggering a quest during Throne of Bhaal.
- You can encourage Dorn to work with the demon. If the demon is Ur-Gothoz, then he'll give Dorn
The Visage. If the demon is Azothet, then Dorn won't receive anything.
Regardless, each character in your party will earn 24,000 xp for completing the ritual. To exit from the lower part of the gorge, you'll have two choices. If you have an Acorn of Yarrow, then you can just use that. Otherwise, you'll need to return to your starting position (#3). When you arrive, Yarrow will teleport you to the surface.
Note: If you kill Azothet, then she'll drop
Water's Edge +3 when she dies. If you raise and kill Vernus, then he'll drop
Leather Armor +1.
1 - Summerheigh
If you're polite to Summerheigh, then she'll become a shopkeeper, but she won't sell anything interesting. If you're rude to Summerheigh, then she might attack you. You'll earn 2000 xp for killing her.
2 - Treadsoft and Yarrow
3 - Lower Gorge Starting Point
4 - Winterbrook
If you kill Winterbrook (worth 650 xp), then you'll find a
Potion of Clairvoyance on her corpse. You can also pickpocket the potion from her. You'll find another
Potion of Clairvoyance inside the cave behind Winterbrook.
5 - Crate
Inside the (locked and trapped) crate here, you'll find a
Rogue Stone.
6 - Great Tree / Summoning Circle
7 - The Magnificent Fil
8 - Glowing Crystals
You'll encounter six corrupted ankhegs here. They're worth 1500 xp each, and they'll drop
Ankheg Shells like regular ankhegs. You might need
Ankheg Shells so
Cromwell in the
Docks District can craft
Ankheg Plate Mail for you. See
Cromwell's page for more information.
If you loot the crystals behind the ankhegs, then you'll find a Purple Crystal (needed by Fil at #7) and a
Wand of Glitterdust.


