 Did we miss anything in this location? Is there something we didn't discover? Let us know!
Overview
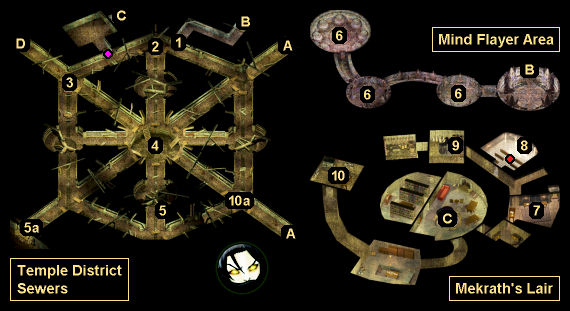
1 - Secret Door
Did we miss anything in this location? Is there something we didn't discover? Let us know!
Overview
1 - Secret Door
This door will start out locked. To open it, you'll need the Sewer Key from Tazok in the
Windspear Hills Dungeon. The "psychic force" that you'll feel just beyond the door will warn you that something dangerous is coming up (past Exit B). All of the corpses in the passage will give you a hint, too.
2 - Tarnor the Hatchetman
At this spot, you'll encounter the bandit Tarnor the Hatchetman (fighter), plus his associates Draug Fea (fighter), Gaius (conjurer), Gallchobhair (fighter), Rengaard (cleric), and Zorl (druid). They'll demand 1000 gp or your life. Obviously, you shouldn't pay them. The bandits aren't really tough, but you might need to buff up before facing them. It's also a good idea to target Gaius first, or else he'll cast Symbol, Fear on you and probably cause half of your party to start running around.
Note: If you have a lot of trouble with the fight, then you don't need to wait for the bandits to talk to you. You can just target their location with a spell like Cloudkill, and change the odds to your favor.
You'll earn over 30,000 xp for defeating the bandits, and when you loot their corpses, you'll find
Full Plate Mail +1,
Hangard's Axe +2, a
Helm of Charm Protection, a
Helmet of Dumathoin (if imported from Siege of Dragonspear),
Plate Mail +1, two
Small Shields +2, and a
Wyvern's Tail +2.
3 - Keldorn
Keldorn (a lawful-good inquisitor) will only appear here once you've progressed far enough into the Cult of the Eyeless quest (see the
Temple District page for more information). If you're rude / insulting to him, then he'll attack you. Otherwise, he'll become available as a companion.
4 - Rakshasa and Kobolds
At this spot you'll encounter a rakshasa and several kobolds. Most of the kobolds will stay in place and shoot you with arrows (including
Arrows of Fire), making them an easy target for a Fireball, which will kill them in one shot. For the rakshasa, it's immune to low-level spells and weapons under +2, but with six against one, you should be able to wear it down even if you don't have great equipment. You'll earn 3000 xp when the rakshasa dies, and you'll find a
Cloak of the Sewers on its corpse.
5 - Roger the Fence / Sea Troll
Roger (#5) will sell you a wide variety of potions. If you ask Roger why he's in the sewers, then he'll bring up the sea troll to the west (#5a) and ask you to kill it. If you oblige, then Roger will pay you 500 gp (even if you lie to him), and you'll also earn 9500 xp.
6 - Mind Flayer Battles
In these three rooms, you'll face increasingly more difficult mind flayer battles. In the first room you'll encounter two archers, an assassin, two fighters, a cleric, a mage, an umber hulk, and a single mind flayer (worth 40,000 xp total). In the second room, you'll encounter three mind flayers, two ultharids, and an umber hulk (worth 69,000 xp total). And in the third room, you'll encounter an alhoon, three mind flayers, two ultharids, and two umber hulks (worth 83,000 xp total).
Mind flayers typically use Psionic Blast to stun their opponents, and then repeatedly use Devour Brain to remove 5 intelligence per cast. If a character is reduced to 0 intelligence by these attacks, then they'll die, which means mind flayers can kill quickly. There are a couple of ways to combat this: summoning creatures to distract the mind flayers while you kill them with ranged attacks, or drawing them to you one or two at a time, and killing them before they can kill you (usually with the help of the Haste spell).
If you can defeat all of the mind flayers in the three rooms, then in a container in the final room, you'll find a
Hammer of Thunderbolts +3 (which
Cromwell can use to craft
Crom Faeyr +5), a
Wand of Wonder, and Illithid Correspondence (which doesn't relate to anything else in the game).
7 - Umber Hulks
In this room, you'll encounter five umber hulks and a minotaur (or salamanders, or yuan-tis, depending on your level). In a (locked and trapped) chest nearby, you'll find a
Necklace of Form Stability.
8 - Altar
This altar will start out locked and trapped. To open it, you'll need to deal with Mekrath (#10) and free Haer'Dalis (#9). Inside the altar, you'll find a
Harp of Discord and a Portal Gem. You'll need the gem for Raelis Shai's quest in the Five Flagons Inn in the
Bridge District.
9 - Haer'Dalis
Haer'Dalis is involved in a quest from Raelis Shai in the Five Flagons Inn in the
Bridge District. To free him from his enchantment, you'll have to kill Mekrath (#10) or complete his quest (or both).
10 - Mekrath / Imp
When Mekrath (#10) first spots you, he'll berate you for breaking into his private sanctum. If you insult him or demand anything from him, then he'll attack you. But if you apologize for intruding, and if you talk to him again and tell him that you're looking for adventure, then he'll give you a quest. He'll tell you that "an annoying little imp" stole a mirror from him and escaped into the sewers, and he'll ask you to get the mirror back.
Note: If you stand next to Mekrath for too long after accepting the quest, then he'll turn hostile.
You'll find the imp -- with a summoned lesser earth elemental -- on the eastern side of the sewers (#10a). You'll earn 2420 for defeating them, and you'll find Mekrath's Mirror on the imp's corpse. When you deliver the mirror to Mekrath, he'll give you Haer'Dalis (who will move over to Exit C), and you'll also earn 18,750 xp. Then Mekrath will teleport away, so you won't be able to complete his quest and kill him both.
If you refuse Mekrath's reward, or if you just attack him at first sight, then you'll earn 14,000 xp for defeating him, and you'll find a
Mage Robe of Fire Resistance and a
Quarterstaff +1 on his corpse.
In the large container next to Mekrath, you'll find a
Rod of Resurrection and a
Wand of Cloudkill.
Exits
- Exit back to the
Temple District.
- Entrance to the Mindflayer Area.
- Entrance to Mekrath's Lair. You can also use this exit to reach the
Bridge District.
- Entrance to the
Cult Compound. This entrance will only become available once you've progressed far enough into the Cult of the Eyeless quest (see the
Temple District page for more information). Prior to that, you'll only see a picture of an eye at the end of the corridor here.


