 Did we miss anything in this location? Is there something we didn't discover? Let us know!
Overview
Did we miss anything in this location? Is there something we didn't discover? Let us know!
Overview
You'll unlock this tomb during one of
Hexxat's companion quests. You'll only be able to travel to it (by tombwalking from the
Graveyard District) if you have Hexxat in your party.
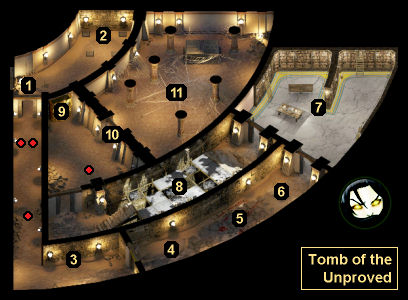
Your goal in the tomb is to acquire the Shroud of the Unproved (#10). To get to it, you'll have to deal with witches (#2), traps (#4-6), magicians (#7), a puzzle (#8), a pop quiz (#9), and finally a spider queen (#10). Once you have the shroud in your possession, Hexxat will offer to take you back to the
Graveyard District. You can either leave right away, or you can do more exploring first, and then leave when it's more convenient.
Note: If Hexxat doesn't offer to take you back, and if you can't talk to her, then it might be because you've been silenced by Raffiyah the spider queen (#10). In that case, you'll just need to rest or wait it out.
1 - Starting Point
This is where you'll begin in the tomb.
2 - Hakima Spirits
At this spot you'll meet the spirits of the four hakima who predicted the coming of the prophet but failed to protect him. If you're polite to them, then they'll give you some background information about the prophet and his shroud. Otherwise, they'll attack you, and you'll earn 40,000 xp for defeating them. If you kill the hakima, then you'll find potions (including
Potions of Superior Healing), magical ammunition, and a
Shortbow +3 on their remains. If you don't kill them, then you can pickpocket the items instead.
In the chest by the spirits, you'll find a Gold Statue, a Lamp of Oil, a Piece of Silk, and a
Scimitar +1. These items will have an effect in the trap room (#4-6).
3 - Statue
If you put the Piece of Silk (from #2) into the statue here, then you'll "decurse" the Gold Statue, the Lamp of Oil, and the Scimitar +1 (also from #2), and they'll no longer trigger anything in the trap room (#4-6).
4 - Trap Room: Statues and Chest
In this part of the trap room, you'll discover eight statues -- four of mages and four of warriors -- and a chest that you can't interact with. If you carry the
Scimitar +1 (from #2) into the area, then you'll wake up the four warrior statues, and they'll attack you. But the warriors will start out "near death," and so they shouldn't prove difficult to kill. If you cure the mages (by casting Stone to Flesh on them, such as from the spell scroll found in the library, #7), then they'll attack you as well.
Each statue that you kill (here and at #6) will earn you 1000 xp. The warrior statues will also drop
Scimitars +1. If you kill all of the statues in the trap room, then you'll be allowed to loot the chest here, where you'll find
Boots of Elvenkind.
5 - Trap Room: Spike Traps
In this part of the trap room, you'll have to cross over numerous spike traps. There isn't any way to disarm the traps, so you'll just need to cross over them quickly, perhaps using Haste or other spells to lessen the damage. If you carry the Gold Statue (from #2) onto the traps, then it'll suddenly gain 1000 weight -- and cause the character carrying it to get stuck on the traps and continually take damage from them. To solve this predicament, you can just drop the statue or put it into
Dragomir's Respite (which you should still have from when you rescued Hexxat from
Dragomir's Tomb).
6 - Trap Room: Statues and Brazier
In this part of the trap room, you'll find six more statues -- four of mages and two of warriors -- and a brazier. As before (#4), if you bring the
Scimitar +1 (from #2) to the area, then the warriors will wake up and attack you. If you bring the Lamp of Oil (from #2) to the brazier, then a fireball will explode in the area, destroying the statues, and a furious djinni will appear and attack you. You'll earn 5000 xp for defeating it. The djinni will also drop
Rashad's Talon +2.
7 - Library
When you enter this library, you'll meet the magicians Diya al-Hafiz, Iqbal al-Din, and Qais Ra'id. No matter what you say to them, the conversation will lead to a fight. All three of the magicians are mages, but they won't cast anything too troublesome, and as long as you buff up a little first, you should be able to defeat them without too much trouble.
Once you've killed two of the magicians, the third one will stop fighting. He'll celebrate his victory over his rivals, and he'll offer you a boon. However, unless the winner is Qais Ra'id and you offer to stay with him after exploring the tomb, any answer you give will cause the magician to attack you. So chances are, you'll end up killing all three magicians, which will net you 36,000 xp.
When you loot the tables and shelves in the library, you'll find several spell scrolls, including
Stone to Flesh, which you might need in the trap room (#4-6). You'll also find the book Tale of the Prophet Unproved, which you'll need for the stone face (#9).
8 - Puzzle Board
When you approach this board, Hexxat will detect how it works, and she'll tell you to avoid squares that contain cracks or webs. If you travel across the board correctly, then you'll make it to the staircase on the other side. If you step on a bad square, then you'll get teleported back to the start, and you'll get attacked by a random spider (including giant spiders, phase spiders, small spiders, sword spiders, and vortex spiders). If the spiders are easy battles, then you can use them to grind some xp if you want.
9 - Stone Face
The stone face here will repeatedly ask you to place your hand in its mouth. When you eventually comply, it'll quiz you about the Prophet Unproved. Sort of annoyingly, even if you've learned the story by talking to people, you won't be able to give the correct answers unless you have the Tale of the Prophet Unproved (from #7) in your inventory.
Here are the correct answers:
- Rabi'ah, Aminah, Bilqis, and Sukayna.
- Raffiyah.
- Muharr.
- Badiat.
- Any answer.
If you answer all of the questions correctly, then the stone face will unlock the door to the Chamber of the Unproved (#10). If you get an answer wrong, then it'll ask you to place your hand in its mouth again, and if you do, then it'll teleport you back to the library (#7), where you can pick up the Tale of the Prophet Unproved, if necessary.
10 - Locked Door
To get this door open, you'll need to satisfy the nearby stone face (#9).
11 - Chamber of the Unproved
When you enter this chamber, you'll meet Raffiyah, who conspired to kill the prophet. You'll have two basic ways to deal with her:
- You can threaten Raffiyah and then attack her and her spiders Jabira and Sundus. You'll earn 22,000 xp for winning the battle, and you'll find the Shroud of the Unproved in the sarcophagus in the back of the room. Picking up the shroud will earn each character in your party an additional 22,000 xp.
- You can flatter Raffiyah and then persuade her to show you the Shroud of the Unproved (by selecting dialogue options 1-2-1-2-1). At that point, you can either attack her (for the same rewards as above), or you can convince her to make a replacement shroud while you keep the original (for no reward).
Regardless, you'll end up with the shroud in your possession.


