 Did we miss anything in this location? Is there something we didn't discover? Let us know!
Overview
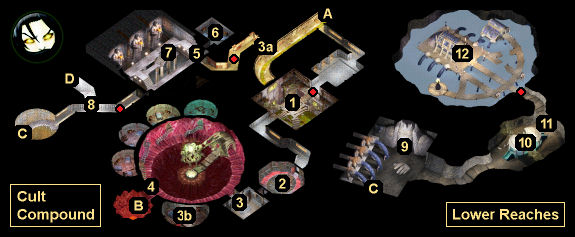
1 - Shadows
Did we miss anything in this location? Is there something we didn't discover? Let us know!
Overview
1 - Shadows
You'll encounter five shadows in this room. When you move to engage them, four ettercaps will appear in the room behind you, and so you'll have to deal with attacks from both sides. You'll earn over 4000 xp for defeating the creatures.
2 - Gas Chamber
When you walk far enough into this chamber, you'll spring a trap that can't be disarmed: the doors will close and lock behind you, a Cloudkill spell will trigger, and two vampiric mists (worth 1000 xp each) will appear. To get the doors back open, you'll need to turn the wheel in the center of the chamber, or just wait long enough for the Cloudkill to expire, or pick the locks.
Ideally, you should send in a character who is immune to poison (from the Cloudkill) or level drain (from the mists), and then have that character trigger the trap, open the doors, and retreat to the rest of your party. The trap will only trigger once.
3 - Gaal
In this chamber (#3), you'll meet Gaal, the eyeless priest you previously witnessed recruiting peasants in the
Temple District. Gaal will try to convince you to join the Cult of the Eyeless as well, and he'll tell you a few things about it -- like that initiates in the cult have their "limiting and offensive" eyes removed, and that the cult's eyeless god is actually a beholder.
If you ask Gaal if there's a way to join the cult without losing one's eyes, then he'll ask you to retrieve a rod from a holy altar in the Lower Reaches, and he'll give you Gaal's Key so you can reach it. This key will allow you to unlock a door to the north (#3a). At the end of the conversation, Gaal will move over to his quarters (#3b).
Note: If you attack Gaal or any of the other cultists, then all of the cultists will turn hostile, and the Unseeing Eye will rise up from the
Pit of the Faithless and attack you. The cultists should be pretty easy to kill, but the Unseeing Eye might be a challenge, depending on how quickly you can pierce / breach its defenses and kill it. Fighting the cultists and the Eye at this point will save you some time, but you'll miss out on some map areas and treasures, and so it's better to wait.
On your way to the Lower Reaches, you'll meet Sassar (#5). He'll tell you that he was Gaal's predecessor in the cult, but that he changed sides when he discovered how evil the Unseeing Eye is. He'll then reveal that the rod you were sent to retrieve is half of a weapon, and that if the Unseeing Eye were to acquire both halves, then it would start "wreaking terrible destruction." So he'll warn you against delivering it to Gaal.
After acquiring the rod -- aka a Rift Device Part -- from the temple in the Lower Reaches (#12), when you return to Sassar, he'll encourage you to steal the other half of the weapon from the Unseeing Eye, and he'll give you the passphrase "the eye is blind." When you use that passphrase with Tad (#4), he'll show you a way to reach the
Pit of the Faithless via
Ghoul Town (Exit B).
Note: If you give the Rift Device Part to Gaal (#3b), then you'll earn 75,000 xp, but he'll decide that you're no longer useful, and he and the rest of the cult -- and the Unseeing Eye -- will turn against you. It's better not to take this path.
In the
Pit of the Faithless, you'll find the second Rift Device Part in a treasure mound on the eastern side. When you pick it up, it'll automatically combine with the first part to form the Rift Device, a usable object with one charge. This will earn you 26,250 xp. Shortly thereafter, the Unseeing Eye will track you down, but using the Rift Device on it will all but kill it, making it easy to finish off. You'll earn 30,000 xp for defeating the Unseeing Eye, and you'll find a
Amulet of 5% Magic Resistance on its corpse.
When you return to the compound, Sassar will be pleased with your progress, and you'll discover that most of the cultists have left for greener pastures. But you'll still have to face Gaal plus four of his elite guards (#3). Defeating them will earn you over 20,000 xp, and you'll find a
Girdle of Fortitude and a
Heavy Crossbow of Accuracy: The Guide on their corpses.
As for the Rift Device, if you try to keep it and take it with you back to the surface, then you'll die "with much suffering" when you reach the
Temple District Sewers. To dispose of the device, you'll need to complete the Avatar's quest in the Lower Reaches (#12).
4 - Tad
Tad won't have much to say to you when you first meet him, but after learning the passphrase from Sassar (#5), he'll show you a way to descend lower into the sewers (Exit B).
5 - Sassar
Sassar is involved in Gaal's quest (#3).
6 - Garuk and Zaelas
Garuk and Zaelas are followers of Sassar (#5), but they're not important for anything.
7 - Sarcophagus
If you open the sarcophagus here, then you'll release a shade lich. Liches are powerful casters -- they'll cast things like Time Stop and Comet, and they're immune to spells of level 5 and below -- so if you're not high enough level yet, then you should probably come back later. Otherwise, please refer to our
Lich Strategy Page for some ways to kill liches.
When you defeat the shade lich, you'll earn 22,000 xp. Then when you interact with the sarcophagus again, you'll find a Golden Arm and Leg. You'll need these body parts for Kangaxx's quest in the
Docks District.
8 - Locked Secret Door
You'll only be able to open this door from the northern side -- that is, as you're making your way back to the compound from the
Pit of the Faithless (Exit D).
9 - Face
If you examine the face carved into the rock here, then you'll summon two sword spiders and a wandering horror (worth 9000 xp total). You can repeat this as many times as you'd like. If you loot the (trapped) nose of the face, then you'll find some spell scrolls.
10 - Rift
To cross the rift here, you'll have to climb up onto the broken bridge and interact with its roof. This will cause a guardian to ask you three questions. The answers are "life," "time," and "the current one." When you get the answers right, the bridge will repair itself -- enough for you to cross it anyway -- and you'll earn 42,250 xp. If you get an answer wrong, then you'll have to fight a greater ghoul (for missing the first question), a skeleton warrior (for missing the second question), or a greater mummy (for missing the third question). You won't earn any xp for defeating the wrong answer creatures.
In one of the "windows" in the bridge structure, you'll either find
Ashideena +2 (EE only, if you didn't import it) or a
War Hammer +2 (otherwise).
11 - Beholders
You'll encounter a group of beholders here. The exact composition of the group will depend on your level, but it will always contain some combination of beholders (worth 14,000 xp) and gauths (worth 9000 xp). Some nearby shadows and shadow fiends might join in the fight as well.
12 - Temple
Outside this temple, you'll meet several diseased ones. However, when you talk to them, they won't remember -- or perhaps care -- who they are, what they're guarding, or who they're guarding it for. You can save these souls from their never-ending fate by completing the Avatar's quest (see below).
Inside the temple, you'll run into an Empathic Manifestation. It'll be hostile and badly wounded, but when you attack it, it'll just tell you that it feeds on hate and suffering, and it won't die. So to kill the manifestation -- at least temporarily -- you'll have to heal it. If you don't have a character with a healing spell memorized, then you can grab a scroll of
Cure Serious Wounds from the altar in the back of the temple, and use it on the manifestation.
When the manifestation goes down, an Avatar will appear in the temple. From talking to him, you'll learn that he's what remains of a forgotten god, and that all he wants to do at this point is end his existence. To that end, he'll give you a Rift Device Part, and he'll ask you to combine it with the Rift Device Part held by the Unseeing Eye (in the
Pit of the Faithless), and to bring the re-assembled Rift Device back to him so he can destroy it -- and end the watch of him and his followers, the diseased ones. This conversation will earn you 25,750 xp.
When you return to the temple with the Rift Device, you'll need to talk to the diseased one by the entrance. No matter what you say to him, you'll encourage him to believe in his god again, which will give the Avatar enough power to destroy the device. This will allow the Avatar (who you'll discover is Amaunator) and his followers to ascend to the Keep of the Eternal Sun. For your reward, you'll receive the medium shield
Saving Grace +3 plus 47,250 xp.
Exits
- Exit to the
Temple District Sewers.
- Passage. After learning the passphrase from Sassar (#5), Tad (#4) will show you the passage here, which will take you down to
Ghoul Town.
- Stairs to the Lower Reaches.
- Exit to the
Pit of the Faithless.


