 Did we miss anything in this location? Is there something we didn't discover? Let us know!
Overview
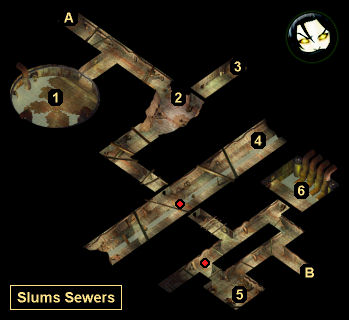
1 - Circular Chamber
Inside this chamber, you'll encounter an Ochre Jelly, an Otyugh, and a Mustard Jelly. You'll earn over 7000 xp for defeating them. After winning the battle, if you reach into the grating in the center of the chamber, then you'll get bitten by something (which will hit you for 8 damage, unless you're protected by a spell like Stoneskin) but you'll find a Hand. You'll need the Hand for the Glowing Pool Puzzle (#6).
2 - Lovers
If you click on the two skeletons on the wall here, then you'll receive The Lover's Ring, which you'll need for the Glowing Pool Puzzle (#6).
3 - Myconid Chamber
Inside this chamber, you'll encounter a Myconid King and two regular Myconids. You'll earn about 2000 xp for defeating them.
4 - Kobolds
You'll encounter a group of kobolds here, including a kobold shaman. The kobolds will start out neutral, but you'll need to kill them for the Glowing Pool Puzzle (#6). The easiest way to do this is to hit them with a Fireball spell, which should kill all of them except for the shaman, and then gang up on the shaman. When the shaman dies, he'll drop his Shaman's Staff, which you'll need for the Glowing Pool Puzzle. If you're playing the EE, then the shaman will also drop a
Circlet of Lost Souls.
5 - Quallo
Quallo and his "friend" the carrion crawler are involved in the Glowing Pool Puzzle (#6). You'll need to kill the carrion crawler so you can claim the Blood of Quallo's Friend for the puzzle.
6 - Glowing Pool Puzzle
When you enter this room, the glowing pool inside will start talking to you. It'll mention keys and locks, but it won't tell you anything about the puzzle or what its prize might be. However, if you examine the drainage pipes in the pool, then you'll see what the four keys are: the Blood of Quallo's Friend (#5), a Hand (#1), The Lover's Ring (#2), and a Shaman's Staff (#4).
To learn more about the puzzle, you'll need to talk to Quallo (#5). If you've read the drainage pipe clues and picked up the keys, then he'll give you hints about the order of the keys:
- The hand is "prime" -- that is, it's first.
- The ring is not first or third.
- The staff will "seal the bargain" -- that is, it's last.
Without too much trouble, you should be able to work out that the order of the keys is: hand, ring, blood, and then staff. To use the keys in the right order, you'll need to return to the drainage pipes and click on the third one, the first one, the second one, and then the fourth one (ordering them from left to right). If you click on the wrong pipe, then you'll take minor lightning damage. When you solve the puzzle correctly, each character in your party will earn 18,000 xp, and you'll receive the two-handed sword
Lilarcor (which you can "converse" with by right-clicking on it).
Exits
- Exit to the
Copper Coronet.
- Exit to the
Slaver Stockade.