 Did we miss anything in this location? Is there something we didn't discover? Let us know!
Overview
Did we miss anything in this location? Is there something we didn't discover? Let us know!
Overview
Depending on what you did while in
Brynnlaw, you'll start out in Spellhold in one of two ways:
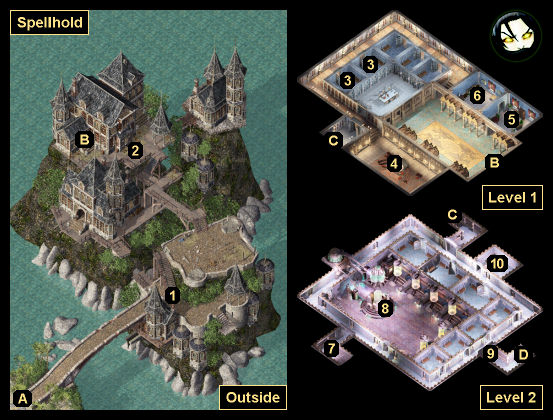
- If you took the Cowled Wizard path, then you'll begin outside Spellhold (Exit A), and you'll have to do some fighting to reach the entrance (Exit B). The Wardstone for Asylum that you got from Perth in
Brynnlaw will allow you to use the entrance. Inside, you'll meet the Coordinator. He'll be friendly enough, and he'll give you a tour of the first level, including introducing you to several of the inmates.
- If you took the deviant path, then you'll begin inside a cell in Spellhold (#3), and each character in your party will earn 38,500 xp. You'll then be met by Lonk the Sane, who will free you from your cell and encourage you to explore and meet the other inmates.
Many of the doors in the asylum will be locked at this point, so you won't have much to do other than talk to the inmates. Luckily, a few of them are interesting. Aphril will tell you what she sees in other planes, including events from Planescape: Torment. Dradeel (an NPC from Werewolf Island in Baldur's Gate: Tales of the Sword Coast) will give you a single recipe for Amnian Dragoon Soup, Baldur's Delight, Monkey Balls, or Ruby Racks. Naljier Skal will give you random gems. Tiax (a companion from Baldur's Gate) will have trouble with his underwear. And Wanev (the former coordinator) will give you scrolls of gibberish. You'll also meet Imoen, who won't recognize you or herself.
Eventually, you'll reach the lounge (#4). At that point, the Coordinator will reveal himself to be Jon Irenicus, and he'll spring his trap on you. If Yoshimo is around, then you'll learn that he's in league with Irenicus -- reluctantly -- and he'll leave your party. You'll then black out and wake up in Irenicus' lab on Level 2 (#8). Irenicus will continue talking to you, and among other things he'll inform you that Imoen is a child of Bhaal as well. Then he'll begin his experiments. This will trigger a dream sequence.
Dream Sequence
The dream sequence will take you back to Candlekeep. A much more lucid version of Imoen will be there, at least in voice, and she'll ask you to "find me within." You'll be on your own for this. Your companions will be in the dream, too, but you won't be able to control them or reach them. So you'll have to do everything with your main character.
When you enter the courtyard surrounding the keep, you'll encounter two entities: Bhaal (on the western side) and a demon (blocking the door to the keep itself). Bhaal will attack you, but you won't be able to defeat him yet, so you should avoid him for now and head over to the demon.
When you talk to the demon, it will demand that you sacrifice a part of yourself to enter the keep. There isn't any way around this. You'll have to lose one point of Agility, Constitution, Intelligence, or Wisdom. One of the latter two is usually the best choice. When you make your sacrifice, the demon will disappear, which will allow you to go inside.
Inside the keep, you'll find Imoen. She'll tell you that the two of you must battle your "instinct" -- aka Bhaal -- together, and that you must lure him back to her. So you'll need to head back outside and locate Bhaal on the western side of the courtyard. He'll talk to you for a bit and then attack you. You still won't be able to kill him, so instead of fighting him, just return to Imoen. Bhaal will follow you.
When you get back to Imoen, you should finally attack Bhaal. You still won't be able to defeat him, but once you've done enough damage to him, Imoen will scream and cry out that something has gone wrong. This will wake you up, and you'll find that you're still trussed up in Irenicus' lab (#8).
Back in Spellhold
Back in Spellhold, you'll learn that Irenicus stole your soul and Bhaal powers -- to cure some sort of curse that had been placed on him and his sister Bodhi -- but your main character will gain 48,500 xp, and everyone else in your party will gain 28,500 xp. Irenicus will be satisfied with the results, and no longer needing you, he'll order Bodhi to dispose of you.
Bodhi, however, will have other ideas. She'll decide to make your death "entertaining," so she'll place you in
Spellhold Dungeon, and she'll give you a chance to escape. Imoen will be there with you, and she'll be available as a companion. If you decide not to add her, then she'll escape on her own, and you'll see her later (in Chapter 6) in the
Copper Coronet in the
Slums District. But be careful! If you drop somebody to add Imoen, then you'll lose that character for the rest of the game.
Back in Spellhold Again
After surviving
Spellhold Dungeon and taking the
Spellhold Tests, you'll end up back in Spellhold (#7). You'll run into Saemon Havarian when you arrive. He'll suggest that you free all of the inmates in Spellhold so they can help you to defeat Irenicus. No matter how duplicitous Saemon might have been to you in the past, you'll decide that his idea has merit.
To free the inmates, you'll need to go back to Level 1 (via Exit C). On your way there, you should avoid Irenicus' lab (#8). If you enter it, then Irenicus will spot you, and he'll kill you, forcing you to load your game. You won't be able to survive an encounter with Irenicus until you have the inmates on your side.
On Level 1, you'll immediately run into Lonk the Sane. You can convince him to release the inmates, you can bribe him 2000 gp to release the inmates, or you can kill him and release the inmates yourself. You can also tell Lonk that you'll return to your cell, but this won't lead to anything. You'll only be able to release the inmates by dealing with Lonk.
When the inmates are free, you'll automatically return to Level 2 and confront Irenicus in his lab (#8). Irenicus won't be an especially tough opponent at this point, but he'll cast Spawn Clones, which will force you to fight a copy of your own party.
Once you've done enough damage to Irenicus, he'll teleport away, and he'll summon several murderers (including Yoshimo, if he was with you) to cover his retreat. This will earn each character in your party 68,500 xp. All of the surviving inmates will suddenly die at this point, and so you'll be on your own for the battle. The murderers shouldn't be too tough, but they'll keep going invisible and backstabbing you, which means spells like Invisibility Purge and True Seeing might prove useful. You'll earn about 10,000 xp for defeating the murderers.
Note: When Irenicus summons the murderers, he'll also open the door to his lab. If you park somebody next to the door and shut it right away, then the murders won't be able to come in (other than Yoshimo, who will start out inside), which will give you time to rest or finish off the clones before facing them. This strategy will also allow you to bunch up the murderers in the doorway and keep your spellcasters safe.
Another Note: The murderers and inmates won't drop anything interesting when they die, but if Yoshimo is with them, then he'll drop all of his gear plus Yoshimo's Heart when he goes down. If you later take Yoshimo's Heart to any Temple of Ilmater (which you'll be able to do when you return to Athkatla in Chapter 6), then the priest there will be able to remove Irenicus' geas from it, and you'll earn 200,000 xp.
To escape from Spellhold, you'll need to return to Level 1. While you're there, you'll run into Saemon Havarian again (outside the cells at #3). He'll inform you that Irenicus is heading to
Suldanessellar, and he'll offer to sail you there. This will give you two options:
- You can accept Saemon's offer. He'll teleport you out of Spellhold, and he'll tell you to meet him in
Brynnlaw, where you'll end up stealing the Pirate Lord's ship.
- You can reject Saemon's offer. This will force you to use the exit portal (Exit D) to escape. The secret door in front of the portal will start out locked. You'll need Jon's Key (from #5) to open it. Each character in your party will earn 20,000 xp when you go through the portal.
Either option will eventually send you to the
Underdark, but if you travel with Saemon, then you'll have to visit the
City-of-Caverns and deal with a rebellion before you get there. Saemon's option is much more profitable. The portal option is quicker.
1 - Battle
You'll have to fight a battle here. During the day, you'll encounter four lizard men (worth 1080 xp). At night, you'll encounter a poison mist, two vampiric mists, and a wandering horror (worth 10,500 xp).
2 - Battle
You'll have to fight a battle here as well. During the day, you'll encounter an air elemental (worth 7000 xp). At night, you'll encounter two shadows, a shadow fiend, and two wraiths (worth 6840 xp).
3 - Cells
These are the cells where you'll start out if Desharik the Pirate Lord commits you to Spellhold.
4 - Lounge
You'll find a
Rogue Stone in this room.
5 - Office
You'll encounter a stone golem (worth 8000 xp) in this room. After defeating it, you'll find the First Journal of Jon Irenicus and the Second Journal of Jon Irenicus on the desk. Combined, they'll reveal Irenicus' plans. You'll also find a
Staff of Thunder and Lightning +2 in a (locked) cabinet.
6 - Bedroom
Inside this room, you'll find a
Horn of Silence, Jon's Key, and a
Rogue Stone. The key will open the secret door (#9) blocking the way to the exit portal (Exit D).
7 - Starting Point
This is where you'll start out after completing the
Spellhold Tests.
8 - Irenicus' Lab
9 - Secret Door
This secret door will start out locked. To open it, you'll need to pick up Jon's Key (from #5).
10 - Storage Room
Inside this room, you'll find another copy of the First Journal of Jon Irenicus.
Exits
- Path to
Brynnlaw.
- Entrance to Spellhold.
- Stairs between Levels 1 and 2.
- Portal to the
Underdark.


