 Did we miss anything in this location? Is there something we didn't discover? Let us know!
Overview
Did we miss anything in this location? Is there something we didn't discover? Let us know!
Overview
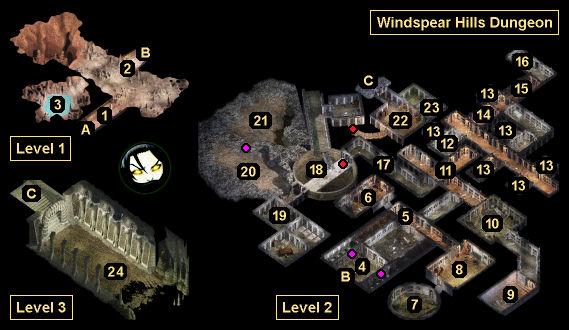
The Windspear Hills Dungeon is involved in events from
Windspear Hills, where Lord Firkraag tricked you into killing knights from the Most Noble Order of the Radiant Heart, and also kidnapped the child of Garren Windspear. So you'll need to enter the dungeon to confront Firkraag and rescue the child -- or perhaps work with Firkraag if you're feeling evil.
When you enter the dungeon, you'll be greeted by a group of hobgoblins, including Chieftain DigDag (#1). He'll inform you that you're "early," and then he'll leave you to his men, who will probably die quickly. You'll only earn 715 xp for winning the battle. As you explore the rest of Level 1, you'll encounter more wimpy creatures, including orcs, kobolds (#2), vampiric mists (#3), and even some more hobgoblins. None of these battles should cause you any problems.
When you explore Level 2, however, you'll face tougher enemies, including golems (#17, #21), vampires (#10), and a hostile adventuring party (#11). Most of Level 2 is optional, but it's a good idea to clear it out anyway so you can pick up some anti-dragon gear: a
Dragon Helm (#18), a
Dragon Scale Shield +2 (#16), and
Dragonslayer +2: Peridan (also #16).
When you reach Level 3, you'll discover that Lord Firkraag is really a red dragon (#24). He'll tell you that he targeted you because of something your foster father Gorion did to him years ago, but then he'll disclose that he's bored with you now, and that you can leave. You'll have two ways to respond:
- If you're set on rescuing Windspear's child, then Firkraag will shrug (as much as dragons can shrug), and he'll send his mage Conster to guard the prison (#22). This will result in you fighting Conster the next time you're there. Conster will drop the Firkraag Prison Key when he dies, which will allow you to open the kidnapped child's cell. This will earn you 23,750 xp. Then when you return to Windspear (in his cabin in
Windspear Hills), he'll thank you for your help, and each character in your party will earn 44,500 xp.
Also, if you're playing a paladin, then Windspear will direct you to the High Hall of the Radiant Heart in the
Temple District. Inside, Prelate Wessalen (in the back) will invite you into the order. If you accept, then the order's building will become your stronghold. See the
Paladin Stronghold page for more information about what you can do there.
- If your Reputation is low enough, and if you're not playing a paladin, then you can tell Firkraag that you don't much care about Windspear or his child, and that you're willing to acquire the Deed to the Windspear Hills for him. Firkraag will like this idea, and he'll send his mage Conster to the prison (#22) to kill Windspear's child.
When you return to Windspear (in his cabin in
Windspear Hills), you'll either need to kill him for the deed or pickpocket it from him. Then when you return to Firkraag, he'll reward you with a
Cloak of the Shield, and each character in your party will earn 40,500 xp.
Fighting Firkraag is optional. You can do that at any time, whether you work with him or not. See Firkraag's entry below (#24) for some battle strategies.
1 - Hobgoblins
2 - Kamikaze Kobolds
At this spot, you'll encounter Ruhk Transmuter and four kamikaze kobolds. You'll earn 7000 xp for killing Ruhk, plus 150 xp each for the kobolds who don't blow themselves up. You'll find
Ring of Fire Resistance: Batalista's Passport on Ruhk's corpse.
3 - Cavern
When you approach this cavern, you'll get attacked by five vampiric mists. You'll earn 5000 xp for defeating them. Then in the back of the cavern, you'll find a pool that you can loot for an
Amulet of Protection +1: The Protector.
4 - Arrival Ambush
When you arrive on Level 2, you'll get ambushed by eight orc archers shooting at you from behind walls. To fight back, you'll either need ranged attackers of your own, or you'll need to detect (and pick open) the two secret doors leading to the archers. You'll earn 8000 xp total for defeating the archers, and you'll find 80
Arrows of Fire on their corpses.
5 - Golems
In the hallway here, you'll either encounter a clay golem, two stone golems, and an iron golem, or two stone golems and an adamantite golem. You'll need specific weapons for defeating the golems: crushing weapons for clay golems, +2 weapons for stone golems, and +3 weapons for iron and adamantite golems. You'll earn over 30,000 xp for winning the battle.
Note: If you have trouble with the golems, then immediately retreat towards the exit (Exit B) when you spot them. Iron golems and adamantite golems are huge, and they won't be able to fit through the doorway. So by retreating, you'll be able to break up the battle into at least two parts. And if you have a +3 or better ranged weapon, then you can shoot the iron / adamantite golem while it's in the doorway, and never have to worry about it hitting you.
6 - Derg and Flaylan
In this room you'll meet the orcs Derg and Flaylan. They'll beg you to spare their lives, which you can do or not, and it won't make any difference. If you spare Flaylan, then he'll tell you a "good secret" -- that Firkraag is waiting for you, and that he doesn't need any help to defeat you. You'll encounter Firkraag on Level 3 (#24).
7 - Otyugh
You'll earn 5000 xp for defeating the otyugh here.
8 - Troll Cook
When you enter this room, you'll meet a troll cook, who will politely ask you to jump onto the grill. No matter how you respond, you'll end up fighting the troll plus a group of hobgoblins. You'll earn about 2000 xp for winning the battle.
On a broken table in the room, you'll find an Orcish Cookbook. It'll give you some hints about the creatures you'll encounter in other parts of Level 2.
9 - Shadows and Wraiths
In this room, you'll encounter shadows, shadow fiends, wraiths, and even a greater wraith. You'll earn over 14,000 xp for defeating these creatures, and you'll find 40 a Chapel Key in the container in the back of the room. You'll need the key to unlock the door just before the tomb entrance (#11).
10 - Undead
In this room, you'll encounter a large collection of undead creatures, including ghasts, mummies, and vampires. If you have a paladin with negative plane protection and disease immunity, you should let him tank as much as possible. Otherwise, you'll probably have to deal with a variety of afflictions after the battle. You might also want to creep towards the room and try to draw the enemies to you one or two at a time. You'll earn around 80,000 xp for defeating all of the creatures.
11 - Tomb Entrance
Next to the entrance here, you'll meet Samia, a historian searching for texts detailing the life of King Strohm III of Tethyr. She'll tell you that something prevents her from entering the tomb where the texts are located, so she'll ask you to go inside and retrieve them for her. To help you out, she'll give you Samia's Key, which will allow you to unlock the tomb's entrance. She'll also warn you that the tomb contains seven guardians, the last of which is supposedly impossible to detect.
Note: All around the tomb, you'll find trapped "doors" that don't actually lead anywhere. So be sure you have your thief detecting traps.
Right away in the tomb, you'll discover the Book of King Strohm III (#12). It'll give you some important information about the tomb -- namely, that you'll need the
Mask of King Strohm III in order to access the burial chamber (#16), and that the mask was broken up into six pieces, with each piece being held by a guardian creature. That means you'll have to kill the six guardians (#13) to pick up the six pieces. When you have all six, they'll automatically assemble themselves into the mask, and you'll earn 24,550 xp.
With one character wearing the mask, when you reach the final guardian (#15), you'll be able to see it and fight it. Otherwise, it'll be invisible and undetectable, and it'll keep hitting you with Fire Ring spells. When the guardian dies, the door to the burial chamber will unlock.
The burial chamber itself (#16) will be almost completely bare. You won't find any texts there, but when you dig up King Strohm III's grave, you'll find a
Dragon Scale Shield +2 and the long sword
Dragonslayer +2: Peridan.
When you exit the burial chamber, you'll run into Samia and her adventuring pals. They'll insult you for doing their work for them, and then they'll attack you. This battle can be complicated since you'll be fighting in tight quarters, but if you can get your melee fighters into the room with Samia and keep your ranged fighters in the burial chamber, then you should be all right. You'll earn 45,000 for defeating Samia's war party, and you'll find some +1 and +2 items on their corpses, including a
Large Shield +2 (in the original game) or
Pellan's Shield +2 (in the EE).
12 - Fell Ghast
Inside this room, you'll encounter a fell ghast worth 850 xp. You'll also find the Book of King Strohm III in a container.
13 - Mask Guardians
Each guardian (an efreeti worth 8000 xp) will drop a Piece of Burial Mask when it dies. You might want some fire resistance when fighting them.
14 - The Director
Inside this room, you'll encounter a beholder called the Director. You'll earn 10,000 xp for defeating it.
15 - Final Guardian
You'll only be able to see this guardian (a fire elemental worth 10,000 xp) if someone in your party is wearing the
Mask of King Strohm III.
16 - Burial Chamber
Inside this chamber, you'll find a
Dragon Scale Shield +2 and the long sword
Dragonslayer +2: Peridan.
17 - Wolfweres
In this hallway, you'll encounter a group of dread wolves (worth 650 xp), wolfweres (worth 1400 xp), and greater wolfweres (worth 15,000 xp). They won't drop anything useful when they die.
18 - Well
You'll encounter a group of orogs around the well here, and while you're fighting them, you'll almost always attract the attention of a group of golems to the north. So be prepared for a major battle. As always, if you have trouble with the golems, then just run through a doorway. The iron / adamantite golem in the group won't be able to follow you, which will give you an easier time defeating it.
After the battle, when you activate the winch attached to the well, you'll draw up a
Dragon Helm plus an air elemental worth 7000 xp.
19 - Grancor and Falik / Wolfwere Lair
Inside this room, you'll meet the adventurers Grancor and Falik. They'll try to convince you that they have wounded friends who need healing, but the more you talk to them, the more it'll become apparent that they're lying. Eventually, if you keep questioning their story, then they'll turn into wolfweres (one greater and one regular) and attack you. Otherwise, if you believe their lies and follow them into the back rooms, then they'll spring an ambush on you, and you'll have to fight them plus their two friends (regular wolfweres) at the same time.
In all, you'll earn 19,200 xp for defeating the wolfweres, and when you loot the containers in their lair, you'll find a
Horn of Blasting plus ammunition, spell scrolls, and 2120 gp.
20 - Gerg, the Captain, and the Troll
When you reach this spot, you'll witness the captain trying to get Gerg and the troll to clean the golems to the north (#21). Gerg and the troll won't want any part of this chore, and they'll end up attacking the captain. If you just watch the battle, then Gerg and the troll will win and then leave. If you attack all three, then you can earn up to 3235 xp.
21 - Golems
You'll encounter a group of golems here, including either an iron golem or an adamantite golem. The big golems will be able to fit through the secret door leading into their part of the cavern, but not through the doorway to the well (#18), and so that's where you should retreat if needed. You'll earn over 30,000 xp for defeating the golems, and you'll find the longbow
Heartseeker +3 in the rocks behind them.
22 - Prison
Inside this chamber, you'll encounter Chieftain DigDag, Tazok (even though he died with Sarevok in the
Undercity in Baldur's Gate), and three orcs. You'll earn over 8000 xp for defeating them, and you'll find
Delver's Plate +2, a
Dragon Blade +3 (if imported from Siege of Dragonspear) or a
Two-Handed Sword +2 (otherwise),
Full Plate Mail +1, a Sewer Key, and several spell scrolls and gems (including two
Rogue Stones and two
Star Sapphires) when you loot the corpses and nearby containers. You'll need the Sewer Key in the
Temple District Sewers.
23 - Cell
Inside this cell, you'll find Garren Windspear's child (Taar or Iltha, depending on the gender of your main character). S/he'll tell you that a mage holds the key to the cell, and s/he'll warn you against facing Firkraag. Conster (see #24) is the mage in question. If you defeat him in battle, then he'll drop the Firkraag Prison Key when he dies. When you use it to open the cell, you'll earn 23,750 xp.
24 - Conster and Firkraag
You'll meet Lord Firkraag and his lackey mage Conster here. No matter what you say to Firkraag, he'll send Conster to the prison (#22), so at the end of your conversation, it'll just be your party and Firkraag in the chamber -- all ready for a fight. But the fight is optional. You can challenge Firkraag at any time.
When you decide to attack Firkraag, realize that he won't start out hostile to you. This will give you a chance to arrange your party and cast some spells. You should cast a bunch of buffs (like Bless, Haste, Resist Fear, Protection from Evil, and Resist Fire and Cold). Summoned creatures can be useful as well. One character (probably your tank) should be wearing the anti-dragon gear. And it's a good idea to spread your party out. That way if things get desperate, then you can let Firkraag chase one character around while the rest of your party hacks at him.
During the fight, Firkraag will cast some spells (like Charm and Silence), he'll try to Fear your party, he'll breathe fire (luckily only rarely), and he'll buffet his wings, causing damage and knocking characters down and back. But mostly, he'll just hit you with slashing damage, and so that's what you should guard against. Meanwhile, Firkraag is immune to fire damage, and he'll resist most other damage to some degree, so it'll take you a while to wear him down.
If you can defeat Firkraag, then you'll earn 64,000 xp, and you'll find
Carsomyr +5, a
Cloak of the Shield (unless he gave it to you earlier), and
Red Dragon Scales on his corpse. The scales can be used by
Cromwell to forge
Red Dragon Scale armor.
Note: If you're playing a paladin, then you can receive a quest to kill Firkraag from your
Paladin Stronghold. So you might want to wait for that (since it won't take long to get to the quest) rather than kill Firkraag right away.
Exits
- Exit to
Windspear Hills.
- Stairs between Levels 1 and 2.
- Stairs between Levels 2 and 3.


