 Did we miss anything on this map? Is there something we didn't discover? Let us know!
Overview
Life in the Hive is the worst of all places unless, of course, a berk likes living in the heart of decay, where anyone's life is cheaper than the cost of a cutter's next meal. Life here is seldom boring, but it's also short and deadly. Honest work is scarce, so people live by whatever means they can. For most, that means stealing or signing on for dangerous jobs that no sane basher'd touch. This is where a cutter goes when he needs bodies for a staged riot, if he wants to raise a company of ill-trained fighters, or if he wants an assassin willing to risk all on a desperate job.
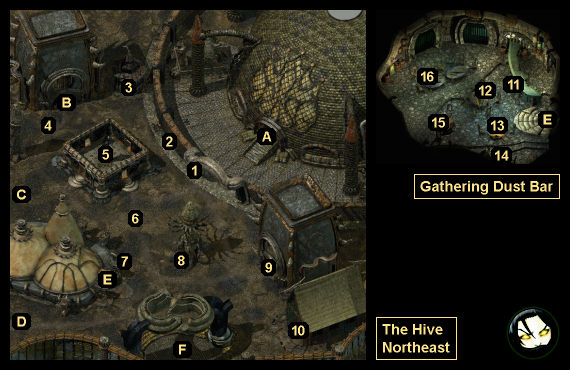
1 - Pox
Did we miss anything on this map? Is there something we didn't discover? Let us know!
Overview
Life in the Hive is the worst of all places unless, of course, a berk likes living in the heart of decay, where anyone's life is cheaper than the cost of a cutter's next meal. Life here is seldom boring, but it's also short and deadly. Honest work is scarce, so people live by whatever means they can. For most, that means stealing or signing on for dangerous jobs that no sane basher'd touch. This is where a cutter goes when he needs bodies for a staged riot, if he wants to raise a company of ill-trained fighters, or if he wants an assassin willing to risk all on a desperate job.
1 - Pox
You'll meet a Collector named Pox here. He'll tell you a bit about Collectors and Dustmen, and if you ask him about Pharod, then he'll direct you to Sharegrave in
Ragpicker's Square. You'll also learn that in the past you've used Pox to get you back inside the Mortuary (Exit A). If you have Charisma 13+, then you can pretend to be dead, and you'll get 500 xp when Pox sells your corpse. Otherwise, you can just have Pox kill you, but you won't earn any xp this way.
2 - Dabus
Around here (and also elsewhere throughout the Hive), you'll meet a Dabus making repairs. When you try to talk to it, you'll see symbols over its head, and you'll learn from Morte that Dabus are janitors for the Lady of Pain, and that they speak through word puzzles called rebuses. If you have Intelligence 13+ and Wisdom 13+, then you'll figure out how to speak to the Dabus, and this will earn you 1000 xp. But the Dabus won't say anything interesting.
3 - Shilandra's Kip
Shilandra is involved in Mar's quest from the
Hive Northwest.
4 - Ingress
Around here, you'll run into a woman named Ingress, who will tell you about her phobia of portals and how she can't find her way back home. If you talk to Candrian at the Smoldering Corpse Bar in the
Hive Southeast, then he'll agree to help Ingress. After informing Ingress of this and then returning to Candrian, you'll earn 750 xp plus
Ingress' Teeth, a great weapon for Morte that will increase in power as Morte levels up.
5 - Dustman Monument
You'll meet three people of interest at this monument:
- Death-of-Names. If you give him a name, then he can show you where it's located on the monument, or tell you if the person is still alive. You can also give Death-of-Names a name to carve onto the monument. This will come up after you've met the Crier of Es-Annon in the
Hive Southeast.
- Quentin. He'll tell you that the monolith is "a tombstone for the planes," and that Dustmen carve the names of all who die into its walls.
- Sev'Tai. She'll ask you to kill the three Chaosmen responsible for destroying her cart and killing her sisters. You'll find these Starved Dog Barking Thugs in the
Hive Southeast. You'll earn 175 xp for each one you kill, and afterwards when you return to Sev'Tai, she'll reward you with a
Copper Earring and 250 xp.
6 - Baen the Sender
Around here, you'll meet a man named Baen the Sender (who will be easy to spot because he's wearing purple). He'll tell you that he's a messenger, and that he's looking for an overseer named Craddock. If you offer to help Baen, then he'll tell you the message that he's supposed to deliver: "The shipment must be in Curst by the third-day or there will be a penalty." You'll find Craddock in the
Hive Southwest. After relaying the message to Craddock, when you return to Baen you'll earn 30 coppers and 500 xp.
7 - "The Post"
At this spot, you'll meet a zombie called "The Post." It'll have various fliers stuck to its body, including notices from the Office of Vermin and Disease Control in the
Hive Southwest and Initiate Norochj in the Gathering Dust Bar (#13). If you "ignore the notices, examine the graffiti," then you'll see Pharod's name, and when you say it to the zombie, the zombie will point you towards
Ragpicker's Square. This will earn you 500 xp. You can also pry a
Cobblestone from the zombie's head for 250 xp.
Cobblestones aren't used for anything.
8 - Annah
This is where you'll first meet Annah, a striking red-haired tiefling girl. She won't be very friendly at this point, but you can attempt to learn the whereabouts of Pharod from her. If you "turn on the charm" (which requires Charisma 14+), then you can get information from her for 10 coppers. Otherwise, it'll cost you 20 coppers. Annah will tell you to look for Pharod in an alley "spireward" (that is, south and west) from the Mortuary.
Using Annah's directions, you'll wind up in the
Alley of Dangerous Angles (Exit D), but this isn't where you'll find Pharod. Instead, you'll encounter some Razor Angels or Darkalley Shivs who will try to extract a "toll" from you. If you return to Annah and confront her about her misdirection, then she'll simply scoff at you and stick to her story. You can threaten her life using either a truthful or bluffing statement, but this won't get you anywhere, and your alignment will shift towards Evil or Chaotic (respectively) if you fire off one of these responses.
9 - Open Tomb
This open tomb is where you'll end up if you took the hidden portal out of the
Mortuary. On the floor you'll find 40 coppers and a note from someone named Penn instructing Vaxis (the Anarchist spy in the
Mortuary) to first secure a new hiding place and then start investigating Pharod. The note will mention that Initiate Emoric in the Gathering Dust Bar (#16) might know something about Pharod's whereabouts.
Additionally, the game will allow you to rest inside this tomb, so take advantage of the fact whenever you get a chance.
10 - Angyar's Home
Inside this house, you'll meet Angyar and Wife-of-Angyar. When you talk to Angyar, you'll sense that he's angry and distracted about something, but he won't tell you what. Instead, he'll threaten you, and if you threaten him back, then he and his wife will attack you. So don't do that.
Instead, talk to Wife-of-Angyar. From her, you'll learn that Angyar has been troubled since he signed a Dead Contract with the Dustmen, as apparently he's having second thoughts about spending his undead life as a zombie worker. Wife-of-Angyar will then let you know that Gravesend at the Gathering Dust Bar (#12) is the Dustman that Angyar signed the contract with.
After acquiring
Angyar's Dead Contract from Gravesend, you'll need to show it to Angyar and then rip it up. This will earn you 750 xp and push your alignment towards Good. Angyar will also suddenly like you a little bit better, and he'll agree to answer questions for you and allow you to rest in his house for free. Meanwhile, Wife-of-Angyar will become a shopkeeper and sell you
Bandages and
Needles and Thread.
Note: Before showing the contract to Angyar, you can show it to his wife and get 11 coppers from her. But if you try to get any money out of Angyar, then he and his wife will attack you.
When you talk to Angyar after settling his contract, he'll tell you that Pharod's hideout is located somewhere beneath
Ragpicker's Square, and that to get to it, you'll need to activate a portal by carrying
Junk with you. Learning this information will earn you 500 xp.
11 - Sere the Skeptic
Sere the Skeptic is having doubts about her Dustman beliefs. Talk with her for a bit and she will reveal to you that she is afraid of dying. If you ask her what has caused this "crisis of faith," then she'll tell you how she feels about the faction, and she'll ask you for your advice. Steer her in whatever direction you like for 500 xp. If you have previously joined the Anarchist faction, then you can convince her to defect from the Dustmen and follow your cause instead. This will earn you another 1000 xp. You can also ask Sere about Pharod, and she'll direct you to
Ragpicker's Square.
12 - Mortai Gravesend
Mortai Gravesend is the Dustman who worked out the Dead Contract with Angyar (#10). When you talk to him, he'll size you up for a contract as well. If you sign it, then you'll earn 50 coppers and 500 xp, and you'll have a vision of a grinning skull (hinting that you've signed one of these contracts before), which will earn you an additional 250 xp.
After signing the contract with Gravesend, you'll also be allowed to sign contracts with Old Copper-Eyes (#15) and Emoric (#16). You'll earn 100 coppers from Old Copper-Eyes, and 50 coppers and 750 xp (replaying the same vision you had with Gravesend) from Emoric. However, signing multiple contracts will make you more Chaotic.
To get Gravesend to release Angyar from his contract, you'll just need to point out that the deal is causing Angyar so much distress that he might not be able to achieve True Death, and that True Death is much more important than a mere contract. When Gravesend hands over
Angyar's Dead Contract, you'll earn 500 xp. You can also ask Gravesend to fetch
Angyar's Dead Contract and then either pickpocket him for it or kill him for it. Just note that attacking Gravesend -- or anyone else in the Gathering Dust Bar -- will cause everyone there to turn hostile.
13 - Norochj
When you talk to Norochj, he'll tell you that something is disturbing the dead in the
Mausoleum to the north (Exit B), and he'll ask you to look into it. He'll also teach you the semi-circle gesture that will cause the entrance portal to the
Mausoleum to appear. After learning what's going on inside the
Mausoleum, when you return to Norochj, you'll earn 1000 xp plus an extra reward based on your Charisma: 100 coppers for Charisma 1-12, 200 coppers for Charisma 13-15, or 300 coppers and three
Bandages for Charisma 16+.
If you're in the process of joining the Dustman faction (see #16), then Norochj will also ask you to track down an imposter within the Hive who is posing as a Dustman. This "not-Dustman" is a guy named Ash-Mantle, and you'll find him south of the marketplace in the
Hive Southwest. After dealing with the imposter, when you return to Norochj, you'll earn 750 xp plus another extra reward based on your Charisma: 100 coppers for Charisma 1-12, 200 coppers for Charisma 13-15, or 300 coppers and three
Bandages for Charisma 16+.
14 - Awaiting-Death
Awaiting-Death is a Dustman initiate who has lost the will to live. If you're working with Emoric (#16) to become a Dustman, then one of your tasks will be to talk some sense into Awaiting-Death. If you've signed a contract with any of the Dustmen in the bar, then Awaiting-Death will quiz you on why you chose to sign one. If you tell him the truth, that it's a win-win proposition for you, then your alignment will shift towards Chaotic.
There are a couple of different ways to talk Awaiting-Death out of dying. You can commit suicide yourself to show him death firsthand. You can also offer to end his life for him, but when you start strangling him, he will decide that he would rather live. Make sure you don't follow through with killing him or else the other NPCs in the bar will turn hostile (but you'll earn 250 xp). If you accept any money for trying to kill Awaiting-Death, then your alignment will shift towards Evil. Once you've convinced Awaiting-Death that he doesn't want to die, you'll earn 500 xp.
15 - Old Copper-Eyes
After signing a contract with Mortai Gravesend (#12), you'll also be able to sign a contract with Old Copper-Eyes. This will earn you 100 coppers but make you more Chaotic.
16 - Emoric
If you're looking to join the Dustman faction, then Emoric is the one you should meet with. He'll give you a few tasks to complete before he'll allow you to join:
- You'll need to talk to Norochj (#13) and complete his quests involving the
Mausoleum (Exit B) and the Dustman imposter.
- You'll need to talk to Awaiting-Death (#14) and convince him that he doesn't want to die. This will earn you 250 xp when you return to Emoric.
- You'll need to talk to Sere the Skeptic (#11) and learn about her crisis of faith. This will earn you 500 xp when you return to Emoric.
- Finally, you'll need to investigate what happened to Soego, a Dustman you might have met while inside the
Mortuary. You'll find him in the
Dead Nations. To complete Emoric's task, you'll need to learn Soego's secret.
After completing these tasks, when you return to Emoric, you'll be allowed to join the Dustman faction. Joining will earn you 2500 xp (or just 1000 xp if you've already joined another faction), give you access to the Dustmen Vault (aka Emoric's shop), and grant you the Dead Truce innate ability (+4 AC vs. Undead). If you subsequently tell Emoric that you're immortal, then he'll kick you out of the faction -- which might be a good thing, as it'll allow you to buy what you want from him first and then join another faction afterwards.
Note: Some of the items available in the Dustmen Vault include
Death of Desire,
Dustman Embalming Charms (Lesser and Greater),
Punch Daggers of True Death, and a variety of charms and scrolls.
You can also ask Emoric about Pharod, and he'll tell you that the Collector has been selling very old corpses to the Dustmen. If you agree to investigate the matter and tell Emoric everything you know after visiting Pharod in the
Buried Village, then you'll earn 2500 xp and 300 coppers.
Exits
- Entrance to the
Mortuary. To re-enter the
Mortuary using this entrance, you'll need to talk to one of the guards out front and tell him that you'd like to see Dhall or pay your respects to Deionarra. The guards will also direct you to Emoric in the Gathering Dust Bar (#16) if you ask them about Pharod.
- Entrance portal to the
Mausoleum. You won't be able to make this portal appear until after you've spoken to Norochj in the Gathering Dust Bar (#13).
- Exit to the
Hive Northwest.
- Exit to the
Alley of Dangerous Angles.
- Entrance to the Gathering Dust Bar.
- Exit to the
Hive Southeast.


