 Did we miss anything on this map? Is there something we didn't discover? Let us know!
Overview
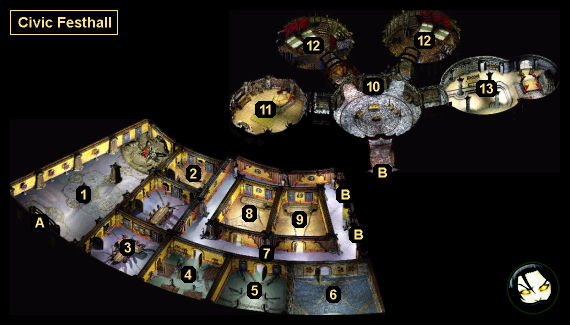
The Civic Festhall is a combination concert hall, opera house, museum, art gallery, tavern, wine shop, and faction headquarters, mixed in with a few other services that are best left undescribed. This mash of services makes sense, given that the place is run by the Sensates. Their desire to experience everything includes the arts, but also much, much more. There's tall tales to be told about what happens in the back halls of the Sensate headquarters....
1 - Foyer
Did we miss anything on this map? Is there something we didn't discover? Let us know!
Overview
The Civic Festhall is a combination concert hall, opera house, museum, art gallery, tavern, wine shop, and faction headquarters, mixed in with a few other services that are best left undescribed. This mash of services makes sense, given that the place is run by the Sensates. Their desire to experience everything includes the arts, but also much, much more. There's tall tales to be told about what happens in the back halls of the Sensate headquarters....
1 - Foyer
You'll meet a few people of interest in this part of the Festhall:
- Jolmi (near the entrance). She'll tell you that she's heard about you -- that you cannot die -- and she'll offer you money if you let her kill you. There isn't any downside to accepting this deal. You'll earn 1000 coppers for Charisma 1-12, 1500 coppers for Charisma 13-15, or 2000 coppers for Charisma 16+.
- Jumble Murdersense (wandering around). This portly fellow is involved in Reekwind's quest from the
Hive Southwest.
- Mertwyn the Headless (wandering around, bumping into things). Mertwyn will only have a wooden head in his possession, so he won't be able to talk to you, but he will pantomime that he'd like to get his real head back. You'll discover Mertwyn's head inside a
Steel Box, found amongst the loot from a thug boss and his three thug cronies, who will likely attack you in the
Clerk's Ward (near Finam the Linguist's house). When you reunite Mertwyn's head with his body, you'll earn 200 coppers and 8000 xp.
- Splinter (near the entrance). He's the doorman for the Festhall. He can give you background information on the Festhall and the Sensate faction, he can accept you into the Sensate faction (just tell him that you'd like to join, or that you're already a member), and he can escort you to the
Sensoriums (but note that the
Private Sensorium is only available to Sensates). Once you've joined the Sensates, Splinter will also become a shopkeeper, and he'll sell you a variety of charms and scrolls.
2 - Classroom
You'll meet two people of interest in this classroom:
- Montague (wandering around). He's involved in Juliette's quest in the
Brothel of Slating Intellectual Lusts in the
Clerk's Ward.
- Qui-Sai (meditating in the corner). He'll appear to be a statue, but when you move to strike him, he'll wake up and start talking to you. To get him to answer your questions, you'll need to be patient with him. If you ask Qui-Sai what he's doing, and if you have Wisdom 16+, then he'll teach you the Way of the Stone, which will improve your AC by 1. If you ask him what he's doing in the Festhall, then he'll inform you that he's the fighter trainer. If you have Intelligence 15+, then you'll be able to convince him to return to the training hall (#4) and get back to work. This will earn you 10,000 xp.
Note: If you don't have Intelligence 15+, then you'll still be able to convince Qui-Sai to start training again, but you'll have to talk to Eli Havelock (either in the Festhall at #5 or in the
Clerk's Ward) and Lady Thorncombe (either in the Festhall at #6 or in the
Public Sensorium) to learn the right counter arguments.
3 - Classroom
Inside this classroom, Ghysis the Crooked will give a lecture (of sorts) about the Blood War. If you ask him how to survive the war, then you'll eventually have a memory, which will earn you 1500 xp. If you purchased the
Beer Goggles from the Curiosity Shoppe located in the
Clerk's Ward, then Ghysis will elaborate about how he survived the war -- by killing two of his fellow soldiers and giving them up to the Pillar of Skulls. If you blackmail him about this, then you'll receive a
Blood Fly Charm, two
Clot Charms, and 200 coppers.
4 - Fighter Training Hall
The Festhall's fighter trainer is Qui-Sai (#2), but you'll have to convince him to return to work. Qui-Sai will be able to teach you up to rank 3 for each weapon proficiency. After that, you'll have to go to Korur in the
Lower Ward.
5 - Thief Training Hall
The Festhall's thief trainer is Eli Havelock. You'll find him in the
Lower Ward, and you'll have to convince him to return to work.
6 - Mage Training Hall
If you talk to the mages-in-training in the back of this chamber, then they'll inform you that the Festhall's mage trainer is Lady Thorncombe, who spends a lot of her time -- "perhaps too much" -- in the
Public Sensorium. To enter the Sensoriums, you'll need to talk to Splinter (#1). As with the other trainers (#4, #5), you'll have to convince Lady Thorncombe to return to work.
7 - Merriman
Somewhere in the Festhall's back hallways, you'll run into Merriman. He's involved in Dolora's quest from the
Brothel of Slating Intellectual Lusts.
8 - Classroom
Inside this classroom, Three-Planes Aligned will give a lecture on alignment and belief.
9 - Classroom
Inside this classroom, Death's Advocate will give a lecture about death and where you go when you die. Morte won't think much of the performance, and when you're allowed to ask questions, you can demand that the Advocate "prove what you say is true." This will give you an opportunity to kill yourself and show that you don't go anywhere, and when the Advocate refuses to kill himself, that even he doesn't believe what he just said. You won't receive any xp for this exchange.
10 - Festhall Room Clerk
The clerk here will allow you to rest for a small fee if you're not a Sensate. But once you've joined the faction (at #1), she'll let you rest for free, and she'll give you a
Festhall Room Key, which will allow you to enter your room (#13).
11 - Unfulfilled-Desire's Room
You'll meet a woman named Unfulfilled-Desire here. When you talk to her, she'll tell you that she can provide you with the things you desire most, but when you describe one of those things, she'll feed on what you say, and the desire will fade away. You'll only get to do this once, and your choice won't make any difference (or affect your character). You'll need to talk to Unfulfilled-Desire at least once if you want to complete the Drunken Mage's quest in the
Clerk's Ward.
12 - Vacant Rooms
There isn't anything special about these rooms. You'll have to pick or bash your way in, and then inside you'll find some coppers, some sellable jewelry, and a
Handkerchief (which you might need in the
Brothel of Slating Intellectual Lusts).
13 - Your Room
To enter your room, you'll need the Festhall Room Key. You can get it from the nearby room clerk (#10), either by joining the Sensates and then talking to her, or simply by pickpocketing her. Inside the room, you'll find a large collection of charms, healing supplies, and scrolls (in the shelves), plus a
Dodecahedron (in the locked cabinet).
When you use the
Dodecahedron in your inventory, you'll discover that it's a puzzle box. Luckily, it'll be somewhat familiar to you, and you'll be able to open it. However, if you don't have Intelligence 16+, then you'll trigger up to three traps during the process. When you have the
Dodecahedron open, you'll find that it's a journal written in some language that you don't understand. Getting this far with the device will earn you 5000 xp.
To read the
Dodecahedron, you'll need to take it to Finam the Linguist in the
Clerk's Ward. He'll recognize the language as Uyo, which his father Fin was fluent in -- before he was murdered by a student fifty years ago. Finam will also mention that Fin's ashes are stored in an urn nearby. This will give you two ways to proceed:
- While talking to Finam, you'll learn that Fin kept notes about the Uyo language. If you ask to see the notes, then Finam will agree -- provided that you track down his missing research journal first. You'll find
Finam's Book in the
Brothel of Slating Intellectual Lusts, in the room with Luis the Armoire. When you bring the book to Finam, he'll hand over
Fin Andlye's Notes. This will earn you 25,000 xp. Reading the notes will teach you the Uyo language.
- If you have the Stories-Bones-Tell ability from Stale Mary in the
Dead Nations, then you'll be able to talk to Fin by interacting with his ashes. Fin will happily teach you the Uyo language, but his lecture will trigger a memory, and you'll realize that you were the student who killed him. If you reveal this to Fin, then he'll forgive you. Either way, you'll earn 8000 xp for learning Uyo, plus 4000 xp for recalling the memory.
Note: You won't be able to return
Finam's Book after learning the Uyo language, so it's best to do that first. Better yet, if you return the book but don't read
Fin Andlye's Notes, then you'll still be able to talk to Fin's ashes to learn about the language and recall the memory. This will give you all of the xp from the two methods above: 37,000 total.
Opening the
Dodecahedron after translating it will earn you 10,000 xp. Then when you read the entries, you'll see that they're from an earlier, less sane version of yourself. They'll give you some clues, like that you can find something hidden in your
Intestines (Marta in the
Buried Village can extract it). They'll also give you a legacy code -- 51-AA -- that you can redeem at the advocate's house in the
Clerk's Ward.
Exits
- Exit to the
Clerk's Ward.
- Dormitory entrance.


