|
|
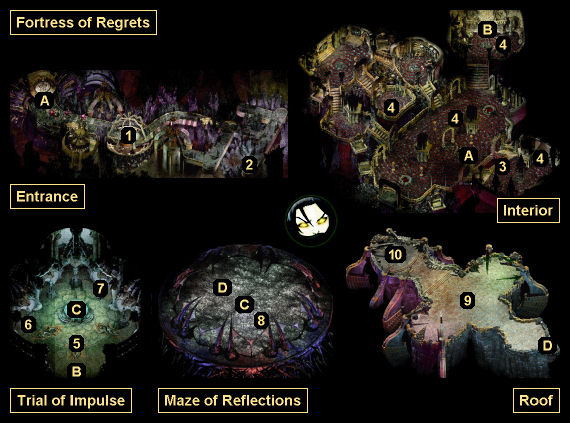
Location: Fortress of Regrets (AR1200 - AR1204)
 Did we miss anything on this map? Is there something we didn't discover? Let us know!
Overview
1 - Starting Point
Did we miss anything on this map? Is there something we didn't discover? Let us know!
Overview
1 - Starting Point
This is where you'll start out in the Fortress of Regrets. You won't have any of your companions with you. If your
Pet Lim-Lim made the trip with you, then it'll turn into a
Dead Lim-Lim.
2 - Deionarra
You'll meet the ghost of Deionarra here. She'll tell you a few things about the Fortress, including that is filled with shadows from the people who died in your place to keep you immortal. If you have
Deionarra's Wedding Ring with you, then Deionarra will infuse it with power to make it
Deionarra's Wedding Ring (Upgraded). After your conversation with Deionarra, she'll disappear, but you'll see her again later (Exit D).
3 - Melted Clock
The clock here will give you some hints about how to escape from the Interior:
- "Run." If you can easily defeat Greater Shadows (worth 10,000 xp), then you won't have any reason to run. You'll be free to take your time and explore the map. Just be wary that the shadows will re-spawn rather quickly.
- "Doors are lies."
- "Use Cannons." The cannons are the war relics (#4). Each time you use one, you'll get teleported to a different part of the map (where you might run into multiple Greater Shadows), and some of your companions -- Annah, Dak'kon, Fall-From-Grace, and Nordom -- will get killed off if they were in your party.
- "Then portal." After using the four war relics (#4), the exit portal (Exit B) will become active.
4 - War Relics
5 - Battle
When you enter this chamber, you'll either be attacked by Ignus (if you're Good) or Vhailor (if you're Evil). You'll earn 32,000 xp for winning the battle.
6 - Container
Inside the container here, you'll find a few supplies: a
Blood Fly Charm, a
Bone Charm, two
Charcoal Charms, and three
Heart Charms.
7 - Sounding Stone
You'll find a
Sounding Stone on the ground here. It might prove useful when you confront the Transcendent One (#10).
8 - Incarnations
Inside the Maze of Reflections, you'll meet three incarnations of yourself: a Good one, a Paranoid one, and a Practical one. As you speak to the incarnations, you'll learn that only one of you will be allowed to leave the chamber, and so you'll need to convince them to merge with you, or kill them. How to deal with them is described below:
- Practical Incarnation. If you ask him about Pharod, and bring up the
Bronze Sphere, then you'll learn that the sphere is a dead sensory stone from the first incarnation. This will earn you 96,000 xp.
When you confront the Practical Incarnation, if you have Intelligence 21+ or Wisdom 21+, then you'll be able to win a contest of wills and have him merge with you. This will earn you +1 Intelligence, +1 Wisdom, and 96,000 xp. If you fail the contest, then you'll have to fight the incarnation, which will earn you 12,000. If you surrender to the incarnation, then you'll have to load your game.
- Paranoid Incarnation. If you speak to him in the language of Uyo (which you might have learned while decoding the
Dodecahedron), then you'll be able to convince him to merge with you. You might also be able to convince him if you previously strangled somebody in the game and then attempt to strangle him. Successfully merging with the Paranoid Incarnation will earn you +1 Constitution, +1 Strength, and 64,000 xp.
You can also fight the Paranoid Incarnation. The easiest way to do this is to ask him about the sensory stone trap in the
Private Sensorium and call it "pathetically easy." Defeating the Paranoid Incarnation will earn you 12,000 xp.
- Good Incarnation. If you ask him about having "countless lives" and then about "traces... left in the mind" (which requires Intelligence 17+), then he'll admit to being the first incarnation. This will earn you 96,000 xp. Otherwise, the Good Incarnation will be much more agreeable than the others. When you ask him to merge with you, he will, and you'll earn +1 Wisdom and 32,000 xp.
During your conversations with the incarnations, it's important to learn two things -- that the
Bronze Sphere is a sensory stone from the first incarnation, and that the Good Incarnation is the first incarnation. This will allow you to use the
Bronze Sphere to learn your true name -- and receive the
Symbol of Torment plus 2,000,000 xp. Learning your true name might also come into play when you face off against the Transcendent One (#10).
After you've killed off or merged with the other three incarnations in the chamber, Deionarra will appear (Exit D). No matter what you say to her, she'll send you to the Roof. If you tell her why she died, and if you lie, or if you tell her the truth and then tell her that you love her, then she'll forgive you for your actions.
9 - Companions
You'll find the remains of your companions here. If you need anything that they were carrying, like, say, the
Blade of the Immortal, then you should pick it up now.
10 - Transcendent One
You'll meet the Transcendent One -- that is, your mortality -- here. He won't be very welcoming, but he'll still talk to you. There are three basic ways that the conversation can go:
- You can convince the Transcendent One to merge with you. There are four ways to do this:
- You can threaten to kill yourself using the
Blade of the Immortal. You'll get this dialogue option while talking about Ravel and how her ritual failed.
- You can threaten to unmake yourself. You'll get this dialogue option while talking about what can change the nature of a man. This option will require you to have Wisdom 24+.
- If you used the Bronze Sphere earlier, then you can reveal that you know your true name, and use that power against him. For this, you'll need to talk about Ravel and how her ritual failed but not bring up the
Blade of the Immortal. You'll learn that the two of you are linked, which will create a new dialogue option to ask the Transcendent One if he knows your name.
- You can convince the Transcendent One that you're better off together. For this, you'll need to talk about Ravel and how her ritual failed, ask why he's kept trying to kill you, realize that he sent the shadows to make you forget, and then accuse him of fearing you. This option will require you to have Charisma 24+.
After you've merged, you'll be able to resurrect your party and send them back to Sigil before suffering your punishment.
- You can kill yourself (using the
Blade of the Immortal) or unmake yourself (which requires Wisdom 24+). Everybody will end up dead.
- You can fight the Transcendent One. If you take the first attack dialogue option -- "We'll see if my mortality can be slain" -- then you'll have to handle the battle by yourself, which can be difficult but not impossible. An easier option is to ask about your companions first. This will lead to you being able to resurrect one of them before the battle starts.
If you pick Morte first, then you'll learn that he was only faking death, and he won't count against you, which means you'll still be able to select a second character. If you pick Dak'kon, then he'll receive +1 Strength, +3 Dexterity, +3 Constitution, and 2,000,000 xp. If you pick Vhailor, then he'll receive +3 Strength, +25 Dexterity, +25 Constitution, and 2,000,000 xp. The other companions won't receive anything.
Finally, if you picked up the
Sounding Stone from the Trial of Impulse (#7), then you'll be able to send the Transcendent One on a wild goose chase looking for Greater Shadows. This will give you time to resurrect your entire party, minus Ignus or Vhailor if you killed them during the Trial of Impulse (#5).
The battle against the Transcendent One should not be too difficult. In fact, the toughest part might be moving your companions over to their equipment, and then getting them dressed so they can help you out. When the Transcendent One dies, you'll be sent to your punishment, and any living companions will get stuck finding their own way home.
Congratulations for completing Planescape: Torment!
Exits
- One-way portal from the Entrance to the Interior.
- One-way portal from the Interior to the Trial of Impulse.
- Crystal. Touching the crystal will send you on a one-way trip to the Maze of Reflections.
- Deionarra. When you talk to Deionarra, she'll send you on a one-way trip to the Roof.
|
|
|


