 Did we miss anything on this map? Is there something we didn't discover? Let us know!
Overview
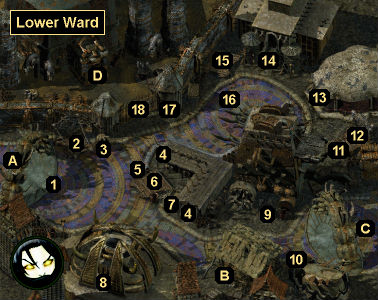
It's argued that this area of the city isn't a proper ward at all, an argument that ignores the fact there's no definitions of wards to be found anywhere. Certainly the Lower Ward's been shrinking over the decades. Old-timers remember when it included the City Armory and the Mortuary. (Younger folks and newcomers place these in The Lady's Ward and the Hive Ward, respectively.) This creates a little confusion between young and old. Whatever the boundaries are, most sods agree that the Great Foundry is the center of the ward. Radiating out from this are lightless warehouses, smoky mills, ringing forges, and a host of other small workshops. In this district are concentrated most of the city's craftsmen.
1 - Arrival Point / Kii'na / Korur / Vorten
Did we miss anything on this map? Is there something we didn't discover? Let us know!
Overview
It's argued that this area of the city isn't a proper ward at all, an argument that ignores the fact there's no definitions of wards to be found anywhere. Certainly the Lower Ward's been shrinking over the decades. Old-timers remember when it included the City Armory and the Mortuary. (Younger folks and newcomers place these in The Lady's Ward and the Hive Ward, respectively.) This creates a little confusion between young and old. Whatever the boundaries are, most sods agree that the Great Foundry is the center of the ward. Radiating out from this are lightless warehouses, smoky mills, ringing forges, and a host of other small workshops. In this district are concentrated most of the city's craftsmen.
1 - Arrival Point / Kii'na / Korur / Vorten
When you first arrive in the Lower Ward, if you have Morte in your party, then he'll get kidnapped by a pair of wererats. The wererats will take him to the
Bones of the Night (Exit B), where you'll have to complete Lothar's quest to get him back. Morte will drop all of his equipment when he's kidnapped, so be sure to pick up anything important before you proceed.
You'll also meet three NPCs around here:
- Kii'na. When you first run into her, if Dak'kon is nearby, then he'll ask you not to speak to her. If you talk to Kii'na anyway, then you'll learn that she and Dak'kon are enemies, and the two of them will attempt to kill each other. If you let them fight, then Dak'kon will (likely) win, which will earn you 650 xp. But if you leave Kii'na alive, then later you might learn some news she'd like to hear (see #16 for details), which will earn you 8000 xp when you inform her.
- Korur. He can train you in weapon specializations up to rank 5.
- Vorten. He's just a guard, but you might need to kill him for Leena (#14).
2 - Sebastion
When you meet Sebastion, he'll notice your scars, and he'll make you a deal. If you can kill the abishai Grosuk for him -- thus releasing him from a contract that he isn't capable of fulfilling -- then he'll heal you up and make you look better. But he'll warn you that abishai can only be harmed by magical weapons.
You'll find Grosuk on the eastern side of the ward (#11). It's possible to tell the devil about Sebastion's plan, but this will just get Sebastion killed, and you won't earn anything. So instead attack Grosuk with spells and magic weapons. You'll earn 8000 xp when he dies, and then when you return to Sebastion, you'll earn an additional 4000 xp plus +2 Charisma.
3 - Xanthia
Xanthia is involved in Thorp's quest (#5).
4 - Marketplace
You'll meet a few people inside this building:
- Aalek (in a stall). He'll sell you charms and jewelry, including a
Displacer Ring, a
Magus Guard, a
Serpent Ring, and a
Spider Bracelet.
- Anze (in a stall). He'll sell you weapons, including a
Club of Piercing,
Magic Punch Daggers, a
Notched Dagger, and
Siphon Knuckles.
- Cinder (in a stall). He'll sell you spells. He can also give you some background information on Trist's quest (#15).
- Corvus (by the northern exit). He's a Harmonium guard, and he's involved in Trist's quest (#15). He's also infatuated with Karina (who wanders nearby). If you talk to Karina and learn that she's lonely, and relay this information to Corvus, then you'll earn 2000 xp.
- Drixel (by the southern exit). He's a Harmonium guard.
- Karina (wandering around). She'll answer your questions at great length. After asking her about weapons and magic, if you mention that she talks a lot, but then say that you like her, then you'll earn 2000 xp.
- Lazlo (by the furnace in the corner). If you ask him about the Lower Ward, then he'll eventually talk about the portal to the Siege Tower (#12), and you'll figure out how to activate it.
5 - Gort, Thorp, and Zerb
You'll meet a trio of warriors here, but only Thorp will have much to say to you. He'll tell you that he and his fellows are going to fight an abishai to prove that they're "warriors of stature" to Xanthia (#3), who they accidentally spilled drinks on during the previous evening. If you talk to Xanthia, then you'll learn that abishai can only be damaged by magical weapons, and that she intends for the warriors to get killed. This will give you two ways to proceed:
- If you warn the warriors about the fight, then you'll earn 600 coppers and 6000 xp right away, and an additional 2000 xp when you return to Xanthia. Xanthia will proceed to threaten you, but nothing will come of it (and, in fact, she'll just stand around in the ward for the rest of the game).
- If you don't warn the warriors, then you'll earn 1500 xp right away, and an additional 500 coppers and 500 xp when you return to Xanthia. Then a short while later, a Red Abishai will walk over to the warriors and attack them. If you defeat the abishai while it's there, then you'll earn an additional 9000 xp, and the abishai will drop a
Blood Charm when it dies.
6 - Byron Pikit
Pikit is a moneylender. If you ask him about the Lower Ward, thieves, and training, then he'll direct you to Lenny (#9), and you'll earn 2000 xp. Pikit is also involved in Trist's quest (#15).
7 - Giltspur
Giltspur the auctioneer will sell you jewelry and charms, including a
Stinger Earring. He'll also rent you a room for 20 coppers a night, and he'll make trades. In particular, if you give him a
Stone Lim-Lim (purchased from a merchant in the
Hive Southwest and transformed in the
Brothel of Slating Intellectual Lusts in the
Clerk's Ward), then he'll tell you the password "eclipse" that you can use to join the Anarchists in the warehouse (#14).
If you ask Giltspur about work, then he'll give you three quests:
- For the first quest, Giltspur will hand you
Giltspur's Handbill, and he'll ask you to take it to Scofflaw Penn at the Print Shop (#13), and have him make 100 copies of it. After delivering the handbill, when you return to Giltspur, you'll earn 50 coppers and 6000 xp.
- For the second quest, Giltspur will hand you
Giltspur's Note, and he'll ask you to deliver it to Keldor at the
Great Foundry (Exit D). The note will get you through the front gate (#18), and you'll find Keldor in the Godsman Hall. After delivering the note, when you return to Giltspur, you'll receive 100 coppers and 6000 xp.
- For the third quest, Giltspur will hand you
Giltspur's Posting Handbill, and he'll ask you to deliver it to Barkis at the Smoldering Corpse Bar in the
Hive Southeast. Barkis is the bartender; you'll find him behind the bar. After delivering the handbill, when you return to Giltspur, you'll receive 200 coppers and 8000 xp.
8 - Pawn Shop
Inside this shop you'll meet Brokah and Miccah. They'll sell you a variety of items, including a
Crimson Sphere Earring, a
Ring of the Traveler, and
Shards of Fate. If you try to talk to the couple, then they'll usually start bickering before you can learn anything. If an argument starts up and you want to keep conversing with them, then you'll need to exit and re-enter their shop to get them talking to you again.
In a locked chest in the shop, you'll find a
Charm of Infinite Recall.
9 - Lenny
Lenny is a thief. If you learned that fact from Byron Pikit (#6), and mention Pikit's name to Lenny, then Lenny will become a thief trainer. Better yet, the first time you change your class with him, he'll give
Punch Daggers of Zar'Anun. The first time you change your class to thief, regardless of the trainer, you'll also earn some xp to get you started: 2500 xp for Dexterity 9-12, 3125 xp for Dexterity 13-15, 3438 xp for Dexterity 16-17, or 3750 xp for Dexterity 18+.
Lenny is also involved in Trist's quest (#15).
10 - The Coffin Maker
Inside this shop, you'll meet Hamrys the coffin maker and his "best friend" Dimtree. Each of these NPCs will give you a quest:
- If you have the Stories-Bones-Tell ability from Stale Mary in the
Dead Nations, then you'll be able to talk to Dimtree, and you'll learn that he's a zombie who was raised by the mage Sebastion to stand in Hamrys' shop and listen to Hamrys' stories -- and save the rest of the ward from the same fate. However, Dimtree won't like this arrangement, and he'll ask you to convince Sebastion to free him.
When you visit Sebastion (#2), he'll be dismayed to learn how aware Dimtree is, but his contract won't allow him to do anything about it. However, he'll "accidentally" reveal how you can release the zombie, and he'll leave his spell book open to just the right page so you can do the job yourself. With his information in hand, when you return to Dimtree, you'll be able to return him to death, which will earn you 4000 xp.
- If you ask Hamrys about his father, then you'll learn that his father was a stonemason who disappeared many years ago. This will trigger a memory, where you'll remember hiring the father to create
your tomb in the
Drowned Nations -- and then killing him to preserve its secrets. This will earn you 500 xp.
If you ask Hamrys if he still has the plans for the tomb, then he'll direct you to the warehouse (#14), where all of his records are stored. Inside the warehouse, you'll need to talk to the Vault of the Ninth World and ask it for the plans. It'll hand over the
Tomb Plans, an item that you can use. If you use the plans inside
your tomb, then you'll get a little more information about the tomb, but nothing interesting enough to make it worthwhile to trek back there if you've already explored it. When you show the
Tomb Plans to Hamrys, you'll earn 2000 xp.
11 - Grosuk
Grosuk is involved in Sebastion's quest (#2).
12 - Portal to the Siege Tower
To learn how to activate this portal, you'll need to talk to Lazlo in the marketplace (#4). When you go through the portal, you'll end up in the Siege Tower, where you'll meet the golem Coaxmetal. He'll sell you a variety of weapons, including
Punch Daggers of Shar and
Spiked Gauntlets of Ogre Power. He'll also have some specialty weapons available depending on your character specializations:
... and depending on your actions:
Coaxmetal will also have crossbow bolts available, but only if you have Nordom in your party.
If you talk to Coaxmetal about forging weapons, then eventually you'll get a chance to ask him about immortality being "just a different kind of death." This will lead to Coaxmetal creating the
Blade of the Immortal, a weapon that can kill you, but only if it's used in "a shell where you are cut off from the planes." Coaxmetal won't have any idea where such a shell can be found, but for receiving the weapon, you'll earn 10,000 xp.
Finally, if you return to Coaxmetal after visiting
Curst, and if you have the
Modron Cube with you, then Coaxmetal will ask you for it when you finish your conversation with him. If you give the cube to Coaxmetal, then you'll become a lot more Evil, but you'll receive the
Entropic Blade in return. If you refuse to give up the cube, then you'll become more Good.
13 - Print Shop
Inside this shop, you'll meet Scofflaw Penn, the owner. He's involved in Giltspur's quests (#4). He's also an Anarchist, which you can learn from Bedai-Lihn in the
Great Foundry (Exit D) -- provided you complete her quests. At that point, if you ask Bedai-Lihn about the Anarchists and indicate that you'd like to join, then she'll tell you the pass phrase "the city must burn," which you can use as an introduction to Penn. Saying the phrase to Penn and then agreeing with everything he says will cause him to give you a quest. If you disagree with Penn, then he'll kick you out of his shop and lock the door, thus preventing you from continuing.
For Penn's quest, you'll have to kill Qui-Sai in the
Civic Festhall in the
Clerk's Ward. Qui-Sai will either be in a classroom or in the warrior training hall. There isn't any way to lure Qui-Sai to a quiet location, so you might have to kill a few others when you kill him (or just run away afterwards). You might also have to deal with (or run away from) a few Harmonium Guards in the
Clerk's Ward. When you return to Penn after completing his task, you'll become an Anarchist, and you'll earn 16,000 xp. Penn will also tell you the password "eclipse," which you can use as an introduction to Conall and Leena in the nearby warehouse (#14).
14 - Warehouse
Inside this warehouse, you'll meet three people: Conall, Leena and Otis. They're Anarchists, and you can learn this from Giltspur (#7) or Scofflaw Penn (#13), who will tell you the password "eclipse," which you can use as an introduction with the trio. Conall will allow you to rest, and he'll sell you charms, scrolls and weapons. If Penn sent you to the warehouse, thus making you an actual Anarchist, then Conall will also have four
Anarchist Earrings for sale.
Meanwhile, Leena will demand that you prove yourself to the faction by completing a quest -- unless you mention that you were sent by Penn, and then she'll be more accepting of you (and not give you a quest at all). For Leena's quest, you'll have to kill the guard Vorten (#1). There isn't anything complicated about this task. You'll just need to walk over to him and force-attack him. After committing the deed, when you return to Leena, you'll receive 8000 xp
Also inside the warehouse, you'll be able to interact with the Vault of the Ninth World. It's involved in quests from Hamrys (#10), Trist (#15), and Nihl Xander in the
Great Foundry (Exit D). Plus, if you have Intelligence 15+ or Wisdom 15+, then you'll also be able to claim "a large bag of coins" from it. This will net you 1123 coppers.
15 - Auction Block
At the auction block here, you'll meet the auctioneer Deran and an indentured servant named Trist. When you talk to Trist, you'll learn that her husband took out a loan before he died, but that the receipt proving he paid it back mysteriously disappeared from her house, leaving her with a debt that she can't repay. So Trist will ask you to look into her case, and she'll point you to the moneylender Byron Pikit and his assistant Lenny.
Note: Although it'll come up during your conversation with Trist, there isn't any way to pay her debt for her.
When you talk to Pikit (#6), he'll just point out that the Mercykillers already investigated the matter and didn't find anything. If you suggest that someone could have stolen Trist's receipt to force her to repay the loan twice, then Pikit will smirk at you but deny the charge -- and decide that he doesn't want to talk to you anymore. But you'll earn 1000 xp for making the accusation.
When you talk to Lenny (#9), you'll learn that he stole Trist's receipt for Pikit, but that while he was supposed to have destroyed it, he didn't. If you ask him to turn over the receipt, then he'll direct you to the warehouse, and he'll tell you to use the phrase "I'm here for a loan" to get it. Furthermore, he'll reveal that if you use the phrase "I gave Pikit the laugh," then you'll receive some evidence against Pikit as well. This conversation will earn you 5000 xp total.
At the warehouse (#14), when you tell the Vault of the Ninth World the phrases you got from Lenny, you'll receive a
Loan Document and a
Scroll of Evidence in return. To free Trist, you'll need to give the
Loan Document to Deran. This will earn you 4000 xp. Then when you talk to Trist, you'll receive 1000 coppers and 4000 xp for your efforts, unless you're rude to her, in which case you won't receive anything.
Finally, to get Pikit arrested, you should give the
Scroll of Evidence to Corvus in the marketplace (#4). This will earn you 4000 xp, and cause Pikit to disappear from the game.
16 - Yi'minn
Somewhere around here, you'll meet a githyanki named Yi'minn. If Dak'kon is nearby, then no matter what you say to Yi'minn, a battle will start up, and five Githyanki Soldiers will emerge from the shadows and attack you. But if Dak'kon isn't around, and if you've helped An'azi (#17), then Yi'minn will offer to restore some of your memories -- if you follow him to a secluded corner of the ward. You'll have two ways to proceed:
- With enough Intelligence, you can detect the trap. This will earn you 1000 xp and cause Yi'minn -- plus five Githyanki Soldiers -- to attack you right away. You'll earn 1525 xp for defeating them, but you won't learn anything from them.
- You can follow Yi'minn into a dark alley, where he'll spring his trap. No matter what you say to Yi'minn, he and five Githyanki Soldiers will attack you. If you fight back, then you'll get to kill the ambushers for 1525 xp. Just note that you're not required to kill them by yourself. Once the fight starts up, you can bring in the rest of your party -- including Dak'kon -- to help out. If instead you let yourself be killed by the ambushers, then afterwards you'll overhear them talking about an attack on Vristigor. If you relay this information to Kii'na (#1), then you'll earn 8000 xp.
17 - An'azi
You'll meet a githzerai woman named An'azi here. If Dak'kon is nearby, then he'll translate her words, and you'll learn that An'azi is dying, that there isn't any hope for her, and that she'd like to be put out of her misery. If Dak'kon isn't around, then An'azi will pantomime her meaning to you. Either way, if you grant An'azi her wish, then you'll receive 4000 xp.
18 - Great Foundry Front Gate
To get the guard on the other side of the gate to open the way for you, you'll need a reason to enter the
Great Foundry. You'll have two options for this:
Giltspur's Note (#7) or the
Godsman Receipt from Advocate Iannis in the
Clerk's Ward.
Exits
- Exit to the
Alley of Lingering Sighs.
- Exit to a wrecked house, which will lead you to the
Bones of the Night.
- Exit to the
Clerk's Ward.
- Exit to the
Great Foundry.


