 Did we miss anything on this map? Is there something we didn't discover? Let us know!
Overview
Did we miss anything on this map? Is there something we didn't discover? Let us know!
Overview
To reach the Modron Maze, you'll first need to purchase the
Modron Cube (aka "Cube Figurine") from the Curiosity Shoppe in the
Clerk's Ward. You won't be able to do much with the cube at first. To learn how to use it, you'll need to talk to the three modrons in the
Brothel of Slating Intellectual Lusts. They'll tell you that it's a portal, and that you'll need to manipulate it in the right way to activate it.
After learning this information, when you use the cube in your inventory, you'll be allowed to play with its appendages. The initial dialogue will give you a hint that the left knee is the appendage that you should move first. From there, you'll be told if your next choice is right or wrong (with "clicks" being bad and other noises being good). After some trial and error, you'll discover that the full sequence is left knee, left wing, right wing, right arm. When you enter the sequence correctly, you'll be teleported to the maze.
1 - Foyer
When you arrive in the Modron Maze, you'll start out in the foyer. A modron there will welcome you to the maze -- aka "Rubikon, the maze construct" -- but it won't tell you anything about it or how to escape.
The Modron Maze is random. You'll start out on the "easy" setting, which means the maze will consist of a 4x4 grid of rooms. Later, you'll be able to switch the maze to "normal" (6x6) or "hard" (8x8). Unlike some other game mazes, the exits won't teleport you willy-nilly to random rooms. Instead, the exits will be realistic, so if you leave one room to the west, and then head back to the east, then you'll always end up where you started. That means it's easy to map the maze, should you feel so inclined.
Along with learning your way around, you'll also have to deal with traps and enemies. On the "easy" setting, the enemies will be Low Threat Constructs (worth 500 xp), which will die in a hit or two. But on "normal" you'll face Medium Threat Constructs (1000 xp), and on "hard" you'll face High Threat Constructs (4000 xp). The latter constructs in particular will probably give you a rough time, so be sure to come prepared with healing supplies and perhaps Fall-from-Grace. You'll also be able to rest in the Foyer and the Engineering Room (#2), so you should always know how to reach one of those locations.
Note: If you die, then you'll return to life in the Foyer. That's the easiest way to get back there if you need to rest.
When you kill constructs, they'll drop random loot. Some of these items, like
A Clue!,
A Goody!,
A Magic Item!, and a
Bag of Coins, are completely worthless, and you shouldn't even bother picking them up. But you'll also find some potentially useful -- or at least unusual -- items, including a
Lens of Confounding, a
Lens of Inherent Viciousness, a
Lens of the Horizon,
Optix, a
Stealth Lens, and
Time's Eyepiece, that you can sell for a decent amount of money, or perhaps save for Nordom (#3).
2 - Engineering Room
Eventually, you'll make your way to the Engineering Room. You'll meet a few modrons here, including a modron engineer (standing on a yellow pattern near the center of the room). When you talk to the engineer, you'll learn that the maze is currently broken because the project director got himself disintegrated. If you volunteer to take his place, then the engineer will allow you to reset the maze and choose the difficulty.
The engineer will also mention that you can use the maze's portal lens to travel to places you've previously visited, like the Hive, the
Clerk's Ward, the
Lower Ward, and the
Weeping Stone Catacombs. This is a one-way trip. You'll have to use the
Modron Cube to return to the maze. While you're exploring, you might also find a
Portal Lens item. This will allow you to use the maze's portal lens from anywhere within the maze, and not just the engineering room.
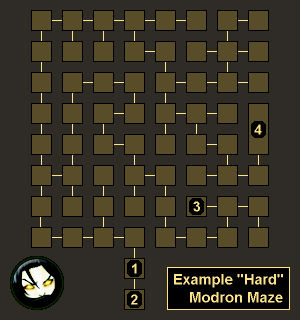
To complete the maze, you'll need to explore it using the "hard" difficulty setting, and defeat the Evil Wizard Construct in the Wizard's Room (#4). You might also want to track down Nordom in his room (#3) and recruit him to your party. An example "hard" maze is shown above.
3 - Nordom's Room
If you're exploring a "hard" maze, then in one of the rooms you'll meet a modron named Nordom (which is "modron" backwards). When you talk to Nordom, he'll offer to join you. If you accept him into your party, then you'll earn 36,000 xp. Just be careful not to leave a companion -- or any equipment that you might need later -- in the maze. If you reset the maze, then anything left inside it will be lost.
4 - Wizard's Lair
If you're exploring a "hard" maze, then in one of the rooms you'll encounter the Evil Wizard Construct plus no less than six High Threat Constructs. No matter what you say to the Wizard, a fight will ensue, but it's better to talk to him first rather than jump right into the battle. That's because if you have Nordom in your party, and if you get the Wizard to mention that he disintegrated the previous Director (by asking him who he is and what he did), then you'll unlock a potential upgrade for Nordom when you speak to him later.
The battle against the Wizard can be difficult, but you're pretty much guaranteed to win, provided you're patient. That's because none of the enemies in the lair will respawn or re-memorize spells, so as long as you don't mind running away, healing, and returning (or dying, healing, and returning), you can eventually whittle away the defenders and kill the Wizard. If you want to win the battle in one shot, then you'll probably need to consume a large number of healing supplies, especially on your character, since the Wizard will start the battle by hitting you with the Mechanus Cannon spell, which will likely do over 30 damage.
When you kill the Wizard, you'll earn 10,000 xp, and you'll find a
Portal Lens, a
Rod of Modron Might, a
Scroll of Mechanus Cannon, and more on his corpse. The
Portal Lens will allow you to exit the maze without returning to the Engineering Room (#2). If you reset the maze to "hard" again, then you'll be able to repeat all of the battles, including the battle against the Wizard. It's a decent enough way to grind some extra xp and coppers, provided the repetitive nature of the process doesn't bother you.


