 Did we miss anything on this map? Is there something we didn't discover? Let us know!
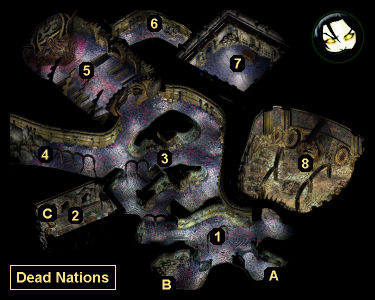
Overview
1 - Foyer
Did we miss anything on this map? Is there something we didn't discover? Let us know!
Overview
1 - Foyer
When you first enter the Dead Nations, you'll be confronted by the skeleton priest Hargrimm the Bleak, who will ask you to submit to being taken prisoner. If you refuse, then all of the undead in the area will turn hostile, and you'll miss out on some conversations and quests. If you accept, then you'll be taken to Soego's chambers (#7), and you'll be told that you're not allowed to leave. To eventually escape from the Dead Nations, you'll have to work with or kill Hargrimm (now at #5), or convince Stale Mary (#2) to let you see the Silent King (#8).
When you later return to the foyer, you'll meet two NPCs:
- Acaste. She'll give you some background information about the Dead Nations, including making it clear that she'd like to challenge the Silent King (#8) for control. If you later learn the Silent King's secret and reveal it to Acaste, then she and her ghouls will attack everybody, which will turn the Dead Nations hostile.
- Knifed Ghoul. This ghoul will wander around, sometimes in the foyer and sometimes in the vestibule to the east. When you talk to him, you'll notice that he has a knife tucked into his waistband. This is the knife that Uhir in the
Buried Village wants. If you ask the ghoul for the knife, then he'll demand food in exchange. You'll find such food -- six
Cranium Rat Tails -- on the western side of the area (#4). When you deliver the tails to the ghoul, he'll hand over
Uhir's Knife as promised, and you'll also receive 600 xp.
2 - Stale Mary's Chambers
Stale Mary is the leader of the zombies. If you ask her how she is able to communicate with her fellow zombies, then she'll teach you the Stories-Bones-Tell special ability (which will give you new dialogue options with many undead creatures, here and elsewhere), and you'll earn 3750 xp.
If you have Charisma 16+, and if you haven't yet earned your freedom from the Dead Nations, then you'll be able to convince Stale Mary to let you see the Silent King. For this case, she'll tell you about a nearby portal (Exit C) that you'll be able to activate by thinking about the king. The portal will take you into the throne room (#8).
3 - Hallways
You can meet several undead NPCs in the hallways here, although sometimes they'll wander into the chapel (#5) and foyer (#2) as well:
- Doubtful Skeleton. He'll tell you that he's pondering Soego's (#7) teachings.
- Nameless Zombie. Once you've learned Stories-Bones-Tell (#2), you'll be able to talk to this zombie, and she'll tell you that she's forgotten her name. She'll reveal that her name can be found on a tomb next to a spiked chest in the
Drowned Nations (Exit C), but if you go there then you'll discover that her name has worn away. If you ask her why she doesn't just choose a new name, then eventually she'll allow you to pick one for her, which will earn you 5000 xp.
- Puzzled Skeleton and Riddling Skeleton. These two skeletons work in tandem. When you talk to the Puzzled Skeleton, you'll learn that he's stuck on a riddle from the Riddling Skeleton. With Intelligence 18, you can tell him that the answer is "tongue." This will earn you 6250 xp, but it will cause the Riddling Skeleton to stop talking to you.
If you don't tell the Puzzled Skeleton the answer -- or if you couldn't figure it out -- then you'll be able to ask the Riddling Skeleton for it. He won't tell you the answer, but this will enable you to challenge him to a riddle contest. The two of you will then exchange up to three riddles. With enough Intelligence (but less than 18), you'll be able to solve the Riddling Skeleton's three riddles for 625, 1250, and 1875 xp, and he'll fail your third riddle. You'll then be able to exchange your riddle's answer for the Puzzled Skeleton's answer for 2500 xp (or 6250 xp total, the same amount as for solving the Puzzled Skeleton's riddle).
At the end of the contest, the Riddling Skeleton will ask you not to reveal the riddle answer to the Puzzled Skeleton. Promising not to tell will make you more Lawful. Telling anyway will make you more Chaotic. You won't earn any xp for telling the Puzzled Skeleton the answer if you got it from the Riddling Skeleton.
- Skeleton Merchant. He'll sell you a variety of charms and weapons.
If you loot the containers scattered around the hallways, then you'll find three
Bone Charms, a
Bone Dagger, a
Charcoal Charm, two
Clot Charms, and 321 coppers.
4 - Cranium Rats
After receiving Hargrimm's quest to deal with Cranium Rats (#5), six of the rats (which is enough for them to be able to cast spells) will appear here. You might need the
Cranium Rat Tails from their corpses for the Knifed Ghoul (#1).
5 - Chapel
You'll usually meet Hargrimm the Bleak inside the chapel, although sometimes he'll wander south into the hallways (#3). Hargrimm is one of the two NPCs (the other being Stale Mary at #2) who can get you out of the Dead Nations. To convince Hargrimm to let you leave, you'll have to do two things for him:
- If you talk to Hargrimm and exhaust the dialogue options about the Silent King and wanting to leave, then eventually he'll ask you why you're there. If you tell him about the
Bronze Sphere and refute his notion that you're a lackey of Pharod's -- and then ask him about leaving again -- then he'll finally give you a way to prove yourself. He'll ask you to be on the lookout for Cranium Rats infiltrating the Dead Nations. This request will cause six Cranium Rats to show up in the western part of the map (#4). Killing them and returning to Hargrimm will earn you 3750 xp.
- After dealing with the rats, Hargrimm will ask you to dig up some dirt on Soego (#7) so he can evict him. You can also learn Soego's secret at any time and then complete Hargrimm's tasks in the reverse order. To learn about Soego, you'll need to get him to leave his chambers. You can do this by talking to the Doubtful Skeleton (#3) and then letting Soego know that the skeleton is considering True Death.
With Soego out of the way, you'll be able to search the metal slab he uses as a bed. You'll find Soego's journal inside, which will indicate that Soego is really a wererat who was sent by Many-as-One to spy on the Dead Nations. When you reveal this information to Hargrimm, Soego will end up dead (if he wasn't dead before), and you'll earn 3750 xp.
After completing both tasks, Hargrimm will allow you to leave the Dead Nations, which will cause the large doors in the foyer (#2) to open, and you'll earn 7500 xp. Having gained your freedom, Hargrimm will also allow you to rest in the chapel for free.
You'll also find a
Scroll of Blood Bridge in the shelf along the eastern wall of the chapel.
6 - Locked Container
You can nab 500 coppers from the locked container here.
7 - Soego's Chambers
Inside this room you'll meet Soego, who you might remember from the Mortuary. He'll tell you that he's doing missionary work with the undead, trying to convince them to achieve True Death. He'll also allow you to rest for free.
To find out what Soego is really up to, you'll need to get him out of his room. To do this, you'll need to talk to the Doubtful Skeleton (#3), who you'll learn is considering True Death. If you tell Soego about this, then he'll rush out to talk to the skeleton. This will give you a chance to examine the metal slab that Soego uses as a bed, where you'll find his journal. The journal will indicate that Soego is really a wererat working for Many-as-One as a spy against the undead. Learning this information will earn you 2000 xp.
If you confront Soego about his affiliations, then he'll turn into a wererat and attack you, and you'll earn 270 xp for killing him. If you tell Hargrimm about Soego, then one of two things will happen. If Soego is still alive, then Hargrimm will go to his chambers and demand to see his journal, which will prompt Soego to turn into a wererat and get killed. If Soego is already dead, then Hargrimm will simply thank you for your help. Either way, you'll get to loot Soego's corpse for
Soego's Skull, and you'll earn 3750 xp.
You'll also find 10
Bandages in the barrels in Soego's chambers.
8 - Throne Room / Silent King
If you enter the throne room via Stale Mary's portal (Exit C), then you'll meet Hargrimm and Stale Mary inside. They'll reveal that the Silent King is dead, and that they've been ruling in his place. In exchange for your silence, they'll allow you to leave the Dead Nations. If you vow to keep silent, then they'll allow you to leave, which will cause the doors in the foyer (#2) to open, and you'll earn 7500 xp. You can also offer to replace the king and rule in his stead, but if you do this then you'll forevermore be stuck in the throne room, and the game will come to an end.
The only other way to enter the throne room is to acquire the
Dead Nations Key from Hargrimm (#5). However, killing him for the key or pickpocketing the key from him will turn the Dead Nations hostile, so this method isn't recommended.
Exits
- Exit to the
Weeping Stone Catacombs.
- Exit to the
Drowned Nations. You'll find three
Bandages in the barrels next to the exit.
- Stale Mary's portal to the throne room (#8). You'll only be able to use this portal if you learn about it from Stale Mary (#2).


