 Did we miss anything on this map? Is there something we didn't discover? Let us know!
Overview
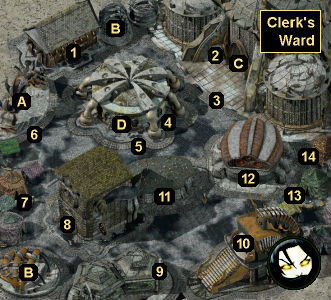
The Lady's Ward may be the most powerful and prestigious, but cutters from the Clerk's Ward proudly point out that it's their ward that keeps the city running. This is the domain of bureaucrats, scribes, sages, and scholars. Here, life is peaceful and without surprises -- or without too many surprises, at least. It's the perfect burgomaster's neighborhood.
1 - Tailor's Shop
Did we miss anything on this map? Is there something we didn't discover? Let us know!
Overview
The Lady's Ward may be the most powerful and prestigious, but cutters from the Clerk's Ward proudly point out that it's their ward that keeps the city running. This is the domain of bureaucrats, scribes, sages, and scholars. Here, life is peaceful and without surprises -- or without too many surprises, at least. It's the perfect burgomaster's neighborhood.
1 - Tailor's Shop
Outside this shop, you'll meet Malmaner. He'll tell you that he somehow managed to offend Goncalves the tailor, who now refuses to sell him a costume for Lord Ird's upcoming masquerade ball. So Malmaner will ask you to go inside and purchase a costume for him. Inside, Goncalves will demand that you stay silent. If you keep talking to him anyway, then eventually he'll attack you, which will turn the entire shop hostile. Otherwise, when you finally get Goncalves talking, he'll sell you a
Dustman Costume for 30 coppers, but he'll warn you that it's a popular choice for the masquerade.
Note: If you wait for Goncalves only once before talking to him, and if you have Annah in your party, then Goncalves will insult Annah's attire and suggest that she wear something more modest -- a sentiment that Morte will heartily disagree with. As a result, Goncalves will add the
Jerkin of the Flitting Shadow to his wares, and you'll be able to choose between it and the
Jerkin of the Brazen Rogue for Annah. Goncalves will also have the
Bodice of the Godless Priest and the
Bodice of the Perilous Quest for Fall-from-Grace, provided that she's in your party.
When you deliver the
Dustman Costume to Malmaner, you'll earn 8000 xp, and he'll reimburse you for the 30 coppers you spent on it. With Charisma 15+, you can lie and convince Malmaner that the costume really cost 50 coppers, and make some extra money.
Optionally, as Malmaner is getting ready to leave, you can warn him that his costume isn't exactly unique. Malmaner won't want to appear "common," so he'll ask you to fetch him a replacement. This time when you talk to Goncalves, he'll sell you a
Godsman Costume for 50 coppers. When you hand it over to Malmaner, you'll earn 6000 xp, and he'll reimburse you for the cost. But once again, with Charisma 15+ you can lie about the amount and receive 80 coppers instead.
2 - Salabesh the Onyx
At this spot, you'll meet Salabesh the Onyx, Master of Curses. He'll tell you that he'd like to become the mage tutor in the
Civic Festhall (Exit C), only the job currently belongs to Lady Thorncombe. There isn't any way to help Salabesh get the job he wants. He's just around to provide incentive for Lady Thorncombe, so you can convince her to return to work.
Salabesh is also a part of Reekwind's quest from the
Hive Southwest.
3 - Sarhava Vjhul
Around here, you'll run into Sarhava Vjhul and her two toadies. Sarhava will do her best to insult you or your companions (including Annah and Dak'kon), in the hopes of starting a fight. If you have Morte with you, then he'll do a good job of insulting Sarhava back. If you have Fall-from-Grace with you, then she'll shame Sarhava. The different companion conversations with Sarhava won't lead to anything, except possibly to Sarhava's death. If you kill the woman, then you'll find a
Gold Bracelet, a
Gold Ring, a
Silver Earring, and more on her corpse.
4 - Eli Havelock / Old Poet
You'll meet Eli Havelock standing here. He'll tell you that he's a master of subterfuge, and he won't like it if you call him a thief. You'll have two ways to get him to return to work. You can pay him 500 coppers, or, if you have Wisdom 13+, then you can make a convincing argument about why he should train you for free. Either way, you'll earn 12,000 xp, and Havelock will head into the
Civic Festhall (Exit C), where he'll begin training again.
Standing near Eli, you'll meet an Old Poet. You won't be able to do anything with the poet other than heckle him, which will make you more Chaotic.
5 - Jolmi's Messenger
You'll encounter a colorful fellow called Jolmi's Messenger here. He'll inform you that Mistress Jolmi of House Syrma would like to meet with you inside the
Civic Festhall (Exit C).
6 - Diligence and Matter-of-Course
Diligence and her bodyguard Matter-of-Course will walk along the western edge of the map, and then enter the advocate's house (#8) and disappear. If you happen to run into the pair while they're around, then you might be able to convince Diligence to clean your slate with the Harmonium guards, which will prevent them from attacking you -- until you do something else to anger them, of course.
7 - Outdoor Bar
At this bar, you'll meet three people of interest:
- Able Ponder-Thought. He'll be mesmerized by some of your companions, including Annah and Morte. When you finally catch his attention, you'll be able to ask him about a variety of topics, including Ravel Puzzlewell and the Lady of Pain's mazes.
- Drunken Mage. He'll tell you that he's truly addicted to alcohol and that he lost his apprenticeship because of it. To help the mage out, you'll need to talk to Unfulfilled-Desire in the
Civic Festhall, realize that she takes desires away, and then relay this information to the mage. The mage will be thrilled that there is such an easy fix, and he'll give you his
Frost-Ale Mug as a reward. You'll also earn 10,000 xp. You'll need a
Frost-Ale Mug for Dolora's quest in the
Brothel of Slating Intellectual Lusts (Exit D).
- Nemelle. She'll tell you -- in an odd, musical, third-person way -- that she's looking for her friend Aelwyn, who looks just like her except for having golden eyes and red hair. You'll find Aelwyn at a bar on the opposite side of the district (#13). After speaking with Aelwyn, when you return to Nemelle, she'll reward you with 8000 xp and +3 maximum hit points.
Note: If you return to Aelwyn after completing the quest, then she'll tell you about the two times she met you previously, including once when you tried to kill her but she killed you instead.
Nemelle will also tell you the command word "nildenosaj" for the
Decanter of Endless Water (from the
Drowned Nations), which will convert it to the
Decanter of Endless Water with Command Word. In this form, you'll be able to use it to recruit Ignus to your party. You'll find Ignus in the Smoldering Corpse Bar in the
Hive Southeast.
8 - Advocate's House
Inside this house, you'll meet Advocate Iannis. If you ask him about his troubles, then he'll mention a fire and his daughter Deionarra (whose ghost you might have met in the Mortuary). Eventually, you'll discover Deionarra's sensory stone in the
Private Sensorium. If you tell Iannis about it and get permission from Splinter in the
Civic Festhall for Iannis to come and visit it, then you'll receive 8000 xp.
If you ask Iannis about his work, then he'll tell you that among other things, he handles legacies -- aka wills. You can find two legacy numbers during the game:
9 - Finam the Linguist's Home
Just outside this house, you'll encounter a Thug Boss and three Clerk's Ward Thugs. If you or your companions insult them -- or pretty much say anything to them -- then they'll attack you. You'll earn 760 xp for defeating the thugs, and you'll find scrolls, jewelry, and a
Steel Box on their corpses. You'll need the
Steel Box for Mertwyn's quest in the
Civic Festhall (Exit C).
Inside the house, you'll meet Finam the Linguist. He'll help you to translate the
Dodecahedron that you'll find in the
Civic Festhall.
10 - The Curiosity Shoppe
Inside this shop, you'll meet the half-demon Vrischika, who will sell you a collection of charms and jewelry, including a
Dread Bond, a
Heart of the Fosterer, a
Lens of Inherent Viciousness, a
Magnifying Lens, a
Spider Bracelet, and a
Tear of Salieru-Dei. She'll also offer you several "exotic" items. These items and their uses are listed below:
-
Beer Goggles (aka "Stained Lens"), 149 coppers. When Vrischika offers you the item, she'll tell you a bit about a soldier named Ghysis, who sold it to her. This will unlock extra dialogue with Ghysis in the
Civic Festhall (Exit C).
-
Chocolate Quasit, 199 coppers. You'll need this to get Quell talking in the
Private Sensorium.
-
Codex of the Inconceivable, 1000 coppers. Reading the codex will earn you 1000 xp.
-
Deva's Tears, 100 coppers. You'll need this for Ecco's quest in the
Brothel of Slating Intellectual Lusts (Exit D).
-
Elixir of Horrific Separation, 200 coppers. You'll need this to help Pestle Kilnn, the alchemist (#12).
-
Fiend's Tongue, 66 coppers. You'll need this for Ecco's quest in the
Brothel of Slating Intellectual Lusts (Exit D).
-
Frost-Ale Mug (aka "Rune-Covered Ale Stein"), 299 coppers. You might need this for Dolora's quest in the
Brothel of Slating Intellectual Lusts (Exit D). But note that you can get a mug for free from the Drunken Mage (#7).
-
Gorgon Salve, 100 coppers. This salve will allow you to cure Gangroighhydon in the Art and Curio Galleria (#11).
-
Lady of Pain Rag Doll (aka "Tattered Rag Doll"), 99 coppers. Using this doll will grant you access to the
Player's Maze.
-
Modron Cube (aka "Cube Figurine"), 1500 coppers. After learning how to use the cube from the modrons in the
Brothel of Slating Intellectual Lusts, you'll be able to use it to teleport yourself to the
Modron Maze.
-
Monster Jug, 100 coppers. Using this jug will cause a Gehreleth to appear, and you'll earn 14,000 xp for defeating it.
-
Ring of Almost Invisibility (aka "Yevrah's Ring"), 349 coppers.
11 - Art and Curio Galleria
Inside this museum, you'll meet Yvana, the proprietor. Once you've examined an exhibit, you'll be able to ask Yvana about it, and she'll give you some background information. After meeting Yves in the
Brothel of Slating Intellectual Lusts (Exit D), you'll also be able to comment that the two of them look alike. Yvana will then reveal that Yves is her daughter but that the two of them no longer speak to one another. If you proceed to tell Yvana why her daughter chases tales, then Yvana will agree to meet with her again, and she'll also regain her sight. But you won't earn a reward for your efforts.
There are a few exhibits in the museum that you can do things with:
- Ice sculpture "Dark Birds of Ocanthus" (near the entrance). If you have a
Frost-Ale Mug from the Curiosity Shoppe (#10) or from the Drunken Mage (#7), then you'll be able to collect one of the birds for Merriman in the
Civic Festhall (Exit C). This is a part of Dolora's quest from the
Brothel of Slating Intellectual Lusts (Exit D).
- Painting "Gray Hag of Oinos" (in the back). Just examining this painting will trigger a memory, which will earn you 300.
- Statue of Gangroighydon (in the back). If you have a
Forge Hammer from the
Great Foundry in the
Lower Ward, then you can break off a piece of the statue for a
Mad Splinter and 4000 xp. If you have the
Gorgon Salve from the Curiosity Shoppe (#10), then you can use it on the statue to free Gangroighydon from his predicament. The mage will instantly kill you, but you'll earn 4000 xp. If Morte is with you, then he'll also learn a new taunt for his Litany of Curses.
12 - Apothecary
Inside this shop, you'll meet Pestle Kilnn, an alchemist. When you talk to him, you'll notice that he's suffering from some strange affliction, and when you ask him about it, you'll learn that he's sampled so many polymorph potions that he's left himself unstable.
To help out Pestle, you'll need to give him an
Elixir of Horrific Separation, which you can purchase from the Curiosity Shoppe (#10). When Pestle drinks it, he'll separate into two people, Pestle and Kilnn, and you'll earn 6000 xp. Then when you talk to Pestle, he'll reward you with ten
Clot Charms.
Pestle is also involved in Nihl Xander's quest in the
Great Foundry, and he'll sell you a variety of charms.
13 - Aelwyn
Aelwyn is involved in Nemelle's quest (#7).
14 - Elobrande
You'll meet the fortune teller Elobrande in front of the tent here. If you pay her for her services, then she'll detect that you're "fateless" and have no fortune, and she'll give you your money back. But before you can leave, she'll hand you a
Suspicious Sealed Scroll, which she'll tell you was entrusted to her mother by a hooded man, and intended for you. If you read the scroll, then it will deal 35 damage to you and disappear.
Exits
- Exit to the
Lower Ward.
- Stairs down to
UnderSigil.
- Entrance to the
Civic Festhall.
- Entrance to the
Brothel of Slating Intellectual Lusts.


