 Did we miss anything on this map? Is there something we didn't discover? Let us know!
Overview
The Dustmen's headquarters is a collection of windowless vaults that rise like a giant's mausoleum above the surrounding shacks. They're all dark, catacombed, vaulted, and chambered halls filled with sods living on the lives of others. Grim traffic trundles down the silent lanes to its doors -- creaking wagons of the dead, driven by the skullfaced, their eyes hollow, their cheeks sunken from the years of their ashen work. The bodies pass through the doors and then beyond. Behind the doors of the Mortuary is one of the largest concentrations of portals in Sigil. There's doorways to everywhere, or at least one to every plane, including the Prime Material and most of its worlds. There, the Dustmen and their undead assistants send the city's corpses to other worlds where they belong.
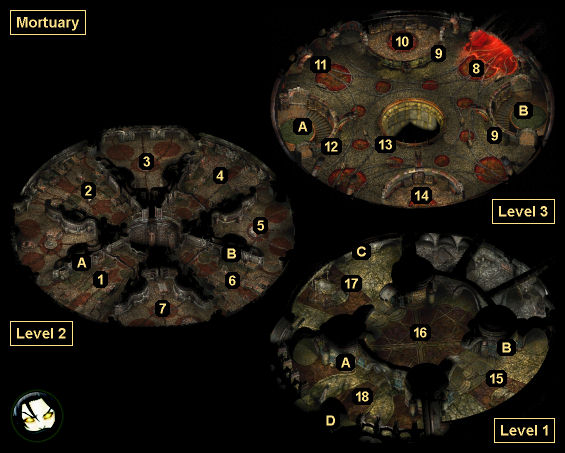
1 - Southwestern Preparation Room / Starting Point
Did we miss anything on this map? Is there something we didn't discover? Let us know!
Overview
The Dustmen's headquarters is a collection of windowless vaults that rise like a giant's mausoleum above the surrounding shacks. They're all dark, catacombed, vaulted, and chambered halls filled with sods living on the lives of others. Grim traffic trundles down the silent lanes to its doors -- creaking wagons of the dead, driven by the skullfaced, their eyes hollow, their cheeks sunken from the years of their ashen work. The bodies pass through the doors and then beyond. Behind the doors of the Mortuary is one of the largest concentrations of portals in Sigil. There's doorways to everywhere, or at least one to every plane, including the Prime Material and most of its worlds. There, the Dustmen and their undead assistants send the city's corpses to other worlds where they belong.
1 - Southwestern Preparation Room / Starting Point
This is where you'll start out in the game. You'll immediately meet a floating skull named Morte. He'll start you off on your quest to discover more about yourself -- in particular, that you should track down your journal plus somebody named Pharod. He'll also suggest that you kill the nearby zombies so you can find the key to one of the doors. Morte (a fighter) will then join you as a companion.
To start a fight with a zombie, you'll have two options. You can talk to them; then if you spot the key, you'll be able to attack them via dialogue. Otherwise, you'll have to select your weapon and then click on a zombie. This system is only necessary since the zombies are neutral to you. For hostile creatures, you'll just need to click on them. However, before fighting anything, you might want to grab the
Scalpel from one of the shelves in the room. Your fists will work well, too.
You'll find the
Preparation Room Key on zombie #782. The other two zombies will drop
Bandages, so it's useful to kill all three. The key will unlock the door on the far western side of the room.
This room is also important towards the end of the game. Eventually, you will return to the Mortuary to open a portal to the
Fortress of Regrets in the Negative Material Plane. When you do, you'll find that the portal can only be opened from this room.
2 - Receiving Room
Loot the shelves in this room for the
Receiving Room Log Book (which will give you some information about the Mortuary), a set of
Fist Irons (which you might find more useful than the
Scalpel), and 13 coppers. Then search the room for zombies #396 and #1201. The former will have some
Bandages for you. When you examine the latter, you'll notice that it has a note sewn into its mouth. Use your
Scalpel (from #1) to cut the zombie's stitches and remove the note unharmed for 250 xp.
The
Note from Corpse #1201 appears to be the person's final effort to request cremation rather than being Raised as a zombie, but it apparently never made it to the Dustmen responsible. If you use the note, then you'll find that it can be folded into a pattern. If you choose Upper Right (1), Lower Right (2), Upper Left (0), and Upper Right (1) -- that is, the zombie's contract number -- and Open the Sides of the Pyramid, then the note will disintegrate into dust and a Triangle Earring (which you'll eventually identify as the
Rule of Threes Earring) will fall into your hand. This will earn you another 250 xp.
Also in this room you'll meet a scribe named Dhall, who will recognize you as a frequent visitor to the Mortuary. He'll explain how you arrived here, that Pharod might have taken your journal from you, and that a Dustman on Level 1 (#18) holds a key to the Mortuary's exit (Exit D). You can kill or pickpocket Dhall for
Dhall's Quill Pen.
3 - Zombie #1664
This room doesn't contain anything of interest other than zombie #1664. If you examine the books that the zombie is holding, then you'll notice a
Receiving Log Page, which will turn out to be a list of dead bodies recently brought to the Mortuary, including your own.
4 - Northeastern Preparation Room
In this room you'll find a tiefling Dustwoman named Ei-Vene hard at work dissecting one of the corpses. When you finally get her attention, she'll ask you to find her a
Jar of Embalming Fluid and a
Needle and Thread. Both of these items can be found on this level of the Mortuary -- the fluid on a table (#6) and the
Needle and Thread from zombie #506 in this very room. You can also find
Needle and Thread on Level 3 (#9). Bringing the two items to Ei-Vene will earn you 250 xp and, if you wait and let her stitch you up, a permanent +1 bonus to your hit points.
Additionally, if you study the motion of Ei-Vene's hands while she is dissecting, then you'll recall stitching something useful inside skeleton #42 during one of your previous lives. This will earn you an additional 250 xp and allow you to loot the skeleton on Level 3 (#13).
If you're working with the Anarchist spy (#5), then you can ask Ei-Vene for her
Embalming Room Key. She'll hand it over without question, which will earn you yet another 250 xp.
Wandering near Ei-Vene, you'll run into zombie #506. You'll notice that it has extensive stitching, which you can cut and unravel using your
Scalpel. This will net you 100 xp plus a
Needle and Thread.
Finally, in the southern part of the room, you'll encounter a stationary zombie labeled #985. If you push it over or try to steady it, then it will collapse into a disgusting heap and drop
Left Arm #985.
5 - Anarchist Spy
If you ask the zombie in this room if there is anything going on, then you'll learn that he's actually an Anarchist in disguise, and that he was sent to the Mortuary to spy on the Dustmen. If you quiz him about the zombie disguise he's wearing, then you can actually convince him to disguise you as a zombie as well. This will require you to hand over a
Jar of Embalming Fluid (#6) and
Needle and Thread (#4, #9), but you'll earn 500 xp for your efforts. Wearing the zombie disguise will allow you to walk around without being challenged by the Dustmen.
You can also ask the spy about a way out of the Mortuary. He'll mention a portal that can be opened, but he'll insist that you bring him a key from Ei-Vene (#4) before he'll tell you anything about it. Once you've obtained the key, delivering it to the spy will earn you 250 xp, and he'll explain that you'll need a
Bone Charm to activate the portal, which can be found on Level 1 (Exit C). If you quiz the spy about where such a charm can be found, then he'll direct you to a storage room on Level 3 (#10). Learning this information will earn you another 250 xp.
It should also be noted that the spy can be threatened to get the information about the portal, though this will shift your alignment in an Evil direction. You can also shift your alignment towards Evil if you vow to the spy that you will not reveal his disguise to the Dustmen, and then double-cross him by exposing him to Dhall (#2) or Soego (#18).
If you're looking for the path of least resistance, then you can actually lie to the spy and tell him that you've come to relieve him of his duties and take his place. This will earn you 500 xp and all of the spy's possessions -- a
Jar of Embalming Fluid, a
Needle and Thread, three
Bandages, and a
Knife -- plus the information about how to activate the portal on Level 1.
6 - Southeastern Preparation Room
Inside the containers in this room, you'll find an
Ancient Copper Earring (Closed),
Bandages, and two
Jars of Embalming Fluid. You might need to bash one of the containers (by selecting a weapon and then clicking on the container) to get it open. You won't be able to do anything with the earring until you've examined a zombie on Level 3 (#14).
7 - Locked Room
You'll need the
Mortuary Sanctum Key (#12) to get into this room. You won't find much inside, other than some
Bandages on the floor.
8 - Crematorium
Upon arriving on Level 3, you'll start encountering Dustmen, including a couple in this room. If they spot you, then they'll flag you down, which might result in them raising the alarm and turning all of the Dustmen -- plus many of the zombies and other protectors -- hostile.
To avoid tipping off the Dustmen, you can wear a zombie disguise (from the spy at #5), you can say that you're not lost and that you're looking for Dhall or Adahn, or you can snap the Dustman's neck (if you have Dexterity 13). The latter action will earn you 250 xp and almost trigger a memory. If you kill one of the Dustmen, then wearing their
Dustman Robes will work as a disguise as well.
Also in this part of the Mortuary, you'll encounter a pair of skeletons. If you're strong enough, or if you have an
Iron Prybar (#14), then you can dismantle the skeletons (here and elsewhere) to gain items like
Iron Spikes and
Wooden Clubs.
9 - Shelves
Inside these shelves, you'll find a
Needle and Thread. You might need these items on Level 2 (#4, #5), or just for healing yourself.
10 - Northern Storage Room
You'll find lots of stuff in the shelves in this room:
Bandages, a
Bone Charm (which you might need to exit the Mortuary), a
Clot Charm, a
Corpse Fly Charm, a
Dustman Embalming Charm (Lesser), a
Mortuary Task List, and 43 coppers.
11 - Skeleton #863
This skeleton is actually a walking messenger who just so happens to have a note still attached to its skull. Grab the
Mortuary Reminder Message to learn that prybars work great for bashing locks.
12 - Shelf
Inside this shelf, you'll find the
Mortuary Sanctum Key, which will get you through most of the locked doors in the Mortuary, including those of the two stairwells (Exits A and B).
13 - Skeleton #42
Skeleton #42 will patrol around the center of the level. When you eventually run into it, it'll recognize your voice and fold its arms over its chest. If you respond by crossing your arms as well, then it will open its ribcage, revealing a small dimensional pocket. When you reach into this pocket, you'll pull out a lump of iron. This will cause the skeleton to collapse, but the lump will disintegrate to reveal two
Clot Charms, a
Green Steel Knife, and 99 coppers. This exchange will earn you 250 xp.
14 - Southern Storage Room
You'll find lots of stuff in the shelves in this room: two
Clot Charms, a
Dustman Request, an
Iron Prybar, and 33 coppers.
You'll also meet zombie #79 here. If you examine the fanged circle branded onto its forehead, then you'll learn how to open the
Ancient Copper Earing (Closed) (#6). This will turn it into an
Ancient Copper Earring (Hollow), which will make it wearable and more valuable, but not useful. Opening the earring will earn you 250 xp.
15 - Southeastern Memorial Hall
In this part of the Mortuary, you'll meet zombie #732. It'll be carrying the
Tome of Bone and Ash in its hands. Taking the tome will give you a way to deconstruct the giant skeletons next door (#16).
16 - Central Chamber
You'll encounter four giant skeletons in this chamber. If you want, you can simply fight them -- carefully, since they'll hit you for a lot of damage -- but it's more rewarding to study them and mar their enchantments. Regardless, it's a good idea to grab the
Crescent Hatchet from a shelf on the northern side of the chamber.
To disable the skeletons without combat, you should examine them, examine their armor, study the symbols, and then study the runes. If you have Intelligence 16, then you'll recognize the runes on your own, and you'll earn 500 xp. Otherwise, with a lesser Intelligence, you'll need to compare the runes to what you saw in the
Tome of Bone and Ash (from #15). This will lead to two possible sequences for marring enchantments. You want to select the one that disables the warding enchantment first, followed by the necromatic and armoring enchantments.
If you disable the enchantments correctly, then you'll earn 800 xp per skeleton (versus 650 xp for defeating them in combat), and each skeleton will drop a
Rune of Armor, a
Rune of Greater Warding, a
Rune of Lesser Warding, or a
Rune of Shielding. If you disable the enchantments in the wrong order, or if you try to pry the skeleton apart, or if you try to take its sword, then you'll trigger the alarms, and all of the skeletons will turn hostile.
Note: If you ask Morte if he'd like one of the giant skeletons for a body, and then reconsider doing so because you're worried about him, then your alignment will shift towards Good.
17 - Northwestern Memorial Hall
If you climb the steps of the tomb in this chamber, then you'll meet the ghost of Deionarra, a woman you once cared for. She'll be bitter about your past experiences with her, but if you're pleasant to her in dialogue, then she'll provide you with some useful information. For example, if you tell her that you are in danger and need to leave the Mortuary, then she'll tell you about the exit portal (Exit C). This will earn you 500 xp. She'll also mention that you are "one who dies many deaths," and that "in your hand lies the spark of life," which allows you to resurrect those who die near you. This will earn you a further 1000 xp and grant you the Raise Dead ability.
When you're ready to depart, Deionarra will inform you that she can see your future, and she'll offer to divulge her vision if you promise to return with some means to save her or join her. If you agree, then she'll tell you a prophecy of sorts where you'll have to face three enemies and eventually destroy the one thing that keeps you alive. Ponder the cryptic message for a bit, and then bid Deionarra farewell.
Note: If you're rude to Deionarra, then she'll curse you and disappear. While Deionarra will make the curse sound dire, it won't actually have a negative impact on your character.
18 - Great Hall
You'll encounter two Dustmen and Soego here. The Dustmen won't fall for the same lies as their brethren, so you'll either have to avoid them (by hugging the outer wall so they don't see you), use a disguise to get past them, or kill them. If you talk to Soego and tell him that you came for the internment of Deionarra or Adahn, and then change your mind and say that you'd like to leave, then he'll unlock the main entrance (Exit D) for you. This will earn you 500 xp. You can also kill Soego for the
Mortuary Key and let yourself out.
Exits
- Stairwell. This stairwell will allow you to move between Levels 1, 2 and 3, but it will start out locked, and you'll need the
Mortuary Sanctum Key (#12) in order to use it. At the top of the stairwell, you'll find a
Hammer in a shelf.
- Stairwell. This stairwell will allow you to move between Levels 1, 2 and 3, but the staircase to Level 1 will start out locked, and you'll need the
Mortuary Sanctum Key (#12) in order to use it. At the top of the stairwell, you'll find a
Charcoal Charm in a shelf.
- One-way exit portal. You'll need to be holding a
Bone Charm for this portal to appear. The portal will take you to the Open Tomb in the
Hive Northeast.
- Mortuary entrance. You'll need Soego (#18) or the
Mortuary Key from Soego to unlock the door here.


