 Did we miss anything in this section? Is there something we didn't discover?
Let us know!
Walkthrough
Did we miss anything in this section? Is there something we didn't discover?
Let us know!
Walkthrough
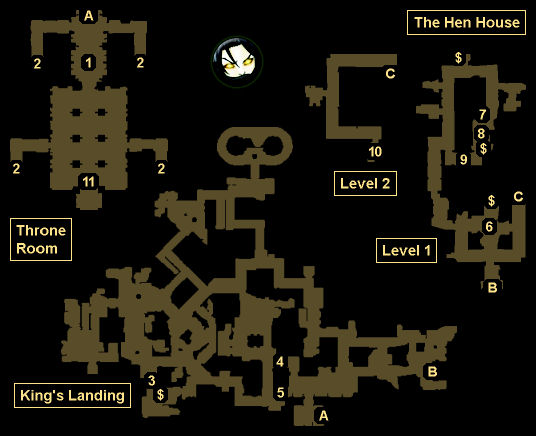
You'll start out this chapter with Alester in the antechamber of the Throne Room (#1). After waiting for a few seconds, Cersei and Valarr will enter the room, and Cersei will order you and Valarr to track down and kill the outlaw called the Mother Hen, who recently stole some important documents. You'll receive 500 xp at the start of the chapter and then 50 xp more after talking to Cersei.
Valarr will then join you, and the two of you will need to travel to the marketplace, where you'll find Valarr's Bloodseekers waiting for you in front of the potter's workshop (#3). When you get there, Valarr will inform you that one of the potter's apprentices, the bastard Harry Waters, has ties to the Mother Hen, and that if you were to rough him up a bit then the Mother Hen would no doubt show his hand.
Note: You might recognize the Bloodseeker named Yohn. He's the one pretending to be Ser Godric Donnerly in Mors' part of the story.
You'll have two ways to proceed:
- If you select Alester's dialogue options, then you'll try to learn about Harry diplomatically. Jaremy the potter will start out a little dodgy and claim that Harry isn't there, but eventually he'll cave in and reveal that Harry is in the workshop. However, when you attempt to go inside, some of the Mother Hen's soldiers will show up and you'll have to fight them. This battle will earn you 80 xp.
- If you select Valarr's dialogue options, then you'll try to learn about Harry through violence. That means you'll attack Jaremy the potter plus all of his apprentices, and then attack the soldiers from the Mother Hen when they show up to protect Harry. This will net you 150 xp total.
After the battle(s), when you enter the potter's workshop, you'll gain 100 xp, but Harry will flee, and you'll have to pursue him. Most of this chase sequence should be straightforward, as you'll just have to dodge barrels and townsfolk while keeping Harry in sight, but about halfway through Harry will run through a gate (#4). There isn't any way to follow him through the gate, but if you keep running and take the next gate on the left (#5), then you'll catch sight of him again, and he'll take you right to Mother Hen's safehouse (Exit B). For successfully completing the chase, you'll earn the bonus trait Nimble (deflection +1%) plus earn the extra achievement for Chapter 6.
Note: The chase sequence won't start up until you enter the workshop. So feel free to look around and loot corpses first.
If you lose sight of Harry during the chase sequence, then you'll have to return to the potter's workshop (#3) and question Weymar Cirley, one of the surviving soldiers. Regardless of how you treat him, he'll give up the location of the Mother Hen's safehouse (Exit B). But if you let Valarr torture him, then you'll earn the bonus trait God of Shadow (critical hit chance +1%), and if you let Alester accept his surrender, then you'll earn the bonus trait God of Flame (critical damage +1%).
Outside the safehouse, you'll encounter a trio of guards, and you'll earn 80 xp for defeating them. Then inside the safehouse, you'll discover that the Mother Hen is none other than Ser Godric Donnerly (#6). However, he won't want to fight you. Instead, he and Harry will flee, and you'll have to defeat a few groups of his underlings in order to catch up to him. You'll receive 760 xp for completing these battles.
When you finally reach Donnerly in the basement (#8), he'll have a few men with him. Donnerly will use a wildfire ability, so you might want to target him first and kill him quickly before he can light you on fire. You'll receive 340 xp for defeating Donnerly and his men, and you'll find
Avalanche, the
Hen's Keys, and a
Flask on Donnerly's corpse.
After the battle, Valarr will insist that you also kill Harry Waters. You can commit the deed yourself or you can let Valarr do it, and it won't make any difference. Next you'll need to go upstairs and search for the documents that the Mother Hen stole. But before heading that way, you should use your R'hllor's Vision ability to search the room where you killed the Mother Hen (#8). You'll discover a wall sconce that can be lowered to reveal a secret room to the south (#9). Inside the room you'll find a chest containing a
Tyrell Cloak.
Upstairs, you'll find Yohn standing next to a locked chest (#10). When you use the
Hen's Keys to open it, you'll find the documents that the Mother Hen "stole" (they're actually instructions from John Arryn, including the letter that Yohn will use to impersonate Donnerly). You'll receive 100 xp for tracking down the documents.
When you return to the Throne Room, you'll find Cersei standing in front of the throne (#11). When you deliver the documents to her, she'll grade your performance, but nothing she says (or you say) will make any difference, and you'll earn 400 xp no matter what. Cersei will then order you and Valarr to continue working together, and to bring back Jeyne Greystone dead or alive.
To complete the quest you'll just need to exit the Throne Room. On your way out you'll run into Lord Arwood Harlton, who will invite you to meet with him for a private conversation about your brother Gawen.
1 - Starting Position
You'll find two Westeros archives near this spot: House Lannister (on the picture of Queen Cersei and her children) and House Baratheon (on the picture of King Robert).
2 - Balcony Staircases
You can go up to the balcony level if you want, but you won't find anything up there that you can interact with.
3 - Potter's Workshop
4 - First Gate
5 - Second Gate
6 - First Meeting with the Mother Hen
7 - Book
Examining the book here will give you the Westeros archive for House Arryn.
8 - Second Meeting with the Mother Hen
9 - Secret Room
10 - Stolen Documents
11 - Queen Cersei
$ - Secret Stashes
Exits:
- Entrance to the Red Keep.
- Entrance to the Hen House.
- Stairs between Level 1 and Level 2 in the Hen House.


