 Did we miss anything in this section? Is there something we didn't discover?
Let us know!
Walkthrough
Did we miss anything in this section? Is there something we didn't discover?
Let us know!
Walkthrough
This quest is the focus of the Beyond the Wall DLC pack. To play it, you'll need to start the game normally, then select "Downloadable Content" from the main menu, then select "Quests" from the next menu, and finally select "Blood Bound."
You'll earn something like 20x as much xp as normal during the quest, which means you should reach level 9 during the hour or two that it takes you to play it. You won't have to worry too much about poison or fire from the enemies in the DLC, so Allergic and Pyrophobia are good choices for weaknesses when creating your character. You also won't find any heavy armor, so you might want to select the Magnar fighting stance.
At the start of the quest, you'll be playing Mors, and you'll be on your way to the top of the Wall with Gorold (who you'll kill at the start of the main game) and Maekar. You and Gorold will be tasked with patrolling the Wall and training a new recruit, while Maekar will be on his way to repair a failing bridge.
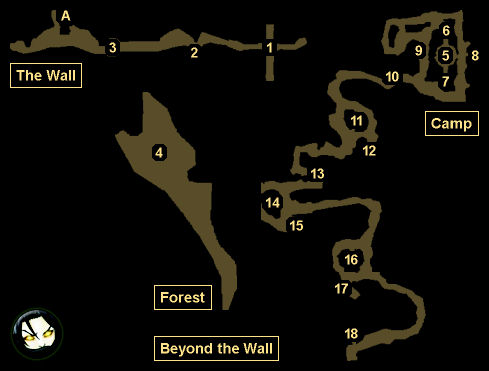
When you reach the top of the Wall (#1), you'll meet Weasel and the recruit Meryn. After a short conversation, Maekar will leave with Weasel for the bridge, and Meryn will join you. You'll then need to travel west to a guard post (#2) so you can relive Bregan from his watch. Past that, you'll come to the bridge (#3), where you'll hear Weasel calling for help. You'll then get attacked by nearly a dozen wildlings, and you'll earn 2200 xp for the fight. Afterwards, you'll discover that Maekar was kidnapped by the wildlings, and you'll decide to rescue him.
To leave the Wall, you'll need to use the nearby basket (Exit A), which will take you to the Forest Beyond the Wall. There you'll come to the outskirts of a wildling camp (#4). After dispatching the sentries out front (easiest to do if you wait for the patrolling sentries to come near you so you can split the fight into two parts), you'll discover that Weasel is working with the wildlings. He'll put a knife to Meryn's throat, and he'll order you to drop your weapons. No matter what you say, you'll end up complying, and you'll be captured and sent to the wildling's arena. Weasel will always end up killing Meryn.
Inside the arena (#5), you'll meet the wildling leader Bael, and he'll order you to kill a weak wildling named Alfyn. You can either obey or not, and the game will proceed in exactly the same way. After the encounter, Bael will order you to go to your cage (#6), where you'll meet a wildling named Torwynd plus a dog (the dog will look just like the dog from the main game, but it isn't the same), and where Gorold will eventually end up. You'll also discover a bowl of raw meat. In between battles in the arena, you'll be given a chance to eat the meat. The game will indicate that doing so will make you stronger, but we've never noticed any benefit. You'll learn more about the meat later.
Next up, you'll need to fight three battles in the arena:
- For the first battle, you'll fight a single opponent, and you'll earn 1500 xp. Afterwards, Bael will offer you a reward, and if you accept it, then you'll receive
Weasel's Brew. This brew is a poison (despite what its description says), so don't drink it.
- For the second battle, you'll fight two opponents (kill the archer first), and you'll earn 2000 xp.
- For the third battle, you and Torwynd will be expected to fight Gorold and another wildling, but you and Gorold will switch things up and fight the wildlings together. Bael will appreciate your trickery, and you'll earn 2000 xp.
To trigger each battle, you'll need to click on the raw meat in your cage (#6). Then during the course of the battles, you'll receive and automatically equip Pit Fighter Armor, Pit Fighter Gloves, and Reinforced Pit Fighter Armor. The weapons you use will only appear while you're in the arena, and they'll be appropriate for your fighting stance.
The wildlings won't approve of your method of winning the third arena battle, and so before you can start a fourth battle, a wildling will sneak into your cage with the intent of killing you. However, the dog will spot him and rip out his throat, and then run off. You'll earn 2000 for this sequence, and the wildling will also drop a
Crude Dagger, which you might find useful.
At this point you'll be able to make your escape. Mors will comment that "the lights seem to show the busiest areas of the camp," implying that you should stay in the shadows, but the more wildlings you kill, the more xp you'll earn and the more equipment you'll find, and so you might as well be thorough and clear out the camp.
The first thing you should do during your escape is free Gorold so he can join you. You'll find him in his cage on the opposite side of the arena (#7). Gorold will want to flee from the wildlings, but you'll insist that the two of you search for Maekar first. You'll then need to head to the southern edge of the camp, killing and looting as you go. Some of the loot you can find include
Dreamwine (#8, #16), good weapons for your fighting stance (#9), and a
Silver Ring (#16). You'll also find Gorold's gear (#11, #12, #17).
When you finally reach Maekar (#18), he'll reveal two things of interest: that he told the wildlings everything he knows about the Wall, and that his limbs were chopped off to provide food for Bael's dogs -- that is, you and Gorold. You'll then be given the option of putting Maekar out of his misery. If you decline, then Gorold will do it.
Right after your meeting with Maekar, Bael will show up, and you'll have to fight him. Bael will have Weasel and two wildlings with him, and we'd suggest taking out the three underlings first, and then concentrating on Bael, stunning him as much as your energy allows. When the wildlings are dead, Gorold will run off in search of help, and when the help returns, they'll find you alone in the camp, sitting on a pile of bodies. "And there's the butcher...."
1 - Starting Point
2 - Cregan
3 - Bridge
4 - Sentries
5 - Arena
6 - Your Cage
7 - Gorold's Cage
8 - First Hut
When you loot the corpses and containers in this hut, you'll find
Dreamwine, an
Iron Mail Helmet, and more.
9 - Weapon Rack
Inside the weapon rack here, you'll find weapons appropriate for your fighting stance.
10 - Cloak
You'll find an
Old Cloak on the ground here, just past the gate.
11 - Second Hut
Inside this hut you'll find
Studded Leather Gloves and an
Andal Glaive, which Gorold will equip.
12 - Cloak
At this spot you'll find a
Sellsword Cloak, which Gorold will equip.
13 - Battle
At this spot you'll battle two wildlings. One will drop a
Longsword, and the other will drop
Barbed Arrows. The arrows are considered bonus loot, but you'll receive them even if your bonus loot chance is 45%.
14 - Third Hut
Inside this hut you'll find an
Iron Mail Helmet, which Gorold will equip.
15 - Gloves
You'll find
Mail and Leather Gloves on the ground here.
16 - Fourth Hut
Inside this hut you'll discover two sleeping wildlings. If you kill them while they're asleep, then you won't receive any xp, but you'll make the fight against the remaining wildlings much easier. Outside the hut on a bench you'll find
Night Watch's Armor. On the wildlings patrolling around the hut, you'll find
Dreamwine and a
Silver Ring.
17 - Tunic
On the ground here, you'll find a
Studded Leather Tunic, which Gorold will equip.
18 - Maekar
Exits:
- One-way exit from the Wall to the Forest.


