 Did we miss anything in this section? Is there something we didn't discover?
Let us know!
Overview
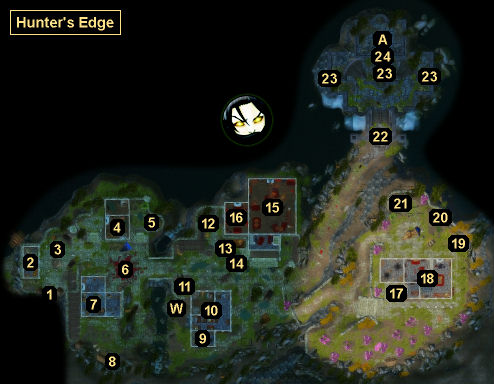
1 - Front Gate
Did we miss anything in this section? Is there something we didn't discover?
Let us know!
Overview
1 - Front Gate
When you get close enough to the gate, the three guards out front will stop you, and you'll have three ways to enter the village. You can show the guards an
Enlightened Amulet, which you can pick up from an Immaculate Slaver in the
Phantom Forest. You can beat the guards in a game of rock-paper-scissors, which will earn you 8160 xp. Or you can kill the guards, which will earn you over 15,000 xp. Nobody in the village will notice if you choose violence. Getting past the gate guards will complete the quest
Infiltrating Hunter's Edge. You'll also earn an exploration xp bonus for entering the village.
2 - Mill
3 - Hornless Gorag
Gorag is peripherally involved in the quest
War of the Stones.
4 - Glen's House
In this house you'll meet the human Fredar and the orc Gural. Gural will give you the quest
The Armoury Key. In the basement of the house you'll find the book
The Art of Whiskey. Reading the book will trigger the quest
Distill My Heart.
5 - Campfire
When you get close enough (but not too close) to this campfire, you'll overhear the orc Ulor and the human Olfrig professing their love for each other. This will trigger the quest "The Star-Crossed Lovers." When you talk to the pair, they'll confirm that they're in love, but they'll inform you that for an orc to love anyone other than Grutilda is considered treason. You'll then have to make a choice between being Compassionate (critical chance +3%) or Heartless (hit chance +20% when backstabbing).
If you refuse to keep the love affair a secret, then the pair will attack you. However, when you kill one of them, the other one will commit suicide, so you'll only earn 5100 xp for the battle. Nobody in the village will notice the fight. If you agree to keep the secret, then you'll earn 5830 xp and the quest will remain open. You won't be able to help the lovers in any way. You'll only be able to report them to Grutilda (who will kill Ulor, which will cause Olfrig to commit suicide) or leave them be and have them attack each other when you complete the quest
War of the Stones.
6 - Fountain
Loitering near the fountain you'll meet the skeleton Michaelis. Talking to him will trigger the quest "To Be, or Not to Be." Michaelis will tell you that he's been considering swapping heads, but that he's worried that the soul resides in the head, and that the swap would change who he is. He'll then ask you for your advice, which will give you a chance to become more Pragmatic (crafting +1) or Romantic (lucky charm +1).
If you tell Michaelis that he lost his soul when he died, then he'll disintegrate into nothing. If you tell him that he can't be separated from his soul, then he'll choose a new head to wear (and when you talk to him again later, you'll find that he's changed to the mayor). Either way, you'll earn 8160 xp for completing the quest.
7 - House
This house belongs to the family involved in the quest
The Hunt in Hunter's Edge. The locked chest in the house doesn't appear to have a key.
8 - Massive Boulder / Hidden Cellar
If you destroy the boulder here, then you'll find a locked hatch underneath it. The key for the hatch can be found in the beehives next to the wizard's house (#18). The boulder and the cellar beneath it are involved in the quest
The Hunt in Hunter's Edge. You'll earn an exploration xp bonus when you enter the cellar.
9 - Armoury
This southern part of the warehouse (#10) is the armoury. It's involved in two quests:
The Armoury Key and
War of the Stones. The human guard at the door won't let you in unless you've accepted the quest
War of the Stones.
10 - Warehouse
This is the base of operations for the Mountain Tribesmen. After talking the human leader Jahrl at the tavern (#15) this is where he'll end up. Jahrl is involved in the quests
The Hunt in Hunter's Edge and
War of the Stones.
After talking to Jahrl, the tribesmen in the warehouse will allow you to go where you want, including the prison in the cellar. Inside the prison, you'll encounter a few prisoners and also the torturers Kansada and Lorr. All of these people are involved in the quest
The Hunt in Hunter's Edge. You'll also find a purple-locked door in the prison. The Armoury Key will allow you to open the door, even though the room beyond isn't the armoury. You won't find much to loot in the room.
11 - Nurt
Nurt will sell you a variety of ho-hum tenebrium weapons. If you ask him where he gets them, then he'll hint that he steals them from Grutilda (#16). This admission will trigger the quest "The Back-Alley Trader." If you tell Grutilda about Nurt, then you'll earn 6800 xp, and Grutilda will walk over to Nurt and kill him.
12 - Ratcatcher
Ratcatcher is involved in the quest
The Hunt in Hunter's Edge.
13 - Gysonn
Gysonn is a merchant, but he won't have much for sale.
14 - Stabigg
Stabigg is a merchant, but he won't have much for sale.
15 - Tavern
On the main floor of the tavern you'll meet Hershel, the barman. He's involved in the quests
Distill My Heart and
The Armoury Key. Sometimes Hershel will run off to Glen's house (#4), so you might have to wait for him.
You won't find much of interest in the main part of the tavern basement, but you should notice a lot of treasure in the half you can't easily reach. This other half contains Grutilda's treasure stash, and you'll have two ways of entering it: you can toss a
Teleporter Pyramid through the "window" in the basement wall, or you can go through the secret hatch in Grutilda's office. You'll need Perception to detect the office hatch, which is located to the left of the fireplace. To open the hatch, you'll have to click on the torch on the fireplace. You'll earn an exploration xp bonus when you enter Grutilda's part of the basement, and while you're there you'll find some paintings and equipment to steal.
On the floor above the tavern, you'll find several paintings to steal, and you'll also meet Norok the Spinebreaker. Norok is involved in the quest
Revenge of the Source Hunter.
16 - Grutilda's Office
You'll meet Grutilda and her aide Resk here.
17 - Jagor
In front of the Wizard's House (#18), you'll meet Jagor. If you ask him why he's trying to get into the house, then you'll trigger a game of rock-paper-scissors. If you win, then you'll earn 8160 charisma xp, and Jagor will give you some background information. If you lose, then nothing will happen.
18 - Wizard's House
You'll only be able to enter the main part of the wizard's house from the hidden cellar to the west (#8). Please refer to the
Wizard's House location entry for more information about what you can do inside.
19 - Beehives
You'll find a key in one of the beehives. You'll need it to unlock the hatch beneath the boulder to the west (#8).
20 - Ornate Chest
Inside this chest you'll find a
Dusty Parchment. The parchment is one of the clues for the Last Chest in the
Homestead.
21 - Hidden Mound
With enough Perception, you'll detect a hidden mound here. Digging it up will reveal a treasure chest.
22 - Buril and Friends
You'll get stopped by Buril and four other orcs here, and you'll have to play a game of rock-paper-scissors against them. If you win, then you'll earn 8160 charisma xp, and the orcs will let you pass. But if you lose, then the orcs will attack you, and you'll earn over 20,000 xp for defeating them. Nobody in the village will care if you kill the orcs.
23 - Levers
You'll need to pull these three levers to open the gate (#24) leading to the
King's Tomb (Exit A). To reach the western lever, you'll have to walk through an illusionary tree, which will earn you an exploration xp bonus.
24 - Locked Gate
You'll need to pull three nearby levers (#23) to open this gate.
Exits
- Stairs down to the
King's Tomb.
- Waypoint portal.


