 Did we miss anything in this section? Is there something we didn't discover?
Let us know!
Overview
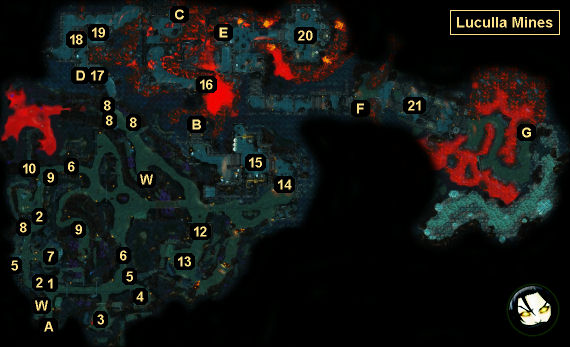
1 - Miklas
Did we miss anything in this section? Is there something we didn't discover?
Let us know!
Overview
1 - Miklas
When you approach this part of the mines, you'll hear somebody call out to you from behind a crate. If you move the crates out of the way, then you'll meet Miklas. He'll give you some background information about the mines -- primarily that the Immaculates are running it, not the goblins -- and he'll warn you about some "Hell Lords" (aka Rogue Dread Lords, aka Death Knights) patrolling the passages. This will trigger the quest
Rogue Dread Lords.
At the end of your conversation, Mikas will ask you if he should stay hiding or try to make his escape. This will trigger the quest "Hide-and-Mikas." Your answer will give you a point of Cautious (sneaking +1) or Bold (initiative +1). If you tell Miklas to flee, then he'll disappear and you'll never see him again. If you recommend that he stay where he is, then the next time you come to this part of the mines, you'll find him dead. Either way, you'll earn 3035 xp for completing the quest.
Note: If you have Madora in your party, then Mikas being from
Hunter's Edge will recognize her, and he'll demand to know if that's really her. Your response will either make you more Blunt (immunity to charm) or Considerate (charisma +1).
2 - Cave-Ins
These cave-ins can be attacked and destroyed to give you easier access to parts of the mines.
3 - Mine Office
The door to this office will start out locked. If you have the Key to the Mine Office from Lawrence's Office in
Silverglen, then it will open the door for you. Otherwise you'll have to pick the lock (Lockpicking 1 is enough) or bash down the door to get inside.
In the office you'll meet an Immaculate named Elizabeth plus four other Immaculates and a Reanimated Troll. When Elizabeth spots you, she'll immediately trigger a game of rock-paper-scissors. If you win the game, then you'll earn 5460 charisma xp, and Elizabeth will become a shopkeeper. If you lose the game, then the Immaculates will attack you, and you'll earn about 25,000 xp for defeating them.
On one side of the office, your characters will notice a detonator, which will trigger the quest "A Long Fuse." When you click on the detonator, you'll have to choose between being Cautious (sneaking +1) or Bold (initiative +1). If you light the fuse, then you'll blow up Dreksis and the other goblins next door (#4). If you don't light the fuse, then nothing will happen. Either way, you'll earn 2730 xp.
4 - Goblin Prison
You'll meet Dreksis the goblin here. He won't like you very much, even when you tell him that you're not an Immaculate. If you release the goblins (by pulling the lever next to their prison), then they'll attack you and you'll earn over 15,000 xp for defeating them. If you don't want to fight the goblins, then you can trigger the detonator in the mine office (#3), and the explosion it causes will kill them for you. Either way,
Dreksis' Head will remain behind. You'll need this for the quest
Goblin Trouble.
If you fight the goblins, then after the battle you can meet the imp Mittix in the prison. Mittix won't add anything to the game -- other than a disturbing love for the "Blood Devils" -- but you can invite him to the
Homestead if you want, and he'll wander around near the Tapestry of Time along with everybody else.
You'll also find an iron ore deposit in the prison.
5 - Iron Ore Deposits
6 - Death Knights
Starting at these spots, you'll begin encountering Death Knights in the mines.
7 - Jaline's Camp
In this camp you'll encounter a group of Immaculates led by Jaline. They'll be guarding a Bone Totem. When Jaline spots you, she'll want to fight you, which will trigger a game of rock-paper-scissors. If you win the game then you'll earn 5460 charisma xp. If you lose then the Immaculates will attack you, and you'll earn over 20,000 xp for defeating them. You'll have to fight the Immaculates eventually regardless, because you'll need to destroy the totem for the quest
Miner Control.
In the back of the camp you'll find a key. This key can be used to unlock a chest in Kaden's camp (#13).
8 - Tenebrium Ore Deposits
Make sure you've triggered the quest
The Troll's Bounty before you start mining any
Tenebrium Ore. Without the quest -- and the
Blood Stone Cage that it'll give you -- the character who mines the
Tenebrium Ore will catch the Rot.
9 - Silver Ore Deposits
10 - Hidden Mound
With enough Perception, you'll detect a hidden mound here. Digging it up will reveal a treasure chest.
11 - Dead Immaculates
You'll discover several dead Immaculates here. They'll have some basic equipment to loot, and you'll also earn an exploration xp bonus when you reach them. Next to the corpses you'll find a silver ore deposit.
12 - Traps
You'll find lots of explosive traps in this passageway -- plus lots of oil barrels -- which isn't a good combination if you want to stay alive. So proceed carefully or set the traps off from a distance.
13 - Kaden's Camp
You'll encounter a group of Immaculates here led by Kaden. Kaden will challenge you to a game of rock-paper-scissors when you arrive. If you win, then you'll earn 5460 xp. If Kaden wins, then the Immaculates will attack you, and you'll earn about 22,000 xp for defeating them. Kaden is involved in the quest
Rogue Dread Lords, but it's not required that you talk to him to complete that quest, so there isn't any harm in killing him.
You'll also find a locked chest in the camp. The key can be found in Jaline's camp (#7). You can also pick the lock with Lockpicking 3.
14 - Temple Door
You'll receive an exploration xp bonus when you approach the door. You'll need to know the password "Sadakandras" (from completing the quest
Miner Control) to pass through it.
15 - Death Knight Manufacturing
You'll find lots of
Tenebrium Bars and
Tenebrium Ore here. When you exit the manufacturing area, you'll encounter Leandra. She'll raise up three Death Knights to attack you, and then she'll disappear. Since you won't have any way to damage the Death Knights yet, you'll have to flee through the nearest exit (Exit B). Talking to Leandra will also complete the quest
Rogue Dread Lords if you didn't complete it with Kaden (#13).
Note: Your encounter with Leandra is a turning point in the mines. Once you've seen her, you won't be able to return to the main part of the mines again -- ever. So make sure you've explored everywhere you want to go first.
16 - Library
17 - Hidden Mound
With enough Perception, you'll discover a hidden mound here. If you dig it up, then you'll find a
Magical Unlock Scroll.
18 - Plaques
You'll notice three plaques here, each designating a burial place. With enough Perception, you'll discover a hidden mound next to each plaque, but whatever you do, don't dig them up. The graves will simply explode, killing your party.
19 - Plaque
You'll find a plaque all alone here. When you click on it, the ghost of Bishop Greevix will appear. Greevix isn't involved in any quests.
20 - Leandra's Room
This room will have a magical barrier around it, protecting it from the fireballs hitting the rest of the temple. However, you'll be able to walk through the barrier, making the room a safe place for you to be. You'll find several
Old Letters in the room, which will show some of the ways that Leandra has concocted her web. You'll also find
Leandra's Lab Notes and
Leandra's Spell, and you'll learn that the spell combined with Leandra's blood will give you a way to revoke the invulnerability of the Death Knights. You'll find Leandra's blood elsewhere in the game.
21 - Entrance Hall
Exits
- Exit to
Luculla Forest South.
- Mirror of Astarte (Death Knight Manufacturing). This mirror will offer to take you to the crypt (Exit D) or the library (#16).
- Mirror of Astarte (Library). This mirror will offer to take you to the crypt (Exit D) or the high priest's office (Exit E).
- Mirror of Astarte (Crypt). This mirror will offer to take you to the library (#16) or the entrance hall (#21).
- Mirror of Astarte (High Priest's Office). This mirror will offer to take you to the crypt (Exit D) or the library (#16).
- Mirror of Astarte (Entrance Hall). This mirror will offer to take you to the crypt (Exit D) or the library (#16).
- Mirror of Astarte. This mirror will offer to take you to the "gold within" or the "sun above." However, you'll learn that the "gold within" isn't actually available, and so you'll only be able to use the mirror to exit from the temple. The mirror will send you to the eastern edge of
Luculla Forest South.
- Waypoint portal.


