 Did we miss anything in this section? Is there something we didn't discover?
Let us know!
Overview
1 - Crates and Barrels
Did we miss anything in this section? Is there something we didn't discover?
Let us know!
Overview
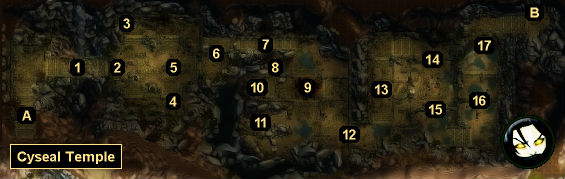
1 - Crates and Barrels
You'll have to move some of these crates and barrels out of the way (by dragging them somewhere else) to clear a path for your characters.
2 - Trap
You'll discover a trap here. Traps can be disarmed using
Trap Disarm Toolkits, and they can also be triggered by damaging them, dragging something on top of them, or by stepping on them. The latter option isn't really recommended.
3 - Locked Chest
At this spot you'll find a random locked chest with the key on the ground right next to it. If you don't see the key, then press the alt key to make it visible.
4 - Locked Chest
You'll discover another random locked chest here. This one won't have a key, but nearby you'll find some
Lockpicks, which should allow you to open it.
5 - King's Tomb
Inside the tomb you'll find an
Old Parchment, which will give you a clue about the secret door to the east (#6).
6 - Secret Door
To open this door, you'll just need to detect and push the button to the right of it.
7 - Locked Door
You'll have to destroy this door to go through it.
8 - Rain Scroll
You'll find a
Rain Scroll on the table here.
9 - Fiery Surface
The easiest way to put out the fires here is to shoot all of the water barrels in and around them. You can also use the nearby
Rain Scroll (#8). Later on you'll encounter lava, which can't be removed by water or rain. For lava, you'll just have to figure out a way around it.
10 - Locked Chest
The locked chest here is random. You'll find the key for it in a nearby vase. You might notice a trap in front of the chest. The easiest way to "disarm" it is to shoot it. You can also pick up the nearby
Trap Disarm Toolkit and use that instead.
11 - Poison Gas
The easiest way to remove poison gas is to set fire to it, which will cause an explosion. If you don't have any fire spells, then you can use the nearby
Fireball Scroll to get the job done. You can also use rain (#8) to remove poison (but fire is more effective). Just behind the poison gas you'll find a chest containing a key. The key will unlock the door to the east (#12).
12 - Locked Door
There are a few ways to get this door open. You can pull the level to the south of it (it's hidden behind some barrels), you can pull the lever to the north of it (it has to be detected first, though), or you can use the key from the poison gas chest (#11).
13 - Poison Vent Traps
The easiest way to deal with vent traps is to move a barrel (or some other container) on top of the vent, which will block the trap. You can also use a Trap Disarm Toolkit to remove them. Just to the east of the traps here you'll find a random treasure chest.
14 - Mummies
You'll encounter a pair of mummies here. They'll be standing on an oil surface. If you sneak up to them, then you'll be able to light the oil on fire to destroy them with one hit. If you don't have any fire spells yourself, then you can use the
Fireball Scroll at the bottom of the stairs.
15 - Locked Door
To open this door, you'll need to use the two pressure plates right in front of it. The door will only stay open while the plates are pressed, so you'll need to move objects (like the nearby broken vases) on top of them rather than standing on them with your characters.
16 - Locked Doors
To open these doors, you'll need to split up your party (by breaking the chain connecting their portraits in the interface) and move one of your characters to the pressure plate in front of the door on the left. That will open the door on the right, which will allow your other character to pass through and stand on the pressure plate on the other side of it. That will open the door on the left and allow your first character to pass through as well.
Note: Unlike the earlier pressure plates (#15), the ones here require more weight, and only your characters can activate them.
17 - Ragequin
When you reach this part in the temple, a skeleton (or maybe a mummy) named Ragequin will pop out of a sarcophagus and demand that you return the Blood Stone to him. No matter what you say to him, he won't believe you, and he'll attack you along with a pair of skeleton archers. When you kill Ragequin, his ghost will appear, and you'll have to kill it as well, so you're best off taking out the archers first.
Exits
- Exit to
Cyseal South.
- Exit to
Cyseal South.


