 Did we miss anything in this section? Is there something we didn't discover?
Let us know!
Overview
Did we miss anything in this section? Is there something we didn't discover?
Let us know!
Overview
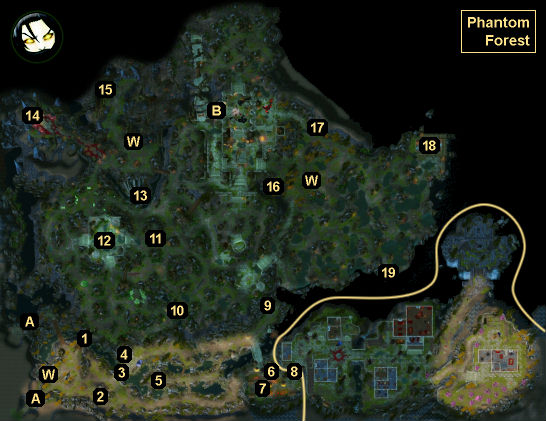
You'll start out in a safe part of the forest (Exit A). From this area you'll be able to access
Hunter's Edge (#8), the last town and quest hub in the game. To reach the rest of the forest, you'll have to pass through a poisonous log (#1). The poison will kill you unless you have protection, which means you'll need to work through the quests
The Hunt in Hunter's Edge and
Follow the Wizard first.
The northern, more dangerous part of the forest is filled with tough battles, many of them including named enemies. These battles don't have any bearing on quests or the story. They're just there so you can grind out some more xp and equipment before the end of the game.
Note: You'll encounter numerous death knights in the forest. You won't be able to kill them unless you've completed the quest
Infiltrating the Immaculates.
1 - Poison Log
If you try to make your way through the log here, then you'll get slowed down and poisoned, and your characters will probably keel over dead. To gain protection against the poison, you'll need to pick up a
Phantom Protection Amulet, which you can find in the
Wizard's House in
Hunter's Edge.
Only the character holding (not necessarily wearing) the amulet will have protection, though. To get your entire party past the log, you'll need to send the character with the amulet through, and then have that character move past the poison gas on the eastern side of the log. Once away from the poison gas, you'll be able to walk around normally, without fear of dying from poison. So once the lead character is in safety, you can use your
Teleporter Pyramids to send the rest of your party to him.
You'll earn an exploration xp bonus when you pass through the log, and then you'll earn another exploration xp bonus when you move past the poison gas.
On the western side of the log, you'll find the corpse of Alistair, who you might remember as a representative of the Fabulous Five in
Cyseal City. Alistair will have a
Maradino Treasure Hunt Flyer on him, but it won't lead to anything.
2 - Hidden Mound
With enough Perception you'll detect a hidden mound here. Digging it up will uncover a chest.
3 - Bridge
When you approach the bridge, you'll witness an Immaculate Slave Master having a disagreement with Rumble the Troll. This will trigger the quest "For Whom the Troll Tolls." The Slave Master will contend that his slaves shouldn't be tolled since they're the same as animals while Rumble will disagree. When you get close enough to Rumble, you'll get to make your opinion known, which will allow you to become more Spiritual (immunity to fear) or Materialistic (loremaster +1).
If you choose to pay for yourself and the Slave Master's party, then you'll lose 800 gp, but the Slave Master will give you an
Enlightened Amulet. If you let the troll and the Slave Master work it out, then the troll will decide to fight everybody, which means you'll get attacked by the troll and the Immaculates (the slaves will run away). You'll then earn over 20,000 xp for completing the battle, and the Slave Master will drop his
Enlightened Amulet. Either way, you'll also earn 5100 xp for completing the quest.
4 - Statue
At this spot you'll see a statue of a warrior with an offering scale at his feet. If you offer coins and / or objects worth over 500 gp, then the statue will reward you with a treasure chest. You'll only be able to do this once.
5 - Mud Huntresses
The spiders here are much more difficult than the ones you might have faced in the desert part of
Luculla Forest North. These can do over 600 damage per round using their ranged attacks, and you'll have to face all five of them at once. The spiders can be stunned and knocked down to prevent them from attacking, so try to do that as much as possible, and also try to keep your melee fighters as healed as possible since they'll likely take the brunt of the damage. You'll only earn about 25,000 xp at the end of the fight.
6 - Hortun
Hortun will warn you that Immaculates have taken over the town of
Hunter's Edge to the east. This will trigger the quest
Infiltrating Hunter's Edge. Hortun is also the best shopkeeper in the game. He'll always have several legendary items for sale.
7 - Arhu / Jinxika
You'll meet Arhu here in his cat form. Like Hortun nearby (#6), Arhu will warn you that
Hunter's Edge isn't a peaceful place any longer, and that Immaculate humans and orcs have struck up an uneasy alliance there. Arhu will then recommend that you infiltrate the town by pretending that you're an Immaculate, and that you trick the humans and orcs into fighting each other.
Near Arhu you might find another cat named Jinxika. She'll either be here or inside
Hunter's Edge near the fountain. Either way, if you have the Pet Pal talent, then she can give you the quest
The Hunt in Hunter's Edge.
8 - Entrance to Hunter's Edge
Please refer to the
Hunter's Edge location entry for more information about this town.
9 - Entrance to Forlorn Tunnel
This tunnel will allow you to free some prisoners during the quest
The Hunt in Hunter's Edge. But to use the tunnel as an escape route, you'll have to defeat the Spore-Infested Guards and the Night Caps inside. The guards shouldn't present much of a problem, but the Night Caps have high enough resistances that spells will heal them, and so you'll need to attack them using weapons without elemental bonuses. You'll earn over 45,000 xp for the battle.
10 - Greal
Greal is involved in the quest
Follow the Wizard. He'll tell you all about the Forest Spirit and Balberith the demon.
11 - Bellegar's Barrels
When you approach this spot, Bellegar will invite you to loot a barrel, which will trigger the quest "Bellegar's Barrels." You'll have three barrels to choose from, but you'll only be allowed to loot one item from them, so look in all three of the barrels first, and then take the one item that looks the best. When you loot the item, you'll complete the quest and earn 6560 xp.
12 - Temple of the Dead
Four invulnerable Sentinel statues will be watching over the temple courtyard here. If they see you, then they'll cause lava to spring up around them, which will make exploring the courtyard difficult at best. But by this point in the game, you should have the
Death Knight Bane Skillbook (gained during the quest
Infiltrating the Immaculates). If you have a character use the skill on the Sentinels, then they'll lose their invulnerability, and when the lava springs up, it will destroy them, clearing the way for you.
Note: You can also sneak past the Sentinels (using Invisibility Potions if necessary). One Sentinel can be killed by stepping on a hidden pressure plate in the courtyard. Another can be killed by pulling a lever. The remaining two can be thwarted by placing Heavy Wooden Crates on their lava vents.
With the Sentinels dealt with, you might notice that there's a treasure chest in the northeastern part of the courtyard. To reach this chest, you'll need to detect the hatch leading to it. You'll find it in the bushes just to the west of the chest. You'll need around 10 Perception to detect the hatch, but you should be able to click on it even if you can't see it. The lever next to the treasure chest is the one that can destroy a Sentinel.
To actually enter the temple, you'll have to solve a puzzle of sorts involving the embossed sign, the lever, and the circle of stones in the center of the courtyard. The sign will give you a hint. It'll tell you that the temple "welcomes only its likeness." Probably, the puzzle was designed to only allow corpses into the temple, but the way it actually works, if you pull the lever, then any inanimate object on the circle of stones will be teleported in. So to solve the puzzle, all you'll have to do is put one of your
Teleporter Pyramids on the circle of stones, then pull the lever, and then use your other
Teleporter Pyramid.
When you enter the temple, you'll earn an exploration xp bonus, and you'll find yourself in the Chamber of Corpses. You won't be able to do much in this chamber other than click on a cave entrance, which will take you to the
Druid Dungeon. Please refer to the
Druid Dungeon location entry for more information about what you can do there.
13 - Titan Head
The Titan Head is involved in the quest
A Forge of Souls. You'll need the
Titan Dictionary (from the
Wizard's House in
Hunter's Edge, #8) to talk to it.
14 - Cassandra's Throne
At this spot you'll meet Cassandra, Braccus Rex's sister and "Queen of the Phantom Forest." She's involved in the quest
A Forge of Souls.
15 - Strange Tree
When you get close enough to this tree, you'll earn an exploration xp bonus. If you click on the tree, then you'll see a bunch of messages from the game's kickstarter contributors.
16 - Ooze-Covered Chest
When you approach this chest, you'll get ambushed by four Source-Tainted Spiders. You probably won't find anything interesting in the chest.
17 - Hidden Mound
With enough Perception, you'll detect a hidden mound here. When you dig it up, you'll find a
Magical Unlock Scroll.
18 - Shearah's House
Shearah's house is involved in the quest
Follow the Wizard. You'll earn an exploration xp bonus when you enter the house.
19 - Glimmering Pile of Gold
When you click on the huge pile of gold here, Bellegar will show up and give you the quest
The Mad Mage's Maze. You'll also earn an exploration xp bonus.
Exits
- Bridge to
Luculla Forest North.
- Entrance to the
Source Temple. You'll need to pick up a
Magic Rune Stone (at #18) before you'll be allowed to enter.
- Waypoint portal.


