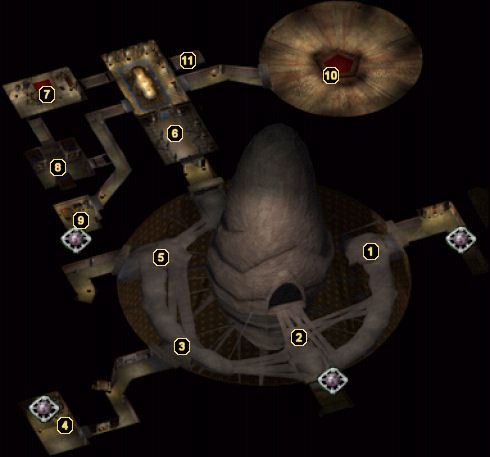
 Did we miss anything on this map? Is there something we didn't discover? Let us know!
1 - Spider Ambush
Your party will be assaulted by a group of Giant, Phase, and Sword Spiders here, so make sure you have a way to neutralize poison before taking them on.
2 - Spider Hive
Several spiders and a couple of Ettercaps bar your way into the spider hive. Make short work of them, then rest up for the battle that awaits you inside.
Upon entering the hive, you'll enter a short conversation with Pai'Na the Spider Mistress, after which she'll call a host of spiders to her aid and attack your party. If you're not prepared to cure poison, this fight can be devastating. Use area effect spells or other means to kill the spiders off quickly, then focus your attention on Pai'Na. Once she falls, grab the
Black Spider Figurine off her corpse, then loot the floor container for two mage scrolls and a
Pale Green Ioun Stone.
3 - Spider Ambush
Another group of spiders will descend upon your party at this location, so be careful.
4 - Urns and Traps
An assortment of decorative urns are lined up in this area, one of which can be searched for a little gold. There are a few nasty traps in the area, though, so be cautious when moving around and looting the chests just down the hallway.
5 - Spider Ambush
As with areas #1 and #3, be prepared to battle a small group of spiders in this vicinity.
6 - Locked Door
This locked door cannot be bypassed until you have completed Aran Linvail's first two tasks up in the
Docks District. At that point, Aran will send a wizard named Haz to open the doors for you.
As soon as you have access to the further areas of the tomb, you'll be attacked by Grimwarders and Vampires, including a powerful one named Gellal.
7 - Pool of Blood
This secret room is inhabited by some Greater Ghouls and a Fledgling Vampire. Send them back to the netherworld, then search the pool of blood along the top wall to find the
Mace of Disruption +1. Submersing yourself into the pool will cause disease, but the minor sickness is well worth the reward.
8 - Vampire Coffins
If you've defeated at least a few of the Vampires in the area, the three coffins in this room will house their retreat. After defeating the Clay Golem guarding the area, use the stakes given to you by Aran Linvail to grant permanent death to the both Vampires. This will earn you a nice bonus of 9000 experience points per kill.
After you have defeated Lassal in area #10, return to this room to enter a conversation with Bodhi. After she leaves more questions than answers with you, you'll be forced to battle her. Once you've done a significant amount of damage to her, she will retreat and you will be granted 18,750 experience points. Return to Aran Linvail in the
Docks District to report your success.
9 - More Stakes & Exit
A couple more stakes and a scroll of Burning Hands can be looted from this room. Additionally, if you'd like to return to the surface, you can use the stairs here to return to the Graveyard District.
10 - Bleeding Room
After taking out a powerful Vampire mage named Tanova, you'll reach the Vampires' source of "food" - a room with a spiked floor designed to bleed victims of their life and fill the center pool with blood.
If you have chased Lassal out of the side chamber on the level below, then he will be waiting for you at the far end of this room. Kill him to earn 11,500 experience points, then return to area #8 to speak with Bodhi.
11 - Down to Lower Level
These stairs lead down to the
Graveyard Lower Tombs 3.