 Did we miss anything in this location? Is there something we didn't discover? Let us know!
Overview
Did we miss anything in this location? Is there something we didn't discover? Let us know!
Overview
Outside the enclave, you'll run into a bouncer. He'll block you from entering. You'll have a few ways to get past him:
- If Neera is in your party, and if she's close enough to the bouncer, then your options will be limited. If you don't scare the bouncer away or attack him, then Neera will kill him outright with a wild surge.
- Otherwise, you can pay the bouncer 250 gp, you can intimidate him, or you can kill him anyway.
If the bouncer dies, then you'll earn 3500 xp. You can also charm the bouncer (using Dire Charm or Domination), and while this will get him to step aside (and earn you 5000 xp), he won't actually unlock the door for you, and so you'll still have to kill him to go inside.
When you enter the enclave, you'll start out in a shop (#1). The merchant Gul Dukeem will greet you. If you tell him why you're there, he won't mind, and he'll try to sell you some interesting items, including a
Dagger of Venom +2,
Longtooth +2: The Grave Binder,
Heart of the Golem +2, a
Robe of the Neutral Archmagi, a
Staff of Striking +3, and a
Tunic of Blindeye. The other three merchants in the shop will have a wide variety of potions, spell scrolls, and wands available.
When you're ready to continue on, you'll need to talk to Gul again and ask him for information. This will lead to you playacting with him about wanting to buy a slave, which will cause him to open the door in the back of the shop. However, when the door opens, a Red Wizard will step through, and this will cause everyone in the shop except Gul to attack you. You can also just attack Gul (either when you first enter the shop or after purchasing some items) for roughly the same result. Nobody in the rest of the enclave will notice the battle in the shop. If Gul survives the battle, then he'll remain a shopkeeper for the remainder of the game, assuming you don't later kill him or force him to flee.
The next room is a lounge (#2). When you enter it, you'll be stopped by a mercenary named Fadell Ironeye. She'll ask you if you were hired by Gul Dukeem. If Gul is still alive, then Fadell will believe you if you play along. Otherwise, you'll need 14 Charisma to convince her. If you fool Fadell, then all of the mercenaries and Red Wizards in the lounge will stay neutral to you, which will give you a chance to stir up some trouble. This will make the upcoming fight against them much easier. If you don't fool Fadell, then you'll have to fight all of the Red Wizards and mercenaries at once. This isn't recommended.
There are two ways to foment trouble between the mercenaries and the Red Wizards:
- If you completed Mironda's quest in the
Hidden Refuge, then she'll be tending the bar. This will allow you to buy three rounds of drinks for everybody, for a total cost of 150 gp (which you'll get back later). After the third round, the drunk mercenaries will revolt, and they'll kill all of the Red Wizards in the lounge, the slave pens (#3), and the barracks (#4). Then they'll leave.
- If you search Fadell's room (#5), then you'll find The Journal of Fadell Ironeye in a locked chest. The journal will list some of the people Fadell has lost recently. Learning this will give you some new conversation options with her, beginning with:
- I want you to know that I completely understand your situation here.
- You've lost people in battle.
From this point on, you'll be able to encourage Fadell to drink to her dead comrades, but importantly, you'll have to bring them up in the order that they died: Stream-Near-The-Hollow, Ellis and Warwick, and then Alinda. If you do this correctly, then you'll get Fadell drunk enough that she'll be open to revolt, which will cause her and her mercenaries to kill all of the Red Wizards in the lounge, the slave pens (#3), and the barracks (#4). Afterwards, they'll leave the enclave.
After the battle, if Mironda is still alive (assuming she was there at all), then talking to her will earn you 10,000 xp and send her back to the
Hidden Refuge. If you paid Mironda 150 gp for drinks, then she'll reimburse you before she leaves.
Note: Killing all of the Red Wizards and mercenaries will earn you around 35,000 xp. You'll probably earn less than half of this by tricking them into fighting each other, and picking off as many wizards as possible.
When you head deeper into the enclave, you'll finally run into Lanneth (#6). She won't have much to say to you, but she will mention that she's working for somebody else -- autharch Vicross. If there are any Red Wizards or mercenaries left in the enclave, then Lanneth will call for them, and you'll have to fight them and her all at once. If Fadell Ironeye is still alive, then she'll show up briefly before departing again. If you rescued Ghallus (#3), then he and some Amnian legionaries will show up and help you with this one fight.
Lanneth will have some fighters and wizards with her, so even if you cleared out the front part of the enclave, you'll still have some work to do. So be sure to buff up your party before starting the encounter, and then target Lanneth right away. Once you've done enough damage to her, she'll Dimension Door into the laboratory.
Note: Lanneth will probably cast Mordenkainen's Sword before departing. These summoned swords can only be hurt by magic damage. So you'll have to hit them with lots of Magic Missiles to kill them, or with Death Spell or Death Fog to unsummon them. You can also just wait them out.
Another Note: If Ghallus showed up to help you, then he and his party will depart at the end of the battle. If Ghallus survived, then you'll earn 1500 xp when he leaves.
When you follow Lanneth into the laboratory (#7), she'll threaten to kill King Gramm if you come any closer. You'll get a few options for how to respond, but from what we can tell, Gramm will always survive, and a fight will start up at the end of the conversation.
This time, Lanneth will have two fighters and a Red Wizard with her, but she'll use an odd strategy to attack you. Instead of buffing up and blasting you with spells, she'll quaff Potions of Invisibility and try to run around undetected while she hits you with an occasional Magic Missile or Flame Arrow. So kill Lanneth's help first, and then chase Lanneth around and kill her, too. You'll earn 14,000 xp for defeating Lanneth, and you'll find an
Amulet of Protection +1: The Protector,
Bracers of Defense AC 6: Bracers to the Death, a
Quarterstaff +2, a
Robe of Invocation, and a
Wand of Paralyzation on her corpse. Lanneth will also drop a Slave Pen Key (for freeing Ghallus in #3) and a Laboratory Key (for opening #8 and #9).
Inside the prison to the east (#9), you'll discover two rows of cages. These cages will contain wild mages -- or not -- depending on which side quests you completed while you were at the
Hidden Refuge.
Top (northern) row, from left to right:
- This cage will contain Daxus Taralom if you gave him a
Talisman of the Hearthfire at Delosar's Inn in the
Bridge District.
- This cage will always contain Knocktor the Fizzled.
- This cage will contain Reginald if you let him attack you without attacking him back.
- This cage will contain Amanis Khal if you completed her quest.
Bottom (southern) row, from left to right:
- This cage will always contain a dead wild mage.
- This cage will always contain a female wild mage.
- This cage will always contain Zaviak.
- This cage will always contain Barad Ding, but when you talk to him, if you failed to rescue his cats from the
Wild Forest, then he'll commit suicide.
To rescue the mages, you'll have to open the first four cages in the proper order: 55, 13, 11, and then 42. You'll learn this sequence from Lanneth's Journal (#8). If you attempt to open a cage in the wrong order, then all of the captive mages will get hit by a lightning bolt. If you do this four times, then you'll kill all of the mages. After the first four cages, you can open the remaining cages in any order. Then to free the mages, you'll just need to talk to them. You'll earn 5000 xp for each mage that you rescue (plus an extra reward from some of them when you return to the
Hidden Refuge).
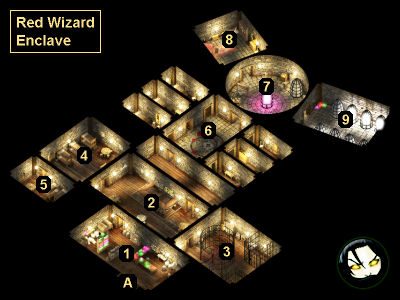
1 - Shop
2 - Lounge
3 - Slave Pens
When you enter this chamber, you'll witness a minotaur slave named Ghallus killing a mercenary. When you talk to Ghallus, he'll ask you to free him. To do this, you'll need to steal the Slave Pen Key from one of the nearby Red Wizards, or loot the key from the Red Wizard's corpse after killing him. When you have the key, you'll just need to unlock Ghallus' pen and then talk to him to free him and the other five slaves in the chamber. If the Red Wizards in this part of the enclave are already dead, then you'll earn 7500 xp total for freeing Ghallus and the slaves, and Ghallus will return later (at #6) to help you out. If the Red Wizards are still alive, then Ghallus and the slaves will attack them -- and probably die pretty quickly -- so it's best to only free them after you've cleared the way for them.
4 - Barracks
5 - Fadell's Room
This room will start out locked. Inside a locked chest in the room, you'll find The Journal of Fadell Ironeye, which will give you a way to make the lounge fight (#2) easier.
6 - Red Wizard Rooms
You'll find some spell scrolls and a
Cloak of Protection +1 in these rooms.
7 - Laboratory
You'll meet King Gramm in this room. If he survives your encounter with Lanneth (see the Overview text above), then you'll earn 5000 xp.
8 - Lanneth's Room
The door to this room will start out locked and trapped. The Laboratory Key (from Lanneth at #7) will open the door.
Inside the room, you'll find a
Rogue Stone, a
Traveler's Robe, a
Wand of Frost, some spell scrolls, and 850 gp. You'll also find three documents: a Contract (which will show that Hayes was working with the Red Wizards), a Letter (from Vicross, Lanneth's superior), and Lanneth's Journal (which will tell you how to open the cages in the prison, #9).
9 - Prison
The door to this room will start out locked. The Laboratory Key (from Lanneth at #7) will open the door.
Exits
- Exit to
Waukeen's Promenade.


