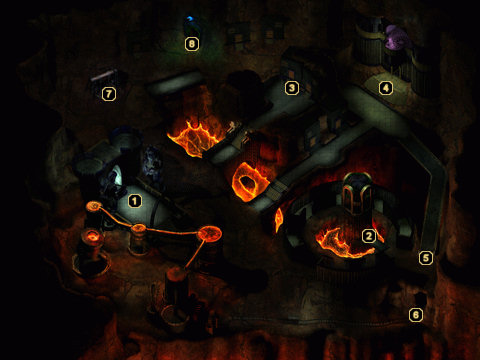
 Did we miss anything on this map? Is there something we didn't discover? Let us know!
1 - Arrival
Progressing to the deepest reaches of Dorn's Deep kicks off Chapter Six. Lower Dorn's Deep is easily the largest and most complex section of the game, so expect to stay awhile. You won't be treading across frozen landscapes here, either. Being this far below the Spine of the World introduces you to a new element - fire. As such, you can expect to face denizens that would inhabit such a place - Salamanders, Fire Giants, and other fire-loving creatures.
It won't be long after you arrive that you'll get an introduction to the dungeon's inhabitants. Several Salamanders and Tarnished Sentries await you just past the stairs in front of you. The Salamanders seem to be considerably tougher than their Frost Salamander cousins and the Tarnished Sentries are completely immune to slashing damage and nearly immune to piercing damage. Your best bet is to attack them with blunt weapons, though a bow or piercing weapon will do the trick... eventually.
2 - Watchtower
Marketh's archers are holed up in this watchtower firing arrows at anyone who comes near the moat of lava that surrounds it. Pay a visit to Fengla at area #5 to get the key to the watchtower's main door, then head inside to bleed the bastards for cutting out the little girl's tongue.
The six Tower Archers inside seem quite surprised when you show up inside the watchtower. You don't have much room to maneuver inside here and their arrows hurt like hell, so be prepared to pause the game periodically to handle the battle efficiently (and without any casualties). When all six archers lie in their own pool of blood, Fengla will enter the watchtower and shake your hand for helping her (awarding your party 80,000 experience points) and then happily run off. Scavenge through the corpses to find six stacks of
Arrows of Piercing and a single suit of
Full Plate Mail +1 from the archer who stood at the top of the ramp. If you need to rest, go through the door at the top of the ramp to find the archers' sleeping room. You can rest in this room without issue.
3 - Norl the Gem-cutter
Three Tarnished Sentries guard the entrance to Norl's home. Deal with them however you wish, then enter the left door and speak with Norl.
The Svirfneblin initially thinks that you're some of Marketh's goons, but that notion is dispelled quickly when he realizes you mean no harm. He tells you that he is a gem-cutter and that Marketh keeps him here to cut gemstones for his master and craft jewelry for his concubine. To make sure the gnome didn't try to escape, Marketh crushed his legs. Norl obviously hates Marketh for what he's done to him, so he's willing to tell you everything he knows about him. The conversation eventually turns to Brother Poquelin and you begin to understand what your next objectives should be - kill Marketh for being a no-good thug and discover what involvement a priest of Ilmater has in this whole situation.
4 - Seth
A halfling named Seth will ask to see your papers here. Obviously you have no idea what he's talking about, so give him the "Uh... what?" response. He'll then inquire as to whether or not someone in the Kraken Society sent you here. If the character speaking as an Intelligence and Charisma of 13 or higher, you'll be given a dialogue option to tell him that you have connections within the Kraken Society and that they have sent you here for a job. Seth is still skeptical why they wouldn't have sent you with any papers, so he asks you three questions:
- Question 1: What's the color of the kraken? Answer: Purple.
- Question 2: Who did you come here to work for? Answer: Marketh.
- Question 3: Under whose banner do we fight? Answer: Ilmater.
With all three questions answered correctly, Seth will be convinced that you are who you say you are. He'll then turn around and enter the door behind him.
If you instead tell Seth that you don't have the papers he's looking for or try to end the conversation, Seth will call in a small army of thieves to deal with you and then run off to the door behind him. The thieves are all using stealth when they appear, so each one of them gets a chance at a backstab when they first attack (which can be quite deadly). Wipe them all out for 2000 experience points each. Unfortunately, you'll only find 46 gold pieces, a long sword, and a nonmagical suit of studded leather armor on each of them.
Regardless of how you handled Seth, you can now proceed through the same door he exited to reach
The Garden.
5 - Fengla
Fengla is an unhappy little Svirfneblin girl whose tongue has been cut out by Marketh. She carries a large key around her neck that she uses to bring food to Marketh's archers in the watchtower at area #2. Realizing that your party is able to carry out her revenge, she gladly hands over the key when asked for it.
6 - Exit
This mine shaft leads to the
Salamander Mines.
7 - Lift
This lift will lower your party down to the
Gnome Pit. It is guarded by nine Salamanders and a Tarnished Sentry.
8 - Exit
This tunnel will bring your party to the
Artisan's District.