 Did we miss anything on this map? Is there something we didn't discover? Let us know!
1 - First Floor
Did we miss anything on this map? Is there something we didn't discover? Let us know!
1 - First Floor
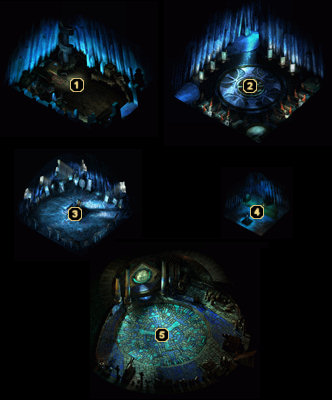
Having discovered the symbol needed to gain entrance to the crystal tower during your
Return to Easthaven, your party will enter its ground floor and stand in front of the entrance to Jerrod's Stone. Everard will show up to start working on the glyphs sealing the entrance and will tell you to ascend the tower in search of an alternate route to Jerrod's Stone.
When your party is ready to tackle the final area of the game, ascend the spiraling staircase in the northwest corner to reach the tower's second floor.
2 - Second Floor (East Room)
This room is completely empty, save for some oddly placed mirrors and decorated beds. If you need to rest at any time in this tower, this is the room to utilize. When you're ready to move on, pass through the doorway to the west.
3 - Second Floor (West Room)
If you're like me, you never liked that Easthaven shopkeeper from the very start. Now it appears that the sniveling worm has joined forces with whatever evil lies within this tower. A "False Pomab" will welcome you to Cryshal-Tirith, which I assume is the name given to this newly formed crystal tower. It won't be long before Pomab calls out for his sentries and a battle will begin.
The Cryshal Sentries are nearly impossible to kill. They will drop to the ground and assume an "Almost Dead" condition, but it won't be long before they'll be back up causing trouble once again. The only known means to finishing them off is for the Phasing effect of such an imbued weapon to trigger just as a sentry drops to the ground. Obviously this is rare at best, so I wouldn't even bother.
There will be lightning bolts dancing between all of the mirrors along the walls, so buff your lightning resistance if you have time. The idea here is to start hacking away at the many "False Pomab" characters running around the room until you eventually slay the "real" Pomab. When this happens, the four sentries will crumble and you'll receive 20,000 experience points. Search Pomab's corpse to find a negligible amount of gold and a
Wand of Lightning.
Go back to the eastern room if you need to rest, then proceed up the ladder to the tower's third floor.
4 - Third Floor
On the tower's top floor, you'll discover Poquelin's crystalline artifact Crenshinibon hovering above a stone dais. Apparently the artifact has opened a portal into the sealed chamber where Jerrod's Stone rests. Head through the mirror in the northwest corner and put a stop to Poquelin before he can unleash the demon hordes.
5 - Jerrod's Stone
Revered Brother Poquelin stands next to the resting place of Jerrod's Stone. He claims that he has let you live in order to witness this "historical moment", then invokes a spell that opens the portal to the Lower Planes within Jerrod's Stone. Before any fiends can burst through the portal, Everard enters the room and stands next to your party. He explains that Tempus has called him to battle and that he now understands what he must do. Just as Jerrod did so long ago, Everard runs to the portal and leaps into it - sealing it once again.
Poquelin will shriek in anger and transform into his true form - a towering demon named Belhifet. Two Iron Golems from either side of the room will animate and charge your party along with Belhifet. When Belhifet falls, the Iron Golems will too, so try to focus your attacks on the demon. If you find that the Iron Golems are too much of a nuisance, hook your best warrior up with
Conlan's Hammer (assuming you have it) and crush them as quickly as possible.
Belhifet will have dispelled all of the magical effects on your characters when the battle began, so you'll have to redo any necessary buffing (Haste is practically a necessity) while in combat. If you've been following this walkthrough and have picked up the more powerful weapons in the game (
Pale Justice, the
Restored Blade of Aihonen, etc.), then you'll probably be able to simply surround Belhifet and melee the fiend to death. Be prepared to move with the demon, though, as it's capable of casting an Infernal Conveyance spell that teleports it around the room. If you find yourself having a lot of trouble taking the demon down, check our
Strategy Guides section for more tips.
When Belhifet is no more, a cinematic will trigger and explain that the power of the Crenshinibon artifact dissipated with the banishment of Belhifet. Your party was forced to scramble out of the crystal tower before it collapsed. Easthaven was eventually rebuilt and a Temple of Tempus was erected atop Jerrod's Stone once again.
At this point, you're ready to move on to the Heart of Winter expansion pack, either by loading your a save game before returning to Easthaven and paying a visit to the strange house in
Kuldahar or by creating a new expansion game and importing your previous characters. Or, if you're looking for something a bit more modern, you can move on to Icewind Dale II. Black Isle's final project introduces D&D's 3rd Edition ruleset into an Infinity Engine game for the first time and is an excellent followup to the original game. Either way, you're in for some more great adventuring.


