 Did we miss anything on this map? Is there something we didn't discover? Let us know!
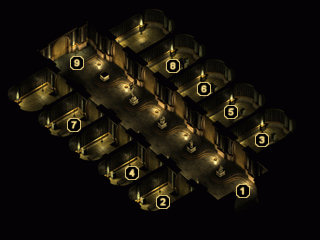
1 - Arrival
Did we miss anything on this map? Is there something we didn't discover? Let us know!
1 - Arrival
The Hall of Heroes is the final resting place for many of the dwarves' finest warriors. Lucky for your party, it's (mostly) uninhabited by restless undead. If you want to
2 - Loot!
Search this trapped tomb to find a very nice suit of chainmail called the
Mail of Life.
3 - Loot!
The trapped pedestal behind this tomb can be ransacked for a random magic weapon (such as
Hold Fast or a
Bastard Sword +3: Defender).
4 - Greater Mummy
A Greater Mummy inhabits this chamber, so you'll have to deal with it before you can grab
Owain's Lullabye from the tomb.
5 - Jamoth's Tomb
If you have Terikan's Phylactery from area #7, it will immediately be destroyed by when you approach this tomb. This will earn your party 52,500 experience points and snuff the unlife out of the undead at the far end of the hall. It will also ensure that Terikan will never rise again, so you should pay another visit to Norlinor at
The Great Forge and tell him the good news.
Aside from the noble purpose this tomb possesses, you'll find that the pedestal behind it contains a
Red Potion, a
Potion of Infravision, a scroll of Monster Summoning III, and an
Axe of Caged Souls.
6 - Loot!
This trapped tomb contains the
Blessed Helm of Lathander.
7 - Terikan's Tomb
It appears that the lich isn't very protective of his most prized possessions. The trapped pedestal contains Terikan's Phylactery, while the trapped tomb holds Terikan's Journal and scrolls of Antimagic Shell, Chaos, and Domination. Once the phylactery is in your possession, head over to area #5 to destroy it.
8 - Evayne's Tomb
You'll discover Evayne's Journal in this tomb, who you may remember is the daughter of Larrel (the Baelnorn you brought the Heartstone Gem to in the Severed Hand). The journal describes how she fought alongside the dwarves during the final moments of Dorn's Deep. With the journal as proof, you should pay a visit to Larrel on the fourth floor of
Labelas Tower to let him know that the dwarves didn't kill her, as he currently believes. This will earn you 56,000 experience points.
9 - Exit
This door leads to
Wyrm's Tooth, but you'll need the Forge Key from
The Great Forge to pass through it. When you return with the key, you'll find that two Bronze Sentries bar your way, so you'll have to dispatch them first before you can continue with your quest. On the bright side, they're worth 5000 experience points each.


