 Did we miss anything on this map? Is there something we didn't discover? Let us know!
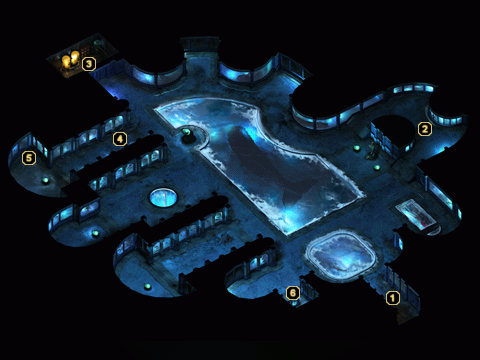
1 - Arrival
Did we miss anything on this map? Is there something we didn't discover? Let us know!
1 - Arrival
Two Frost Salamanders stand guard at the main entrance to this strange museum. When you first arrive here, one of the Frost Salamanders will ask your party what they're looking for. If you tell him that you're here to see their leader, he will agree and you'll soon find yourself standing in front of a Frost Salamander named Kerish (area #2).
It's worth noting that you're required to see Kerish. If you choose the alternate dialogue choice that you just want to leave, your whole party will be exited out the door before you can do anything else.
2 - Kerish
When you tell the guards that you want to see their leader, this is where they bring your party. Kerish is a paranoid salamander and seems to think that you're a spy for his superior. You can use this to your advantage, though, since Kerish obviously wouldn't want to hurt his superior's henchmen. Inquire about who's in charge and Kerish will fill you in on Joril Frostbeard, and how the Frost Giant killed his father Kreg to become ruler.
You can also ask about the dead bodies strewn about to learn that the salamanders' slaves recently revolted. Most of them were killed, but the survivors were able to increase the temperature of the room below so that it was too hot for the Frost Salamanders to pursue them. Kerish believes he has them trapped, though, and is hoping that they either starve to death or get themselves killed trying to return to the surface for food or other supplies.
Regardless of the slaves' fate, the Frost Salamander leader does have one duty he'd like you to perfrom. The slave leader has made Kerish look bad in front of his people and therefore must pay the price. Kerish wants you to go below and gain the slaves' confidence so that you may slay their leader. This is a perfectly viable course of action to further your own goals, though I suppose it could be considered the "evil" path. Helping the slaves escape and killing Kerish later on would be considered the "good" path. Regardless of which path you want to pursue, tell Kerish that you'll consider his offer. He will deem you his guests and you'll be free to roam about his domain without having to worry about any hostiles.
If you decide to help the slaves, then you'll first need to speak with Gareth down in the
Slave Den to learn that the slaves need a key to utilize an escape route. Ask Kerish if you can have the key and he surprisingly hands it over once you promise to take precautions to prevent the slaves from escaping. Obtaining the key is worth 60,000 experience points.
If you decide to genuinely help Kerish, then Vera at area #5 is the one you want to kill. Once she's dead, you can return to Kerish for 80,000 experience points. He will then ask you to either convince the slaves to return or slay them, which will earn you an additional 60,000 experience points upon completion. It's also worth noting that you can still ask him for the key to the escape route even when all of the slaves are dead. This will earn you another 60,000 experience points.
After finishing either of the "good" or "evil" paths, you may want to kill Kerish as he's worth 5000 experience points and drops the
Spear of Kerish. This is a little easier if you took the evil route as you can force attack him and then run out of the museum quick rather than having to fight your way here.
3 - Temperature Control Room
This is the room that the slaves were forbidden to enter. After Vera snuck in and fiddled with the controls inside, the Frost Salamanders were driven from the lower chamber due to the rise in the heat level. Unfortunately, you can't use it to cause any further distress for the salamanders.
4 - Concerned Frost Salamander
One of the Frost Salamanders here will tell you that he keeps hearing noises at the end of the hall. Offer to investigate and then go speak with Vera at area #5. When you return to the Frost Salamander, you can either tell him that Vera is hiding at the end of the hall (which gets her killed) or tell him that there's nothing at the end of the hall for him to be concerned about. Either route earns you 60,000 experience points.
5 - Vera
Vera Elles is the would-be scout for the slaves down in the
Slave Den and happens to be hiding around the corner at the end of this hallway. If you tell her that Kerish thinks you're a spy and that you've done nothing to convince him otherwise, she'll allow you to ask a few questions. You won't get much information out of her, though.
If you help the slaves escape by giving the key from Kerish to Gareth down in the
Slave Den, then you can return to Vera and tell her the good news. She will thank you for your aid and you'll be granted 80,000 experience points as she sneaks off to escape herself.
If you told the Frost Salamander about Vera at area #4, then he will make his way back here and slay her. Search her remains to uncover an
Amulet of Protection +1, some
Leather Armor +2, and a
Dagger +2. If you're helping Kerish with his slave problem, then Vera's death fulfills your task to kill their leader.
6 - Exit
This set of stairs leads down into the
Slave Den.


